NAVIGATION SAFETY
Make sure the following warnings and cautions have been read and fully understood before using the navigation system.
Failure to use the navigation system safely could result in an accident, leading to serious injury or death.
The navigation system is not a substitute for driving safely with due care and attention, Road Traffic Regulations must always be observed. Drivers should not assume that a feature will correct errors in judgment when driving.
The driver is responsible for staying alert, driving safely, and for being in control of the vehicle at all times, relative to the prevailing conditions. The driver is responsible for determining the safety of the route suggested by the navigation system. The navigation system may not function properly in all circumstances.
Do not adjust the touchscreen controls, or allow the system to distract the driver, while the vehicle is moving.
Make sure the relevant safety warnings have been read and understood before operating the touchscreen. See TOUCHSCREEN SAFETY.
During any map update, the USB drive must not be removed, or the ignition switched off, before the update is complete. Doing so cancels the map update and potentially leaves the system without any available map data.
NAVIGATION OVERVIEW
Navigation instructions is by map and turn information displayed on the touchscreen, instrument panel, and in the Head-Up Display (HUD). Navigation instruction can also be complemented by voice guidance.
The touchscreen is used to control the navigation system via menus and map displays. See USING THE NAVIGATION SYSTEM.
The navigation system uses a selection of Connected Navigation features to enhance the navigation system. See CONNECTED NAVIGATION.
The vehicle’s instrument panel can be set up to display navigation instructions and maps. See INSTRUMENT PANEL.
The HUD can also be set up to display turn instructions. See HEAD-UP DISPLAY (HUD).
The navigation system can also be controlled via voice commands. See NAVIGATION VOICE CONTROL .
NAVIGATION PERFORMANCE LIMITATIONS
Under certain conditions, it is possible for the vehicle’s position displayed on the map screen to be incorrect. Incorrect vehicle positioning may happen when:
- Driving on a spiral ramp in a building.
- Driving on or beneath elevated roads.
- Driving between tall buildings.
- Two roads are close and parallel.
- The vehicle is transported to another location.
- The vehicle has been rotated on a turntable.
- The vehicle’s battery has been disconnected.
GPS signals may occasionally be interrupted due to physical barriers, such as roads under raised highways and tunnels.
USING THE NAVIGATION SYSTEM
Make sure the relevant safety warnings and cautions have been read and understood before operating the navigation system. See NAVIGATION SAFETY .
To access the navigation system, touch the navigation soft key on the touchscreen’s HOME menu. Alternatively, select the navigation icon. See TOUCHSCREEN HOME MENU.
A first time user should set up personal preferences in the NAVIGATION SETTINGS menu. Personal preferences include settings for managing which Connected Navigation features can connect to the internet when on the home network or while roaming. The settings are applied whenever navigation is used. See NAVIGATION SETTINGS .
When navigation is selected and the vehicle is stationary, the navigation system displays a map view of the current vehicle position. The touchscreen displays a side panel containing quick access tiles.
The quick access tiles act as shortcuts, to allow quick access to certain navigation system functionality.
The quick access tiles are hidden when the vehicle’s speed reaches a predetermined level. The quick access tiles return only when the vehicle is stationary for a period of time, and a route is not set. If required, the options can be accessed via the NAVIGATION SETTINGS menu. See NAVIGATION SETTINGS .
If the navigation system is started when the vehicle’s speed is already above the predetermined level, the quick access tiles do not display.
Control the navigation system as follows:
- Scroll bar: Touch to scroll up or down the tile list.
- Quick access tile options: Options include:
COMMUTE MODE. See COMMUTE MODE .
RECENT DESTINATIONS.
FUEL FINDER. See FUEL FINDER.
HOME.
HELP TOPICS. See HELP TOPICS .
LICENSE INFORMATION. See NAVIGATION SETTINGS .
- The current vehicle position and direction.
- View options icon: Touch to select the 2D, 3D, Traffic, Compass, North facing, or Satellite map views. When guidance is active, combination views based on 2D, 3D, Traffic, Compass, North facing, and Satellite map views become available, such as Maneuvers, Full route, and Route remaining. See VIEW OPTIONS.
NOTES
Internet connectivity is required for Traffic and Satellite map views.
- Navigation menu icon: Touch to select the NAVIGATION MENU. See NAVIGATION MENU.
- Settings icon: Touch to select the SETTINGS pop-up menu. Select Navigation settings to view or adjust the settings. See NAVIGATION SETTINGS .
- Return icon: Touch to return to a higher menu level.
When the vehicle is in motion and no active route is selected, an assistance map is displayed.
NAVIGATION MENU
Make sure the relevant safety warnings and cautions have been read and understood before operating the navigation system. See NAVIGATION SAFETY .
When displayed, touch the navigation menu icon to access the NAVIGATION MENU.
Some of the options listed are only available when a route has been selected.
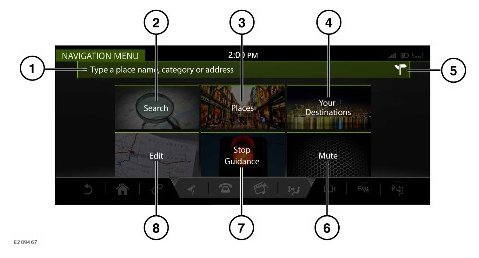
- One box search: Provides a choice of options to search for an address, destination, or a Point Of Interest (POI). See ONE BOX SEARCH .
- Search: Type the required text into the search box. See SEARCH.
- Places: Select from the Point Of Interest (POI) categories listed. See PLACES.
- Your Destinations: Displays saved locations, e.g., home address, saved locations, most recent destinations, and stored favorites. See FAVORITES .
NOTES
When signed in to an InControl navigation account, destinations can be automatically synchronized. Destinations are synchronized between the vehicle, the internet, and the Route Planner smartphone app. See NAVIGATION PROFILE , INCONTROL NAVIGATION ACCOUNT , and PLANNING ROUTES AND DOOR TO DOOR ROUTING .
- Address entry icon: Touch to enter a full detailed address. See ADDRESS ENTRY.
NOTES
The address entry icon displays only, when the one box search bar or Search soft key is touched.
- Mute: Touch to mute the navigation system’s voice guidance.
- Stop Guidance: Cancels the current route guidance, if a route is selected.
- Edit: Touch to edit the current route. See EDIT ROUTE.
ADDRESS ENTRY
Make sure the relevant safety warnings and cautions have been read and understood before operating the navigation system. See NAVIGATION SAFETY .
When displayed, touch the address entry icon to enter a detailed address.
- Input the following information:
Country, State, or Province.
City, Town, or Zip code: Previous entries and narrowed search results are displayed. Select the required entry and touch Ok.
Street name, Number, or Intersection, if applicable: Previous entries and narrowed search results are displayed. Select the required entry and touch Ok.
- The map displays the entered location as the address is entered. If the location displayed is correct, touch Show place details to confirm.
- The navigation system calculates and displays a map with the entered location, destination address, and the most appropriate route.
- Touch Start to begin navigation.
- If the highlighted route is not the desired route, select Route options to change the route. The navigation system displays the ETA and route distance for each alternative route.
NOTES
The navigation system calculates all the routes, based on the selected route preferences, e.g., avoiding toll roads or ferries. The route preferences can be adjusted while setting the destination, if required, touch the Route preferences soft key, when displayed.
- Select the alternative route. Touch Start to begin navigation.
An address or a Point Of Interest (POI) can be added as a waypoint after a destination has been selected. See EDIT ROUTE.
Previous entries, or search results as they are narrowed, are displayed on the touchscreen, behind the keyboard. If required, touch the hide keyboard icon¹ for better access to the displayed results.
Hide keyboard icon¹.
SEARCH
Make sure the relevant safety warnings and cautions have been read and understood before operating the navigation system. See NAVIGATION SAFETY .
To search for a place name, category, or address:
- Touch the Search soft key on the NAVIGATION MENU screen. See NAVIGATION MENU.
- Input the required destination and select the required entry.
NOTES
Touch the hide keyboard icon¹ to view the search results. Touch the text box to continue typing.
- The navigation system calculates and displays a map with the entered location, destination address, and the most appropriate route.
- Touch Start to begin navigation.
- If the highlighted route is not the desired route, select the Route options soft key to change the route. The navigation system displays the distance and ETA for each route.
NOTES
The navigation system calculates all the routes, based on the selected route preferences, e.g., avoiding toll roads or ferries. The route preferences can be adjusted while setting the destination, if required, touch the Route preferences soft key, when displayed.
- Select the alternative route. Touch Start to begin navigation.
An address or POI can be added as a waypoint after a destination has been selected. See EDIT ROUTE.
If a route is already active, the following list of search areas are available from the drop-down menu icon²:
- Along the route.
- Most relevant.
- Near the waypoint 1, 2, or 3, etc.
The selected route must include one or more waypoints for this option to be available.
- Input the search choice into the text box. Touch the hide keyboard icon¹ to view the search results. Touch the text box to continue typing.
- Select the search result from the list provided.
- Touch Start to begin navigation.
Previous entries, or search results as they are narrowed, are displayed on the touchscreen, behind the keyboard. If required, touch the hide keyboard icon¹ for better access to display results.
Hide keyboard icon.¹
Drop-down menu icon.²
PLACES
Make sure the relevant safety warnings and cautions have been read and understood before operating the navigation system. See NAVIGATION SAFETY .
To search for Points Of Interest (POIs):
- Touch the Places soft key on the NAVIGATION MENU screen. See NAVIGATION MENU.
- Select a search category from the list:
Fuel Station
NOTESFuel stations can be sorted by the price of the fuel.
Eat & Drink
Parking Facility
ATM/Bank/Exchange
Public Toilet/Rest Area
Shopping
Going Out
Leisure & Outdoor
Accommodation
Car Dealer/Repairer
Hospital or Healthcare Facility
Airport
Transport.
- Select the search result from the list provided.
- The navigation system calculates and displays a map with the entered location, destination address, and the most appropriate route.
- Touch Start to begin navigation.
- If the highlighted route is not the desired route, select the Route options soft key to change the route. The navigation system displays the ETA and route distance for each alternative route.
NOTES
The navigation system calculates all the routes, based on the selected route preferences, e.g., avoiding toll roads or ferries. The route preferences can be adjusted while setting the destination, if required, touch the Route preferences soft key, when displayed.
- Select the alternative route. Touch Start to begin navigation.
An address or POI can be added as a waypoint after a destination has been selected. See EDIT ROUTE.
The following details and options may also be available:
- POI phone number: Touch to view the POIs phone number and to phone the POI, if required.
- Add to favorites: Touch to add the selected POI to favorites.
- Nearest parking lot: Touch to search for nearby parking lots, if the selected destination or waypoint is not a parking lot.
- Extra information, e.g., postal address, opening times, reviews, website addresses (URLs), and photographic view of the POI.
If the vehicle is connected to the internet, the search function can be performed using cloud-based information. The connected feature settings can be enabled and disabled via the NAVIGATION SETTINGS menu. See NAVIGATION SETTINGS .
If a route is already active, the following list of search areas is available from the drop-down menu icon¹:
- Along the route.
- Most relevant.
- Near the waypoint 1, 2, or 3, etc.
NOTES
The selected route must include one or more waypoints for this option to be available.
- Near your destination.
Drop-down menu icon.¹
MAP SPLIT SCREEN
Make sure the relevant safety warnings and cautions have been read and understood before operating the navigation system. See NAVIGATION SAFETY .
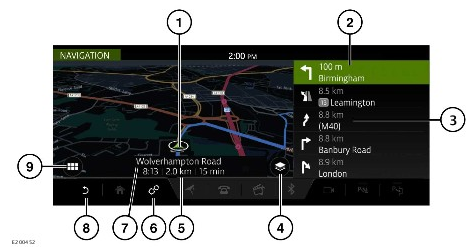
When a route has been selected, the navigation system displays a guidance map.
- The current vehicle position and direction.
- Active route: Next direction display.
- Selected extra view option: Maneuvers, Full route, or Route remaining. See VIEW OPTIONS.
- View options icon: Press to select the 2D, 3D, Traffic, Compass, North facing, or Satellite map views. See VIEW OPTIONS.
- Information bar: Displays information including the time, remaining route distance, and the ETA.
- Settings icon: Touch to select the SETTINGS pop-up menu. Select Navigation settings to view or adjust the settings. See NAVIGATION SETTINGS .
- Current location.
- Return icon: Touch to return to a higher menu level.
- Navigation menu icon: Touch to access the NAVIGATION MENU. See NAVIGATION MENU.
MAP AUTO ZOOM
When auto-zoom is enabled, the map automatically zooms in when the vehicle is traveling at slow speeds and zooms out when traveling at higher speeds.
Auto-zoom can be enabled and disabled via the NAVIGATION SETTINGS menu. See NAVIGATION SETTINGS .
REAR SEAT NAVIGATION
The navigation system can be viewed from the rear screens and operated via the rear screen’s remote.
The navigation features available on the rear screens are different from the front touchscreen.
Rear seat passengers can monitor the selected route, e.g., ETA, distance to destination, etc., and view or suggest new locations.
To view the navigation map on a rear screen, select the home button on the remote control. Use the cursor controls to select Navigation. Press the OK button to confirm.
To view the navigation menu, press the OK button again. Use the cursor controls to select Search, Browse map, or Settings.
Select Search, to display a list of options for selecting a new location. After selecting a new location, select To Driver. The driver receives a prompt on the front touchscreen to accept or refuse the selection. See REAR SEAT REMOTE CONTROL and REAR SEAT SCREENS OVERVIEW.
NAVIGATION SETTINGS
To view the NAVIGATION SETTINGS menu:
- Select the settings icon. See USING THE NAVIGATION SYSTEM.
- Select Navigation settings from the SETTINGS pop-up menu.
The following options are available:
- Profile:
Edit profile: Edit or set up a navigation profile. See NAVIGATION PROFILE .
Connected feature settings: Manage and configure the navigation connected features, mobile data, and roaming usage.
- Map views:
Map features: Enable or disable from the following:
– POIs.
– Landmarks.
– Traffic flow.
Auto-zoom: Enable or disable auto-zoom. See MAP AUTO ZOOM.
- Navigation:
Route options: Select to avoid certain road features.
Alerts: Enable or disable from a list of alerts. See ALERTS.
- Advanced:
Commute Mode: Enable or disable the Commute Mode feature.
Keyboard layouts: Select extra keyboard layouts.
Manage profile data: Clear the search history or delete all profile data.
- About:
App details: View details of the installed navigation system.
Installed maps and updates: View the details of the maps currently loaded to the vehicle’s navigation system, and check for any updates to installed maps. See MAP UPDATES.
Help topics: Provides information on how to use the navigation system. See HELP TOPICS .
Connected services licenses: View connected services license details.
NAVIGATION SYSTEM VOLUME
To adjust the volume of the navigation voice guidance, rotate the media system’s volume control while spoken guidance is given. See MEDIA CONTROLS.
The volume of the safety camera alert feature is linked to the voice guidance volume.
EDIT ROUTE
Make sure the relevant safety warnings and cautions have been read and understood before operating the navigation system. See NAVIGATION SAFETY .
A waypoint can be added or deleted, a route rearranged, or a round trip created for a selected route.
Waypoints can also be added from the Search, Places, or Your Destinations soft keys on the NAVIGATION MENU screen. Alternatively, select a point on the map. See NAVIGATION MENU.
Touch the Edit soft key on the NAVIGATION MENU screen to edit a route. See NAVIGATION MENU.
The following options can be selected:
- Add waypoint soft key: Touch to add a waypoint to the current route.
- Remove waypoint: Touch the trash can icon¹ to remove the waypoint from the current route.
- Change the order of the waypoints: Touch the up and down arrows to re-order the waypoints.
- Return journey selection box: Touch to make a selected destination into a round trip.
NOTES
The return journey does not include any of the selected waypoints. If waypoints are required, the waypoints must be added in the normal manner.
Trash can icon.¹
VIEW OPTIONS
Make sure the relevant safety warnings and cautions have been read and understood before operating the navigation system. See NAVIGATION SAFETY .
Touch the view options icon on the map to display the VIEW OPTIONS screen. See USING THE NAVIGATION SYSTEM.
The navigation map and guidance views can be adjusted as follows:
- 2D: Flat two-dimensional view.
- 3D: Three-dimensional perspective view.
- North facing: Map view displays in a two-dimensional view.
- Satellite view: Bird’s-eye view of the surroundings.
NOTES
Satellite view requires an internet connection.
- Traffic: Displays any traffic delays on a selected route.
NOTES
Traffic view requires an internet connection.
- Maneuvers: Displays a detailed view of the next intersection or turn.
- Full route: Displays full route description.
- Compass: Displays a digital compass, with the vehicle’s heading displayed in degrees.
- Route remaining: Displays the remaining route.
ALERTS
Make sure the relevant safety warnings and cautions have been read and understood before operating the navigation system. See NAVIGATION SAFETY .
Alerts can be selected from the NAVIGATION SETTINGS menu. See NAVIGATION SETTINGS .
The following options are available:
- Show maneuver details: A detailed intersection map while approaching a maneuver.
- Show traffic: Notification of traffic incidents.
- Intersection view: Active on multi-lane highways, when approaching an intersection. Intersection view displays the lane information for the next intersection.
- Safety camera: Notification of safety cameras.
- Low fuel: Available online and offline. Fuel stations are listed by price. The preferred station name and type of fuel can be selected.
FAVORITES
Make sure the relevant safety warnings and cautions have been read and understood before operating the navigation system. See NAVIGATION SAFETY .
When detailed information is displayed about an address or place, touch the add favorite icon¹ and the place is added to the list of favorites.
The list of favorites is located via the Your Destinations soft key on the NAVIGATION MENU screen. See NAVIGATION MENU.
Displayed information that is already a favorite displays the edit favorite icon². Touch the edit favorite icon² to view information about the favorite location. The edit favorite icon² gives the option to change the icon and name, or to delete it from the list of favorites.
If no route is selected, select the required favorite to set it as a destination. If a route is selected, select the required favorite to add it as a waypoint.
When signed in to an InControl navigation account, destinations can be automatically synchronized. Destinations are synchronized between the vehicle, the internet, and the Route Planner smartphone app. See NAVIGATION PROFILE , INCONTROL NAVIGATION ACCOUNT , and PLANNING ROUTES AND DOOR TO DOOR ROUTING .
Add favorite icon.¹
Edit favorite icon.²
MAP UPDATES
Make sure the relevant safety warnings and cautions have been read and understood before operating the navigation system. See NAVIGATION SAFETY .
Due to the map data file size, it is recommended that a USB 3.0 memory device is used to update the map data.
The vehicle must be stationary to enable the map update to start. Once the update process has started, the vehicle may be driven.
The navigation system cannot be interacted with until the map update is complete. If a route was active before the map update started, the navigation guidance is limited to voice guidance only.
Internet connection is required when downloading online.
The map data in the navigation system can be updated by downloading the updated map data to a USB memory device.
To update the navigation system’s map data, please visit www.landrover.com and search for ‘Map Updates’.
To download to a USB memory device:
- Download the map data from the website to a USB memory device.
- Insert the USB drive into the USB socket.
NOTES
Only the USB sockets in the center console’s storage box can be used for map updates. See AUXILIARY POWER SOCKETS.
- Follow the on-screen instructions to upload the map data to the navigation system.
Information on the installed maps is available in the NAVIGATION SETTINGS menu. See NAVIGATION SETTINGS .
For further information on updates to the navigation system’s maps, visit www.landrover.com and search for ‘Map Updates‘. Alternatively, contact an authorized retailer/authorized repairer.
FUEL FINDER
When the fuel level falls below a predetermined level, an alert is triggered and the navigation system searches for nearby fuel stations.
Preferred fuel stations can be stored in the ALERTS menu. See ALERTS.
The alert can be enabled and disabled via the NAVIGATION SETTINGS menu. See NAVIGATION SETTINGS .
INSTRUMENT PANEL VIEW
The availability and functionality of navigation maps displayed on the instrument panel depends on the specification of the vehicle.
The instrument panel can be set up to show a view of a full navigation map or a mini navigation map, depending on the instrument panel setup.
In this view, essential information, e.g., vehicle speed, fuel level, range, etc., is displayed as an information bar.
Navigation turn instructions are also available to the user and are displayed on the instrument panel and Head-Up Display (HUD).
Navigation turn instructions are only displayed if route guidance is active.
To display navigation map views in the instrument panel or HUD, please refer to the relevant section of the Owner’s Handbook. See INSTRUMENT PANEL MENU.
HELP TOPICS
The navigation system assists the user with help topics. Help topics provide the user with a short tutorial on how to use various navigation features.
Help topics can be accessed via the quick start tiles that are displayed on the NAVIGATION screen. Alternatively, help topics can be accessed via the NAVIGATION SETTINGS menu. See USING THE NAVIGATION SYSTEM and NAVIGATION SETTINGS .
The navigation system provides tutorials for the following features:
- How to set a destination.
- How to search by category.
- How to use commute mode.
- Understanding real-time traffic information.
- Creating and managing navigation profiles.
- How to sync, share, and keep up to date.
- How to use the Route Planner smartphone app.
The navigation system may also provide further tutorials on different navigation features.
The availability and functionality of navigation help topics depends on the specification of the vehicle.
NAVIGATION VOICE CONTROL
Navigation voice control is not available in all markets.
When using voice control for the navigation system, information is used from the on-board navigation database. Online features are not available.
The user can command the navigation system to:
- Navigate to a saved home location.
- Navigate to a recent or previous destination.
- Enter an address.
- Navigate to Point Of Interest (POI).
- Navigate to a zip code.
NOTES
The navigate to a zip code voice command is not available in all markets.
- Cancel an active route guidance.
For assistance when operating the navigation system’s voice control feature, please refer to the relevant section of the Owner’s Handbook. See VOICE TUTORIAL.
CONNECTED NAVIGATION
Connected Navigation uses a selection of features to enhance the navigation system.
Connected Navigation features include:
- Real-Time Traffic Information. See REAL TIME TRAFFIC INFORMATION.
- Online Routing. See ONLINE ROUTING.
- One Box Search. See ONE BOX SEARCH .
- Planning Routes and Door to Door Routing. See PLANNING ROUTES AND DOOR TO DOOR ROUTING .
- Share ETA. See SHARE ETA.
- Satellite Views. See SATELLITE VIEWS.
- Street Level Imagery. See STREET LEVEL IMAGERY .
- Fuel Price Service. See FUEL PRICES SERVICE.
- Commute Mode. See COMMUTE MODE .
- Parking Service. See PARKING SERVICE.
- Safety Cameras. See SAFETY CAMERAS.
In order to benefit from the full range of Connected Navigation features, the vehicle requires connection to the internet. Please complete the following steps:
- Fit a SIM card. See FITTING A SIM CARD.
- Create a navigation profile. See NAVIGATION PROFILE .
- Create an InControl navigation account. See INCONTROL NAVIGATION ACCOUNT .
User preferences are available in the NAVIGATION SETTINGS menu. The connected feature settings for managing which features can connect to the internet when on the home network or while roaming can also be applied. See NAVIGATION SETTINGS .
REAL TIME TRAFFIC INFORMATION
Uses live traffic data feeds, allowing for better traffic information, planning, and rerouting, for the user to complete the journey more efficiently.
Historical and internet traffic information are not available in all markets.
Traffic information is displayed as color coded on the navigation map roads. The color codes are:
- Red: Very heavy traffic or stationary traffic.
- Amber: Heavy traffic.
- Green: Free-flowing traffic.
- Black: Closed road.
Real time traffic can be displayed with a route selected or with no route selected.
Real time traffic information does not automatically reroute journeys.
A traffic-enabled route can be selected. A traffic-enabled route displays improved and updated routes to the destination, avoiding traffic congestion and delays. An option can also be enabled to possibly find a route to the destination, avoiding an alerted incident or traffic flow issues.
A live internet connection is required to receive updated traffic information during the journey.
For further assistance, please refer to the navigation help topics. See HELP TOPICS .
ONLINE ROUTING
While on route to a destination, the navigation system monitors live traffic conditions and takes into account typical traffic patterns for that time of day, keeping the user on the optimum route.
Online routing can be used in conjunction with commute mode.
ONE BOX SEARCH
The one box search feature allows the user to search the surrounding area for places of interest. The system can access expert destination information, travel tips, and inspiration as well as online travel reviews of the local area.
One box search is supplemented with data from the internet to provide more accurate results.
A live internet connection is required.
PLANNING ROUTES AND DOOR TO DOOR ROUTING
Before starting a route, the user can use the optional Route Planner smartphone app, one box online search, or saved destinations to set a destination. The smartphone app uses the Cloud to send the selected destination automatically to the vehicle’s navigation screen.
Once parked, the Route Planner smartphone app guides the user to the selected destination, which includes public transport options.
The Route Planner smartphone app is only available in selected markets.
For further assistance, please refer to the navigation help topics. See HELP TOPICS .
Downloading and installing the Route Planner smartphone app:
- Search for and download the Route Planner smartphone app from the Apple App Store or Google Play Store.
- When the installation is complete, open the launcher. Select the Route Planner smartphone app icon.
To sign in to the Route Planner smartphone app, use the same email address and password used to set up the InControl navigation account. See INCONTROL NAVIGATION ACCOUNT .
Apple and iPhone™ are registered trademarks of Apple Inc., registered in the US and other countries. App Store is a service mark of Apple Inc.
Google Play Store is a registered trademark of Google Inc.
SHARE ETA
The user can share the ETA so selected contact(s) know exactly when arriving to destination, as calculated by the navigation guidance system.
If the user is running late to the destination, the share ETA feature can send automatic updates via text messages or email, without any further action from the user.
Contacts need to be set up within the navigation profile.
To share the ETA, touch the information bar (5) on the touchscreen. Follow the on-screen instructions. See MAP SPLIT SCREEN.
For further assistance, please refer to the navigation help topics. See HELP TOPICS .
SATELLITE VIEWS
The satellite views feature provides an overhead map view of the vehicle’s surroundings.
If the satellite view feature is used continuously, it may consume large amounts of mobile data. Check the data allowance is appropriately configured for providing high-data services.
STREET LEVEL IMAGERY
The street level imagery feature provides a 360° panoramic street view in selected locations and markets only.
FUEL PRICES SERVICE
When fuel station is selected during a POI search, the nearby fuel stations can be sorted according to the price of the fuel. Fuel prices are updated to the vehicle’s database from the internet.
Fuel pricing information may not be updated in real time and cannot be guaranteed to be accurate.
In some markets, a relative price index is displayed instead of live fuel prices.
COMMUTE MODE
Commute mode allows for the navigation system to learn regular commutes and automatically advises the user of the expected journey time based on live and historical traffic movements without the user having to input a destination.
The navigation system learns the routes the user takes for a set destination and advises which of those is the quickest.
Commute mode can be enabled and disabled via the NAVIGATION SETTINGS menu. See NAVIGATION SETTINGS .
Commute mode displays a highlighted route on the navigation map and uses the learned routes, combined with live traffic information, to calculate the fastest of the previously used routes.
If more than one commute is available, the alternative commutes are available for selection.
Commute mode displays a map on the touchscreen, but does not give voice guidance.
For further assistance, please refer to the navigation help topics. See HELP TOPICS .
PARKING SERVICE
As the user approaches a destination, the navigation system displays available parking. Simply tap on the preferred parking lot. The navigation system updates to direct the user to it. Available parking and pricing information are also displayed for selected markets.
SAFETY CAMERAS
The safety cameras feature provides the location of potential accident black spots, or areas that have been identified as a potential danger by the presence of safety cameras. Available in selected locations only.
Safety camera information is not available in all countries.
NAVIGATION PROFILE
A navigation profile enables personalized settings and information, e.g., favorite destinations, previous journeys and navigation settings to be stored.
More than one navigation profile can be created.
On first use of the navigation system, the touchscreen prompts the user to create and name a profile.
When prompted, scroll to the bottom of the page and select Turn on all to enable all connected navigation features.
A navigation profile can also be edited, switched, and reset within the NAVIGATION SETTINGS menu. See NAVIGATION SETTINGS .
For further information on creating a navigation profile, please refer to the InControl section of the Land Rover website at: www.landrover.com/navigation.
INCONTROL NAVIGATION ACCOUNT
An InControl navigation account must be created in order to use certain Connected Navigation features.
Once a navigation profile has been created, an InControl navigation account can be created.
In the main navigation screen, select Sign In.
Follow the on-screen instructions to register a new account.
An InControl navigation account can also be set up within the Edit profile tab in the NAVIGATION SETTINGS menu. See NAVIGATION SETTINGS .
For further information on setting up an InControl navigation account, please refer to the InControl section of the Land Rover website at: www.landrover.com/navigation.