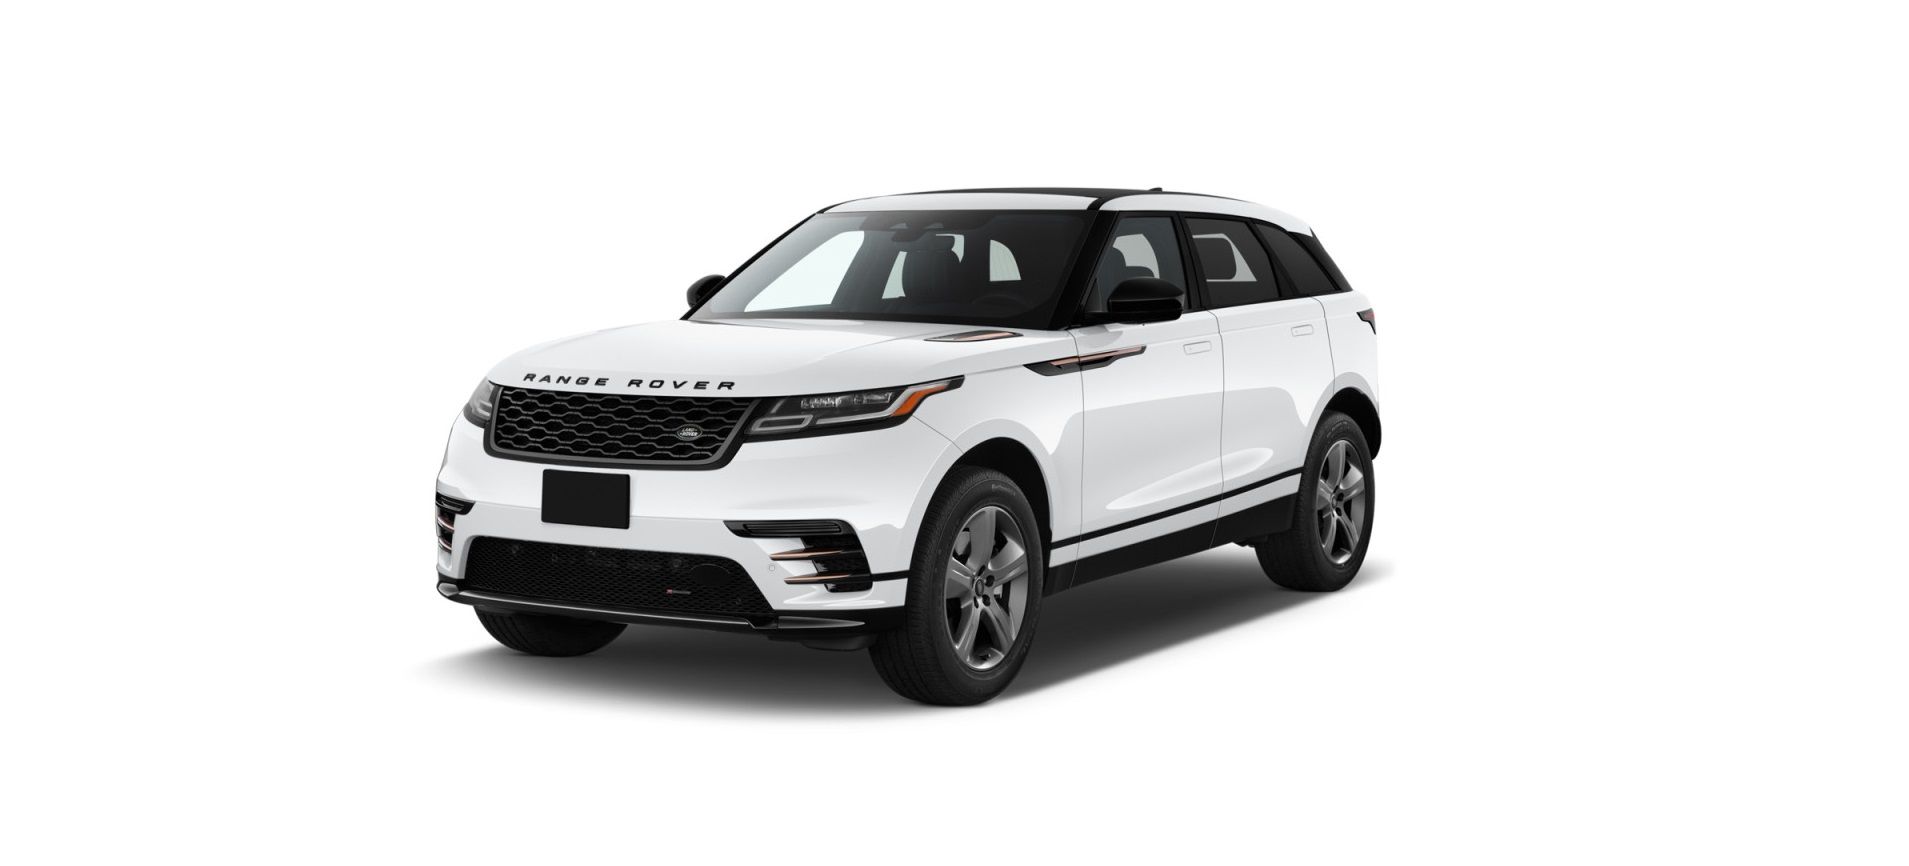
2022 Land Rover Range Rover Velar Maintenence

BREAKING-IN
The vehicle is built using high-precision manufacturing methods, but the moving parts of the engine must still settle in relative to each other. The breaking-in process occurs mainly in the first 2 000 mi (3 000 km) of operation.
During the breaking-in period of 2 000 mi (3 000 km), observe and follow the instructions below:
- Do not fully press the accelerator pedal.
- Avoid high engine speeds (rpm) until the engine has reached its full operating temperature.
- Avoid operating the engine in too high a gear at low engine speeds (laboring).
- Gradually increase engine and road speeds.
- Avoid extended operation at high engine speeds with abrupt stops.
- Avoid frequent cold starts followed by short-distance driving. Where possible, allow the engine to reach operating temperature.
- Longer journeys are more helpful during the breaking-in period.
- Do not participate in off-road driving, competition driving, track days, sports driving schools, or any similar events.
AIR CONDITIONING (A/C)
With reference to US legislation relating to Air Conditioning (A/C) refrigerants, J2845 Technician Training for Safe Service and Containment of Refrigerants Used in Mobile Air Conditioning (A/C) Systems (HFO-1234yf) states that under no circumstances should any part of the A/C system be serviced, dismantled, or replaced by anyone other than suitably qualified and certified personnel. Make sure that the refrigerant is correctly contained at all times. Failure to adhere to the above may result in serious personal injury or death.
All replacement parts for the Air Conditioning (A/C) system must be new and equivalent to the manufacturer’s original equipment. All replacement parts must comply with the relevant SAE standard (J2842). Contact a retailer/authorized repairer for advice. Failure to do so may lead to serious personal injury or death.
The following symbols may be used on an under-hood label and are relevant to the refrigerant fluid:

A/C symbol.

Lubricant symbol.

Caution.
Flammable refrigerant.
Required registered technician to service A/C system.
Consult the Owner’s Handbook.
OWNER MAINTENANCE
Any significant or sudden drop in fluid levels, or uneven tire wear, should be reported to a qualified technician without delay. It may cause damage to the vehicle.
In addition to the routine maintenance, a number of simple checks must be carried out more frequently.
DAILY CHECKS
Check the operation of the following every day:
- Lights.
- Horn.
- Turn signals.
- Windshield wipers.
- Windshield washers.
- Warning lamps.
- Seat belts.
- Brakes.
Look for fluid deposits underneath the vehicle that might indicate a leak.
Condensation drips from the Air Conditioning (A/C) system are normal.
WEEKLY CHECKS
- Engine oil level.
- Engine coolant level.
- Brake fluid level.
- Dynamic response fluid level.
- Windshield washer fluid level.
- Tire pressures and condition.
- Operate the Air Conditioning (A/C) system.
The engine oil level should be checked more frequently if the vehicle is driven for prolonged periods at high speeds.
STORING A HYBRID VEHICLE
Always keep the hybrid battery charged to a minimum charge level of 25%. Failure to do so may result in damage to the hybrid battery.
Make sure that the 12V battery remains connected, and in a sufficiently charged state, during the storage period.
In the event of long-term storage, make sure to charge the hybrid battery every 30 days.
Using the vehicle’s charging cable to connect to an external charging station is the recommended method for charging the hybrid battery. In this event the instrument panel displays the current hybrid battery charge level. See CONNECTING A CHARGING CABLE.
Alternatively, the hybrid battery is charged when driving the vehicle. If required, deactivate the auto stop/start system to prevent the operation of the electric motor. See DEACTIVATING AUTO STOP/START.
The current hybrid battery charge level can be viewed in the instrument panel’s power gauge display. See INSTRUMENT PANEL: HYBRID VEHICLES.
In extreme cold climate conditions store the vehicle in a warmer area to protect it from the environment.
If the vehicle cannot be charged using the charging cable or via normal driving, then the following procedure may be used:
- Make sure that adequate ventilation is available.
WARNING
Never start the engine or leave it running, when the vehicle is in an enclosed space without adequate ventilation. Exhaust gases are poisonous and inhalation can cause unconsciousness and potentially lead to serious injury or death.
- To maintain control of the vehicle, make sure that the Electric Parking Brake (EPB) is applied.
- Make sure the transmission is engaged in Neutral (N) or Park (P).
- Start and run the engine.
- Make sure the instrument panel is configured to display the tachometer. See INSTRUMENT PANEL: HYBRID VEHICLES.
- Lightly press and continually hold the accelerator pedal at approximately 1 500 rpm, to allow the engine to charge the hybrid battery.
- Switch off the engine when the battery gauge indicates a charge level of 25%.
ARDUOUS DRIVING CONDITIONS
When a vehicle is operated in extremely arduous conditions, more frequent attention must be paid to servicing requirements.
Arduous driving conditions include:
- Driving in dusty and/or sandy conditions.
- Driving on rough and/or muddy roads.
- Frequent wading.
- Frequent driving at high speeds in high ambient temperatures above 122 °F (50 °C).
- Frequent driving in severe cold weather down to -40 °F (-40 °C).
- Frequent driving in mountainous conditions.
- Frequent trailer towing.
- Driving in areas using road salt or other corrosive materials on the driving surface.
Contact a retailer/authorized repairer for advice.
ANTI-THEFT SYSTEM
No modifications or additions should be made to the anti-theft system. Such changes could cause the system to malfunction, which increases the risk of theft.
AIRBAG SYSTEM
The components that make up the airbag system are sensitive to electrical or physical interference. Electrical and/or physical interference could easily damage the system and cause inadvertent operation or a malfunction of the airbag module. Airbags should only be repaired by an authorized repairer. If the airbags are not repaired correctly, they may not operate correctly during a collision, which may lead to serious injury or death.
To prevent malfunction of the airbag system, always consult a retailer/authorized repairer before fitting any of the following:
- Electronic equipment such as a mobile phone, two-way radio, or in-vehicle entertainment system.
- Accessories are attached to the front of the vehicle.
- Any modification to the front of the vehicle.
- Any modification involving the removal or repair of any wiring or component in the vicinity of any of the airbag system components. The components include the steering wheel, steering column, and instrument and dashboard panels.
- Any modification to the dashboard panels or steering wheel.
PARTS AND ACCESSORIES
The fitting of non-approved parts and accessories, or the carrying out of non-approved alterations or conversions, may be dangerous. Doing so could affect the safety of the vehicle and occupants, and also invalidate the terms and conditions of the vehicle’s warranty.
All replacement parts for the Air Conditioning (A/C) system should be new and equivalent to the manufacturer’s original equipment, while complying with the SAE standards. Contact a retailer/authorized repairer for advice. Failure to adhere to the above may lead to serious injury or death.

The extremely flammable symbol may be used on an under-bonnet label. The symbol is relevant to the Air Conditioning (A/C) refrigerant fluid.
The symbol identifies flammable chemicals that have low flash and boiling points, and gases that catch fire when exposed to air.
Jaguar Land Rover Limited accepts no liability for death, personal injury, or damage to property, occurring as a direct result of non-approved modifications. These modifications include but are not limited to: fitment of non-approved accessories, and the carrying out of non-approved conversions to the vehicle.
ROAD TESTING DYNAMOMETERS (ROLLING ROADS)
Any dynamometer testing should only be carried out by a qualified person, familiar with the dynamometer testing and safety procedures practiced by retailers/authorized repairers.
SAFETY IN THE GARAGE
Make sure the following warnings have been read and fully understood. Failure to comply with the safety instructions could result in an accident, leading to serious injury or death.
If the vehicle has been driven recently, do not touch the engine, exhaust, or cooling system components until the engine has cooled. Handling any of these components when hot may cause personal injury.
Never leave the engine running when the vehicle is in a garage. Exhaust gases are poisonous and can cause unconsciousness and death if inhaled.
Do not work beneath the vehicle with the wheel-changing jack as the only means of support. The jack is designed for wheel changing only. Never work beneath the vehicle with the jack as the only means of support. To avoid injury, always use correctly-rated vehicle support stands, before putting any part of the body beneath the vehicle.
Keep your hands and clothing away from drive belts, pulleys and fans. Some fans may continue to operate after the engine has stopped. Always pay attention to fans in operation to avoid personal injury.
Remove metal wristbands and jewelry, before working in the engine compartment. Failure to do so can lead to serious injury or death.
Do not touch electrical leads or components while the engine is running, or with the ignition turned on. Doing so may result in electric shock.
Do not allow tools or metal parts of the vehicle to make contact with the battery leads or terminals. Such contacts may result in serious personal injury or death.
POISONOUS FLUIDS
Fluids used in motor vehicles are poisonous and should not be consumed or brought into contact with open wounds. Vehicle fluids may cause serious injuries or infection, which can result in death.
For safety, always read and obey all instructions printed on labels and containers.
USED ENGINE OIL
Prolonged contact with engine oil may cause serious skin disorders, including dermatitis and cancer of the skin. Always wash thoroughly after contact.
Pollution of drains, waterways, or soil is illegal. Use authorized waste disposal sites to dispose of used oil and toxic chemicals.
OPENING THE HOOD
Before opening the hood, make sure that the ignition is switched off and the smart key is removed from the vehicle. Failure to do so can potentially result in serious injury or death.
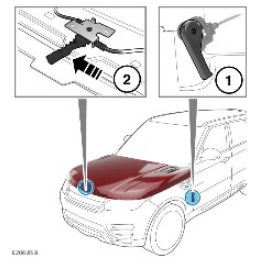
- Pull the handle, located in the left side front footwell.
- Push the hood safety catch, located underneath the center of the hood at the front. Raise the hood.
CLOSING THE HOOD
Before closing the hood, make sure that no-one is obstructing the closing area and that hands and clothes are clear. The closing hood may cause serious injuries.
Do not drive with the hood secured by the safety catch alone. If the hood opens while driving, it may lead to a collision, which may cause serious injuries or death.
When closing the hood, make sure to stand in front of the vehicle. Do not attempt to close the hood while standing at the side of the vehicle. Doing so may result in incorrect latching of the hood, which may cause serious injuries or death.
To close the hood:
- Using both hands, lower the hood and let it drop from a height of between 8 to 20 in (20 to 50 cm).
- Try to lift the front edge of the hood, near both corners, to check that it is securely engaged.
- If the hood lifts slightly, it is not properly latched. Open the hood again, and with a little more force, try again to close it.
UNDER-HOOD COVERS REMOVAL
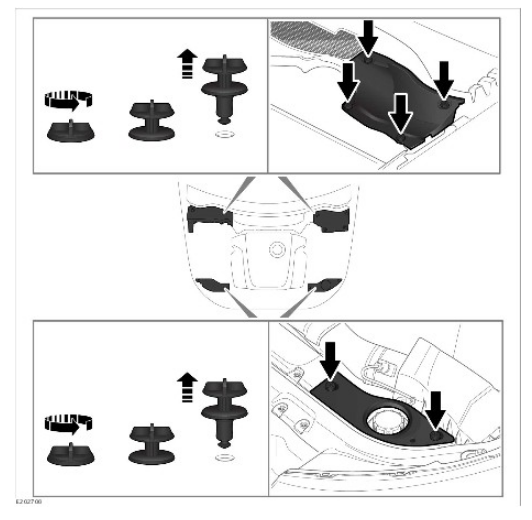
- Release and remove the turnbuckle clips securing the cover.
- Lift the front edge of the cover and slide forwards to remove.
UNDER-HOOD COVERS REFITTING
Before refitting the under-bonnet covers, make sure that no pipes, cables, or other items have been trapped between the cover and the casing.
To refit the under-bonnet covers:
- Place the cover over the casing. Make sure that the holes are aligned.
- Push the cover down firmly. Rotate the turnbuckle clips clockwise to fasten.
FUEL SYSTEM
Under no circumstances should any part of the fuel system be dismantled or replaced by anyone other than a suitably qualified vehicle technician. If any parts are replaced by an unqualified person, this may cause interference in the operation of the vehicle, leading to serious injury or death.
Make sure sparks and open flames are kept away from the engine compartment. A spark may cause an explosion, which may lead to serious injuries or death.
Wear protective clothing, including, where possible, gloves made from an impervious material. Failure to do so may result in serious injury or death.
If fuel odor is detected, switch off the vehicle and exit as soon as possible. Contact a suitably qualified vehicle technician. Failure to do so could lead to serious injuries or death.
CHANGING A BULB
Do not attempt to change any bulb with the lighting switched on. If the lighting has just been switched off, give the bulbs time to cool down. Handling them in a hot condition may cause personal injury.
All lights that are either LED or xenon units must only be replaced by a retailer/authorized repairer.
Before attempting to replace a bulb, make sure that both the affected light and the vehicle’s ignition are switched off. If the circuit remains live, a short circuit can occur which may damage the vehicle’s electrical system.
Always replace bulbs with the correct type and specification. If in any doubt, contact a retailer/authorized repairer for advice.
In certain places it is a legal requirement to carry spare bulbs. A replacement bulb kit is available as an approved accessory from a retailer/authorized repairer.
REAR LIGHT REMOVAL
To change any of the rear bulbs, it is necessary to completely remove the light unit from the vehicle.
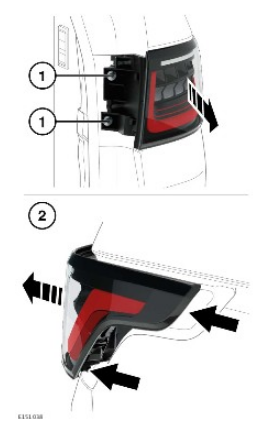
- With the tailgate open, remove the trim panel and then remove the 2 screws from the inner edge of the unit.
- Firmly, but carefully pull the unit away from the vehicle, releasing the 2 lugs situated at the rear of the light unit.
- Disconnect the electrical connector and remove the unit from the vehicle. Place face down on a flat surface covered in soft material to prevent damage.
REAR FOG LIGHT BULB REPLACEMENT
Always find a safe place to stop, off the highway and away from traffic.
Apply the Electric Parking Brake (EPB) and engage Park (P).
Switch on the hazard warning lights.
Place a warning triangle at a suitable distance behind the vehicle, facing toward oncoming traffic.
Disconnect the trailer from the vehicle.
Make sure all passengers and animals are out of the vehicle and in a safe place away from the highway.
If the vehicle has been driven recently, do not touch the exhaust system components until they have cooled.
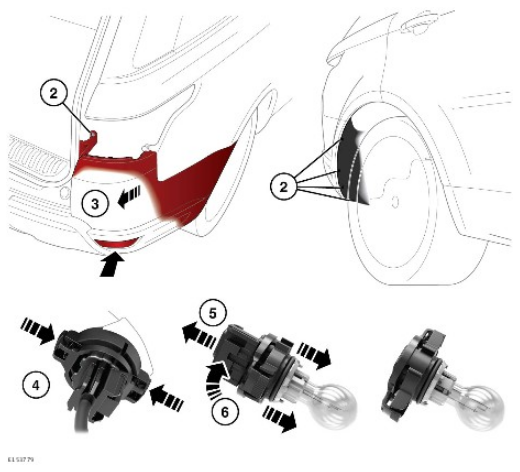
Access to a rear fog light housing is from above and behind the rear bumper. The bulb holder is a black plastic unit that incorporates the bulb.
Set the electronic air suspension to the off-road height position, for increased access to the bumper fixings. See OFF-ROAD HEIGHT.
- Remove the rear light unit. See REAR LIGHT REMOVAL.
- Remove the five fixings from the bumper.
- Gently and evenly pull the bumper to release the eight securing clips from the fender panel.
CAUTION
Do not use excessive force, as this may cause damage to the vehicle.
NOTESOnly limited movement is required to allow access to the rear of the fog light unit.
- To remove the bulb holder, press in the outer fenders on the black plastic unit and pull the holder free of the housing.
- To separate the bulb holder from the electrical connector, first push up the connector lock.
- Push in the release mechanism while pulling the connector and bulb holder apart.
NOTES
Inside the bulb holder, there are three locating lugs. When fitting the new bulb unit, the lugs must line up with the connector correctly.
Refitting is the reverse of the removal process. Make sure the connector lock is pressed down and that the bulb unit locates securely into the fog light housing.
WIPERS SERVICE POSITION
To avoid damage to the hood, do not lift the wiper blades when they are in the normal parked position.
The smart key must remain in the vehicle while the wiper blades are being replaced.
Fit only replacement wiper blades that are identical to the original specification.
Replace the wiper blades in accordance with the manufacturer’s instructions.
Before changing a wiper blade, the wiper arms must be set in the service position as follows:
- Make sure the vehicle’s ignition is switched off.
- Switch the vehicle’s ignition on and then off again.
- Immediately press the wash/wipe control to its lowest position, as if to command a single wipe. Hold this position while switching on the vehicle’s ignition again. The wipers move to the service position. See WIPER OPERATION.
- When the new parts have been fitted, switch the vehicle’s ignition off. The wipers return to the park position.
PANORAMIC ROOF BLIND RESET
The fixed panoramic roof blinds need to be reset if the battery is disconnected, becomes discharged, or power supply is interrupted.
- Switch on the engine.
- With the blinds closed, press the front of the front blind switch and hold it for 10 seconds. See ELECTRIC WINDOWS.
- After 10 seconds, the front and rear blinds fully close. If already in the closed position an audible click is heard. Release the switch. Within 5 seconds, re-press and hold the front of the front blind switch until the blinds complete a full open and close cycle.
- Once the rear blind has stopped moving, release the switch.
The blinds can now be operated as normal.
PANORAMIC ROOF RESET
If the battery is disconnected or the power supply is interrupted while the panoramic roof is partially open, it may need to be recalibrated.
The panoramic roof and panoramic roof blind are reset together with the same procedure. See PANORAMIC ROOF BLIND RESET.
WINDOW RESET
The windows need to be reset if the battery is disconnected, becomes discharged, or the power supply is interrupted.
- Close the window fully. See ELECTRIC WINDOWS.
- Release the switch. Lift the switch to the close position and hold for 1 second.
- Repeat the procedure on each window.
Make sure that a minimum of 12 volts is available at all times. It is advisable to have the engine running while resetting the windows.