2022 Land Rover Range Rover Velar Phone
PHONE SAFETY
Make sure the following warnings have been read and fully understood before using the phone features.
Failure to use the phone features safely could result in an accident, leading to serious injury or death.
Do not adjust the touchscreen controls, or allow the system to distract the driver, while the vehicle is moving.
Make sure the relevant safety warnings and cautions have been read and understood before operating the touchscreen. See TOUCHSCREEN SAFETY.
Switch off the phone in areas with a high explosion risk, e.g., filling stations, fuel storage areas, or chemical factories. Further high explosion risks are found where the air contains fuel vapor, chemicals, or metal dust. The phone could trigger an explosion or cause a fire.
Always store the phone securely. In an accident, loose items can cause injury.
The functioning of cardiac pacemakers or hearing aids may be impaired when the phone is in use. Check with a doctor or the device’s manufacturer whether any such devices that the vehicle’s occupants are using are sufficiently protected against high-frequency energy.
Even when using the Bluetooth® wireless technology hands-free feature, using the phone while driving is dangerous. The use of a phone diverts the driver’s attention from the traffic situation. When using the phone, stop at an appropriate place where other vehicles are not endangered or inconvenienced.
Drivers should talk on the phone only when it is safe to do so and when such use does not distract the driver from the road.
Drivers should never text messages while driving. Texting while driving diverts attention from the road.
The Health Industry Manufacturers’ Association recommends that a minimum separation of 8.7 in (22 cm) is maintained between a wireless phone antenna and a pacemaker. The recommendation is to avoid potential interference with the pacemaker. The recommendations are consistent with the independent research by, and recommendations of, Wireless Technology Research.
PHONE SYSTEM OVERVIEW
Make sure the relevant safety warnings have been read and understood before operating the phone features. See PHONE SAFETY.
The touchscreen displays the recent call list in the order that the calls were recorded. If this information is not available on the connected phone, the recent call list displays as sent from the phone. Some phones may arrange the list in another order.
The system removes duplicate entries of the same call type from the same caller. For example, multiple calls from the same caller are reduced to one call.
Duplicated icons can be operated on the lower touchscreen when the phone widget is displayed. Further information on the lower touchscreen can be found in the relevant section of the Owner’s Handbook. See LOWER TOUCHSCREEN CONTROLS.
The phone system can be operated and viewed via the touchscreen, lower touchscreen, or instrument panel. See TOUCHSCREEN HOME MENU, LOWER TOUCHSCREEN CONTROLS, and INSTRUMENT PANEL MENU.
To access the phone features, a phone must be paired with the vehicle. Further information on pairing a phone can be found in the relevant section of the Owner’s Handbook. See PAIRING AND CONNECTING USING THE PHONE.
To access the PHONE screen, touch the Phone on the touchscreen’s HOME menu. See TOUCHSCREEN HOME MENU.
To access the PHONE screen on the lower touchscreen, swipe left or right, until the PHONE screen displays. If the PHONE screen does not display, setup is required within the lower touchscreen’s display settings. See LOWER TOUCHSCREEN CONTROLS.
To access the PHONE screen in the instrument panel, press the MENU button to activate the instrument panel menu. Search Phone and press OK. For further information, please refer to the relevant section of the Owner’s Handbook. See INSTRUMENT PANEL MENU.
The phone system can also be operated via voice commands. Further information on voice control can be found in the relevant section of the Owner’s Handbook. See USING VOICE CONTROL.
- Options: Touch to access the following options:
Voicemail.
Change phone.
Auto reject.
- Messages: Touch to display a list of received messages.
NOTES
The availability and functionality of Messages depend on the specification of the vehicle and the market in which the vehicle is being used.
- Keypad: Touch to access the keypad dialing mode.
- Contacts: Touch to view the downloaded contacts.
- Recent: Touch to display a list of recently dialed, received, and missed calls. When a call is unanswered or missed, the number is displayed in the top right corner of the Recents soft key.
- Feature display: The selected feature is displayed in this area.
- End call icon: When a call is in progress, the end call icon is displayed. Press to end the call.
- Phone icon: Touch to select the PHONE screen. When the PHONE screen is selected, the icon changes to an active icon. Touch the icon to select an alternative paired phone. Alternatively, when receiving an incoming call, an active green icon displays. Touch to answer the incoming call.
- Settings icon: Touch to access the PHONE SETTINGS pop-up menu. Select one of the following options to manage the features: Settings for all phones, Settings for ‘name of phone’, or Bluetooth settings.
- Scroll bar: If more than five features are available, touch the scroll bar or arrows to move up or down the list. Alternatively, swipe the list in the direction required.
- Auto-reject icon: Touch to access the auto-reject options.
- Voicemail icon: Touch to access the voicemail options.
- Recent icon: Touch to display a list of recently dialed, received, and missed calls.
PHONE COMPATIBILITY
Please refer to the OWNERSHIP section of the Land Rover website at: www.landrover.com for a list of compatible phones.
The Bluetooth® wireless technology devices listed have been tested for compatibility with Jaguar Land Rover vehicles. Performance varies, based on the phone’s software version, battery condition, coverage, and network provider. Phones are warranted by the phone manufacturer, not by the vehicle manufacturer.
PAIRING AND CONNECTING USING THE PHONE
Make sure the relevant safety warnings have been read and understood before operating the phone features. See PHONE SAFETY.
The process of pairing and connecting with the vehicle, from the phone, varies depending on the type of phone used.
The process of pairing and connecting the phone is the same for both the touchscreen and the lower touchscreen.
Pairing and connecting a phone:
- Switch the ignition on and make sure that the touchscreen is active.
- When pairing a device for the first time, select Tap to connect the phone from the HOME screen. Select Pair new device. The vehicle’s Bluetooth® wireless technology device is now discoverable. See TOUCHSCREEN HOME MENU.
NOTES
When a phone is paired to the vehicle, Tapping to connect the phone becomes the name of the user’s phone. See TOUCHSCREEN HOME MENU.
- Using the phone, search for Bluetooth devices. On some phones, this is referred to as a new paired device. See the phone’s operating instructions for further information. The vehicle’s discoverable Bluetooth name is the same as the vehicle’s name.
- When the vehicle’s name is discovered, follow the on-screen instructions. Select Yes, when prompted, to confirm the pairing. Alternatively, some older phones request a PIN to be entered. Either enter the PIN 1234, or select Yes, to confirm that the PIN displayed on the phone matches the vehicle’s PIN.
- If there is a prompt for a phonebook or contacts download, accept it. See CONTACTS.
NOTES
When prompted, select the Remember this setting option once the Phonebook or Contacts information has been downloaded.
- Once the phone is paired and connected to the system, select the return icon or the PHONE screen. See TOUCHSCREEN GLOBAL ICONS.
NOTES
Some phones require the Bluetooth device pairing to be set as authorized or trusted, in order to automatically connect. Refer to the phone’s operating instructions for further information.
To select the paired phone’s settings, make sure the following steps are followed:
- Select the settings icon from the PHONE screen.
- Select Phone settings from the SETTINGS pop-up menu.
- A list of all paired phones is displayed. Touch the paired phone’s name.
Paired phones have the option to be used as a phone, a media device, or both. To select a device type, make sure the following steps are followed:
- Select the settings icon from the PHONE screen.
- Select All settings.
- Select Connectivity.
- From the CONNECTIVITY screen list, select Bluetooth.
- Select the Paired devices list to manage any devices.
MANAGING TWO CALLS
Make sure the relevant safety warnings have been read and understood before operating the phone features. See PHONE SAFETY.
When more than two calls, e.g., a conference call, are active on the phone when connecting to the vehicle’s phone system, the calls are maintained. However, a maximum of two call details are displayed. When more than two calls are in progress when connecting, any calls that are not active, i.e., on hold or incoming, are rejected.
Two calls can be taken on the same phone. Notification is given when a second call is received. When accepting a second call, the first call is automatically put on hold.
Alternatively, a second call can be dialed from the displayed screen options. From the screen options, select Add call and then Contacts to display the list of contacts. Select Keypad to enter the number.
When there are two separate calls, the hold icon changes to a swap icon. Touch the swap icon, or the contact’s name or number, to swap between the current call and the call on hold. See PHONE SYSTEM ICONS.
Touch and hold the end call icon to end the current call and return to the remaining call. Touch the end call icon to end both calls.
MERGE CALLS
Make sure the relevant safety warnings have been read and understood before operating the phone features. See PHONE SAFETY.
If two calls are in progress on the same phone, both calls can be merged into one conference call. Select the displayed Merge option.
While the calls are merged, touch the hold icon or the mute icon to mute both calls. Alternatively, touch the end call icon to end both calls.
Merge cannot be deselected. If one caller ends the call, the remaining call stays active. See PHONE SYSTEM ICONS.
PHONE SYSTEM ICONS
Depending on the part of the phone system in use, the following icons display on the touchscreen:
Call icon: Touch to send or accept a call.
End call icon: Touch to end or reject a call.
Hold icon: Touch to hold a call. Touch again to return to the call.
Swap icon: Touch to swap between connected calls.
Handset icon: Touch to switch the call to the phone handset.
Mute icon: Touch to mute the microphone and initiate privacy mode. While selected, the caller cannot hear the conversation.
Phone signal strength indicator.
Phone battery level indicator.
Swap phone icon: Touch to change the phone.
Search contacts icon: Touch to search for contacts.
Recents icon: Touch to view a list of recent calls.
STEERING WHEEL PHONE CONTROLS
Make sure the relevant safety warnings have been read and understood before operating the phone features. See PHONE SAFETY.
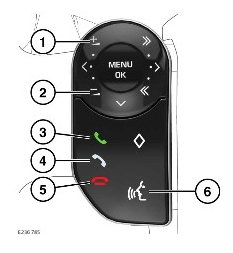
- Press to increase the volume. Sweep clockwise to increase the volume during a call.
- Press to decrease the volume. Sweep counter-clockwise to decrease the volume during a call.
- Press to answer an incoming call. Press to access the recent calls list on the touchscreen. Press and hold to access the contacts list on the touchscreen.
- Phone not in use.
- Press to end a call.
- Press to make a call using voice control. See USING VOICE CONTROL.
The user must scroll through a contact list by using the touchscreen scroll bar.
PHONE CALL VOLUME
Make sure the relevant safety warnings have been read and understood before operating the phone features. See PHONE SAFETY.
While a phone call is active, rotate the media system’s volume control to adjust the call volume. Alternatively, adjust via the steering wheel controls. See STEERING WHEEL PHONE CONTROLS.
If the media system is in use when a phone call is active, the media system source is muted for the duration of the call.
MICROPHONE VOLUME
Make sure the relevant safety warnings have been read and understood before operating the phone features. See PHONE SAFETY.
To adjust the microphone’s volume, make sure the following steps are followed:
- Select the settings icon from the PHONE screen.
- Select Phone settings from the SETTINGS pop-up menu.
- From the PHONE SETTINGS pop-up menu, select Microphone volume.
- Touch + or – to adjust to the required level.
CONTACTS
Make sure the relevant safety warnings have been read and understood before operating the phone features. See PHONE SAFETY.
Contacts stored in the memory of a paired phone can be automatically downloaded to the vehicle’s Contacts list. The contact list is downloaded each time the phone is connected to the system. See PAIRING AND CONNECTING USING THE PHONE.
Certain phones store the contacts in two different areas: the SIM card and the phone’s memory. The vehicle’s system accesses only those numbers stored in the phone’s memory.
To access contacts via the touchscreen:
- From the PHONE screen, select Contacts. See PHONE SYSTEM OVERVIEW.
- Use the scroll bar, or swipe the list, to search the list alphabetically.
- Identify the required contact from the displayed list. Touch to call. When a contact has more than one number stored, select the required number from the list.
NOTES
To view the entire list, use the scroll bar.
To access contacts via the lower touchscreen:
- From the PHONE screen, select the recents icon. See PHONE SYSTEM OVERVIEW.
- Swipe the list to view the most recently dialed, received, or missed contacts.
- Identify the required contact from the displayed list. Touch to call.
To access contacts via the instrument panel:
- Select Phone from the instrument panel menu. See INSTRUMENT PANEL MENU.
- Select Recents.
- Use the steering wheel controls to scroll through the displayed list. See INSTRUMENT PANEL MENU.
- Identify the required contact from the displayed list. Press OK on the steering wheel controls to call.
If the phone supports contact cards, contact information can be viewed in the vehicle’s Contacts list.
The order in which the Contacts list is displayed can be changed as follows:
- Select the settings icon from the PHONE screen. See PHONE SYSTEM OVERVIEW.
- Select Phone settings from the SETTINGS pop-up menu.
- Select the required phone. Select First name or Last name to change the display for the connected phone.
To delete the Contacts list:
- Select the settings icon from the PHONE screen.
- Select Phone settings from the SETTINGS pop-up menu.
- Select Delete from car for the connected phone.
Once the Contacts list is deleted, Auto update contacts is unavailable for selection until the paired phone’s contact list is downloaded again.
If a contact, or the Contacts list, is deleted, incoming calls display the number but no name.
RECEIVING TEXT MESSAGES
Make sure the relevant safety warnings have been read and understood before operating the phone features. See PHONE SAFETY.
The message feature is not compatible with all phones. For further information, please refer to the Land Rover website at: www.landrover.com.
The availability and functionality of Messages depends on the specification of the vehicle and the market in which the vehicle is being used.
The Messages soft key does not display on the touchscreen if the user declines access via the mobile phone to download messages.
To access text messages via the touchscreen, a phone must be paired with the vehicle. For further information on pairing a phone, refer to the relevant section of the Owner’s Handbook. See PAIRING AND CONNECTING USING THE PHONE.
When receiving an incoming text message, the touchscreen displays either a pop-up or banner notification.
A pop-up notification displays the following options:
Call icon: Touch to call the sender of the text message.
Read out soft key: Touch for the text message to be read out as an audio message.
Alternatively, a banner notification informs the driver when a new message is received. The received message can only be viewed in the Messages list.
To access the Messages list on the touchscreen:
- From the PHONE screen, select Messages. See PHONE SYSTEM OVERVIEW.
- Use the scroll bar to search the list.
- Identify the required text message from the displayed list and select.
- The selected message allows for the following options:
Call.
Read out.
Reply: Provides a list of templates that the user can reply with, e.g., Please give me a call or Can’t talk right now. Select the required reply. Alternatively, the user can edit and create a message template to reply with.
The Reply option is only available when the vehicle is stationary.
The user can access received messages and send replies via voice commands. For further information, refer to the relevant section of the Owner’s Handbook. See USING VOICE CONTROL.
To view the message settings from the PHONE screen:
- Select the settings icon. See PHONE SYSTEM OVERVIEW.
- Select Phone settings from the SETTINGS pop-up menu.
- Select Settings for all phones from the PHONE SETTINGS pop-up menu.
The following options are available:
- Sort order.
- Messaging.
- Message tones.
- Message alert.
- Edit message templates.
ANDROID AUTO
Android Auto™ is compatible with Android phones running v5.0 (Lollipop) and above.
Google™, Android™, Android Auto™, Google Play™ and other related marks and logos are trademarks of Google LLC.
Android Auto is a feature designed to give the user access to core phone features while driving, e.g., music, phone calls, Google voice support, messaging and navigation, with safety in mind. The feature is designed to minimize distraction so that the user can remain focused on the road.
To access Android Auto, the user needs an Android phone running 5.0 (Lollipop) or higher.
- Connect a compatible Android phone via the USB cable to the portable media interface, or
- Pair the Android phone via Bluetooth® to enable wireless Android Auto.
- Follow the steps indicated on the touchscreen. See PORTABLE MEDIA CONNECTIONS, See CONNECTING A MEDIA DEVICE and See PAIRING AND CONNECTING USING THE PHONE.
Android Auto is designed to work using voice control as much as possible. A Google voice session can be started either from the Android Auto screen or through a long press of the steering wheel voice button.
A short press of the voice button will start a vehicle native voice control session. See USING VOICE CONTROL.
For further information on Android Auto please visit www.android.com/auto.
APPLE CAR PLAY
Apple CarPlay® is only compatible with an iPhone® 5 and above running iOS 7.1 and above.
Apple® and iPhone® are registered trademarks of Apple Inc., registered in the US and other countries. App Store® is a service mark of Apple Inc.
Apple CarPlay is a feature designed to give the user access to core iPhone features while driving, e.g., music, phone calls, Siri, messaging, and navigation with safety in mind. The feature is designed to minimize distraction so that the user can remain focused on the road.
To access Apple CarPlay, the user needs an iPhone 5 and above running iOS 7.1 and above.
- Connect a compatible iPhone via the USB cable to the portable media interface, or
- Pair the iPhone via Bluetooth® to enable wireless Apple CarPlay.
- Follow the steps indicated on the touchscreen. See PORTABLE MEDIA CONNECTIONS, See CONNECTING A MEDIA DEVICE and See PAIRING AND CONNECTING USING THE PHONE.
Apple CarPlay is designed to work using voice control as much as possible. A Siri voice session can be started either from the Apple CarPlay screen or through a long press of the steering wheel voice button.
A short press of the voice button will start a vehicle native voice control session. See USING VOICE CONTROL.
For further information on Apple CarPlay please visit the Apple website at: www.apple.com.
DECLARATION OF CONFORMITY
The product contains commodities, technology, or software exported from the United States (US) in accordance with the Export Administration regulations. Diversion contrary to US or Canadian law is prohibited.
This device complies with part 15 of the FCC Rules. Operation is subject to the following two conditions:
- This device may not cause harmful interference, and
- this device must accept any interference received, including interference that may cause undesired operation.
The manufacturer is not responsible for any radio or TV interference caused by unauthorized modifications to this equipment. Such modifications could void the user’s authority to operate the equipment.
The device complies with Industry Canada Standard IC-RSS-210 and IC-RSS-251.
Operation is subject to the following two conditions:
- this device may not cause interference, and
- this device must accept any interference, including interference that may cause undesired operation of the device.
The equipment complies with FCC/IC radiation exposure limits set forth for uncontrolled equipment and meets the FCC Radio Frequency (RF) Exposure Guidelines in Supplement C to OET65 and RSS-102 of the IC Radio Frequency (RF) Exposure rules. The equipment has very low levels of RF energy that is deemed to comply without Maximum Permissive Exposure evaluation (MPE).
But it is desirable that it should be fitted and operated with at least 8 in (20 cm) and more between the radiator and person’s body, excluding extremities: hands, wrists, feet, and ankles.
USA FCC ID: A269ZUA130.
Canada IC: 700BIAM2101.
Changes or modifications, not expressly approved by the party responsible for compliance, could void the user’s authority to operate the equipment.
The equipment has been tested and found to comply with the limits for a Class B digital device, pursuant to Part 15 of the FCC Rules. The equipment limits are designed to provide reasonable protection against harmful interference in a residential fitment.
The equipment generates, uses, and can radiate Radio Frequency (RF) energy. When not fitted and used in accordance with the instructions, the equipment may cause harmful interference to radio communications. However, there is no guarantee that interference will not occur in a particular fitment.
If the equipment causes harmful interference to radio or television reception, when turning the equipment off and on. The user is encouraged to try to correct the interference by one or more of the following measures:
- Reorient or relocate the receiving antenna.
- Increase the separation between the equipment and the receiver.
- Connect the equipment into an outlet on a circuit different from that to which the receiver is connected.
- Consult the retailer/authorized repairer or an experienced radio/TV technician for help.