
2022 Kawasaki KX450X Throttle Body Assy

Throttle Body Assy
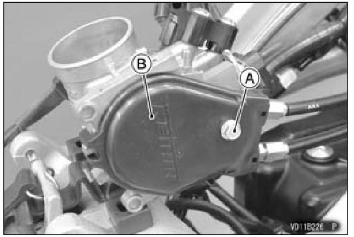
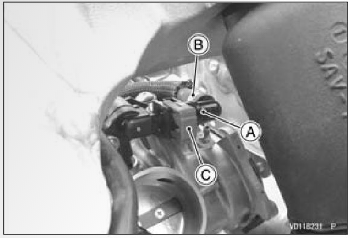
Idle Speed Adjustment
- Thoroughly warm up the engine.
- Turn the idle adjusting screw/choke knob to adjust the idle speed 2 250 2 350 r/min (rpm) by using the engine revolution tester (The tester should be followed the method described by the manufacturer.).
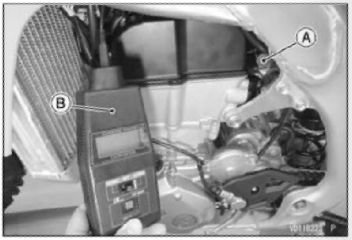
A. Idle Adjusting Screw/Choke Knob
B. Tester
- Open and close the throttle a few times to make sure the idle speed does not change and readjust if necessary.
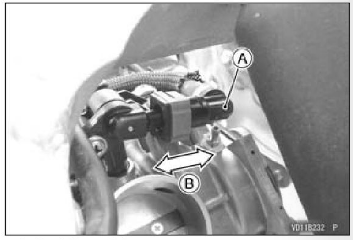
- With the engine idling, turn the handlebar both ways and check if handlebar movement changes the idle speed. If so, the throttle cable may be improperly adjusted, incorrectly routed, or damaged.
- Be sure to correct any of these conditions before riding.
WARNING
Operation with damaged cables could result in unsafe riding condition. Replace damaged control cables before operation.
NOTICE
This motorcycle’s radiator does not incorporate a cooling fan. Prolonged idling of the engine with no airflow through the radiator can cause coolant loss and engine overheating resulting in possible engine damage. Any riding conditions that increase engine temperature will further reduce idling time before coolant loss occurs. These conditions include high ambient temperature, sandy or muddy terrain, or other conditions causing high engine loads at low speeds. Furthermore, warming the engine up excessively before operation, or leaving idling with the hot engine temperature after operation results in the engine overheating, too.
Cleaning the Throttle Body Assy
- Remove the seat (see Spark Plug section)
- Remove the left side cover (see Air Cleaner section).
- Remove the right side cover (see Exhaust System section).
- Remove the fuel tank (see Spark Plug section).
- Loosen the muffler clamp bolt.
- Remove the muffler mounting bolts, and pull out the muffler body backward.
A. Muffler Clamp Bolt
B. Muffler Mounting Bolts
C. Muffler Body
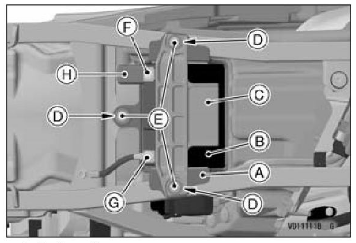
- Disconnect the negative (-) cable from the negative(-) terminal.
- Slide the red cap from the positive (+) terminal.
- Disconnect the positive (+) cable from the positive terminal
- Remove the bolts, collars, and battery holder.
- Take the battery with the battery case.
A. Red Cap
B. Negative (-) Terminal
C. Positive (+) Terminal
D. Bolts
E. Collars
F. Battery Holder
G. Battery
H. Battery Case
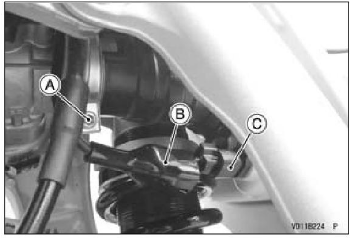
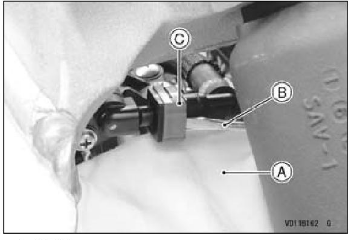
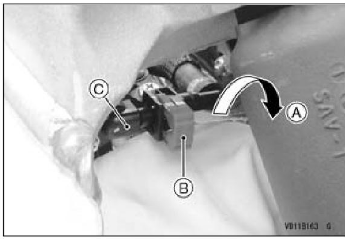
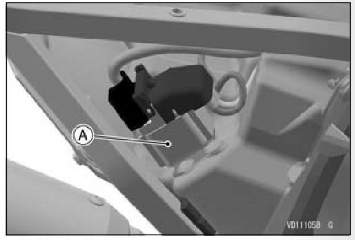
- Remove the starter relay.
A. Starter Relay
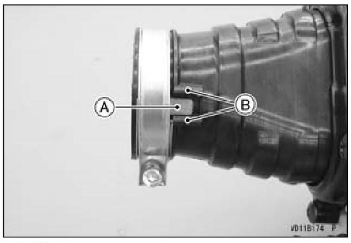
- Loosen the air cleaner duct clamp bolt.
- Slide the dust cover, and disconnect the intake air temperature sensor connector.
A. Air Cleaner Duct Clamp Bolt
B. Dust Cover
C. Intake Air Temperature Sensor Connector
- Remove the main relay.
- Open the clamp.
- Free the main harness and starter motor cable from the holder.
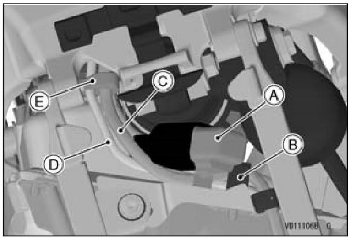
A. Main Relay
B. Clamp
C. Main Harness
D. Starter Motor Cable
E. Holder
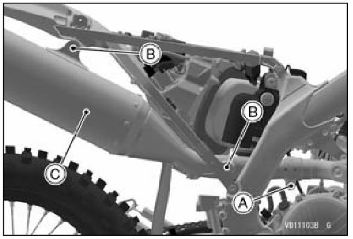
- Remove the rear frame mounting bolts on both sides.
- Pull the rear frame rearward with the air cleaner housing.
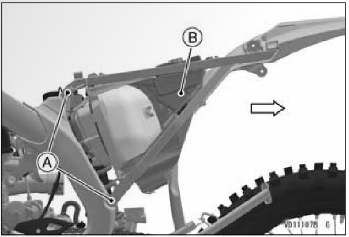
A. Rear Frame Mounting Bolts
B. Air Cleaner Housing
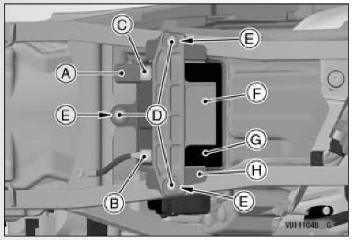
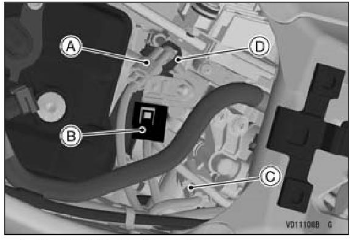
- Disconnect the throttle sensor connector.
- Disconnect the intake air pressure sensor connector.
- Disconnect the fuel injector connector.
- Open the clamp.
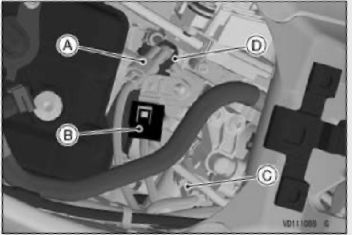
A. Throttle Sensor Connector
B. Intake Air Pressure Sensor Connector
C. Fuel Injector Connector
D. Clamp
- Be sure to place a piece of cloth around the fuel hose joint.
- Wipe off the dirt on the surface around the connection using a cloth or a soft brush.
- Insert a flat-tip screwdriver into the slit on the joint lock.
A. Cloth
B. Flat Tip Screwdriver
C. Joint Lock
- Turn the driver to disconnect the joint lock.
- Disconnect the fuel hose joint from the delivery pipe.
A. Turn
B. Joint Lock
C. Fuel Hose Joint
- Cover the delivery pipe and the fuel hose joint with the vinyl bags to keep them clean.
- Loosen the throttle body assy clamp bolt.
- Pull the throttle body assy from the holde
A. Throttle Body Assy Clamp Bolt
- Open the clamp.
- Remove the bolts.

A. Clamp
B. Bolts
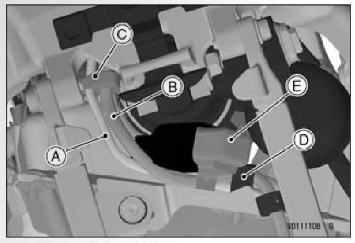
- Remove the throttle pulley cover bolt and take off the throttle pulley cover.
A. Throttle Pulley Cover Bolt
B. Throttle Pulley Cover
- Loosen the decelerator cable bolt locknut, and free the tip of the cable’s lower end.
- Loosen the accelerator cable bolt, and free the tip of the cable lower end.
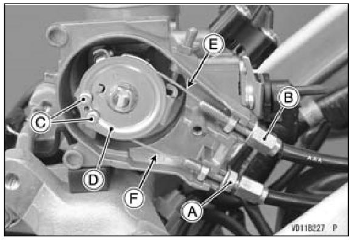
A. Decelerator Cable Bolt Locknut
B. Accelerator Cable Bolt
C. Tips of Throttle Cable Lower Ends
D. Throttle Pulley
E. Accelerator Cable
F. Decelerator Cable
NOTICE
Never drop the throttle body assy, especially on a hard surface. Such a shock to the body assy can damage
- After removing the throttle body assy, cover the throttle body assy holder and air cleaner duct with a clean cloth to protect them from dirt.
- Clean the throttle body assy.
- Check the throttle bore at the throttle valve for carbon deposits by opening the throttle valve.
- If any carbon accumulates, wipe the carbon off the throttle bore and the throttle valve, using a lint-free cloth penetrated with a high flash-point solvent.
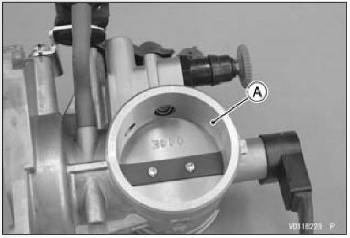
A. Throttle Bore
NOTICE
If dirt gets through into the engine, excessive engine wear and possibly engine damage will occur.
- Lubricate the lower ends of the throttle cables.
- Install the tip of the accelerator cable lower end to the throttle pulley.
- Install the accelerator cable so that the position of the claw of the washer is as shown.
- Tighten the accelerator cable bolt to the specified torque.
- Tightening Torque
- Accelerator Cable Bot:
- 3.0 Nm (0.31 kgfm, 27 in-lb)
- Accelerator Cable Bot:
- Install the tip of the decelerator cable lower end to the throttle pulley.
- While holding the decelerator cable bolt, tighten the cable bolt locknut to the specified torque.
- Tightening Torque
- Decelerator Cable Boit Locknut:
- 3.0 Nm (0.31 kgfm, 27 lb)
- Decelerator Cable Boit Locknut:
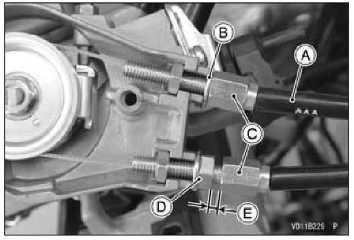
A. Accelerator Cable
B. Claw of Washer
C. Cable Bolts
D. Decelerator Cable Bolt Locknut
E. 2 t1 mm (0.08 t0.04 in.)
- Install the throttle pulley cover and tighten its bolt to the specified torque.
- Tightening Torque
- Throttle Pulley Cover Bolt:
- 4.0 Nm (0.41 kgf m, 35 in-lb)
- Throttle Pulley Cover Bolt:
WARNING
Operation with improperly adjusted, incorrectly routed, or damaged cables could result in an unsafe riding condition. Be sure the control cables are adjusted and routed correctly and are free from damage.
- Install the throttle body assy to the throttle body assy holder. Align the projection with the groove.
- Check the throttle body assy is installed securely.
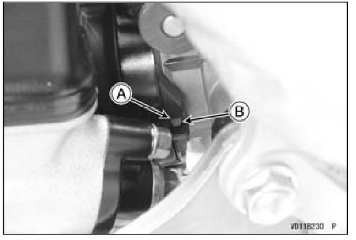
A. Groove
B. Projection
- Tighten the throttle body assy clamp bolt to the specified torque.
- Tightening Torque
- Throttle Body Assy Clamp Bolt:
- 1.1 Nm (0.11 kgfm, 9.7 in-ib)
- Throttle Body Assy Clamp Bolt:
- Check the joint lock for deformation and wear.
- If the joint lock is deformed, replace the fuel hose with a new one.
- Apply engine oil to the fuel delivery pipe lightly.
- Insert the fuel hose joint straight onto the delivery pipe.
- Check the paint mark of the hose on the throttle body assy side.
- Push the joint lock until the hose joint clicks.
A. Fuel Hose Joint
B. Mark Paint
C. Joint Lock
- NOTICE
When installing the fuel hose joint, do not apply strong force to the delivery pipe on the throttle body assy. The pipe made from resin could be damaged. - Push and pull the fuel hose joint back and forth more than two times, and make sure it is locked and does not come off.
A. Fuel Hose Joint
B. Push and Pull
WARNING
Leaking fuel can cause a fire or explosion resulting in serious burns. Make sure the hose joint is installed correctly on the delivery pipe by sliding the joint.
NOTE
If it comes off, reinstalls the fuel hose joint.
- Connect the intake air pressure sensor connector,
- fuel injector connector, and throttle sensor connector.
- Run the starter motor cable and throttle position sensor lead into the clamp.
A. Throttle Sensor Connector
B. Intake Air Pressure Sensor Connector
C. Fuel Injector Connector
D. Clamp
- Position the claw on the air cleaner duct clamp between the projections.
A. Claw
B. Projections
- Install the rear frame with the air cleaner housing to the throttle body assy.
- Check the duct is installed securely.
- Run the main harness and starter motor cable into the holder.
- Hold the main harness and starter motor cable with the clamp.
- Install the main relay.
A. Starter Motor Cable
B. Main Harness
C. Holder
D. Clamp
E. Main Relay
- Tighten the air cleaner duct clamp bolt to the specified torque.
- Tightening Torque
- Air Cleaner Duct Clamp Bolt:
- 2.2 N-m (0.22 kgfm, 19 in-lb)
- Air Cleaner Duct Clamp Bolt:
- Tighten the rear frame mounting bolts to the specified torque.
- Tightening Torque
- Rear Frame Mounting Bolts:
- 35 Nm (3.6 kgfm, 26 ftlb)
- Rear Frame Mounting Bolts:
- Install the starter relay.
A. Starter Relay
- Place the battery case and battery.
- Install the battery holder and collars, and tighten the bolts to the specified torque.
- Connect the positive (+) cable to the positive (+) terminal.
- Cover the positive (+) terminal with the red cap.
- Connect the negative (-) cable to the negative () terminal.
A. Battery Case
B. Battery
C. Battery Holder
D. Collars
E. Bolts
F. Positive (+) Terminal
G. Negative (-) Terminal
H. Red Cap
- Tightening Torque
- Battery Holder Bolts:
- 8.0 Nm (0.82 kgfm, 71 in-lb)
- Battery Terminal Screws:
- 4.5 Nm (0.46 kgfm, 40 in-lb)
- Battery Holder Bolts:
- Install the fuel tank (see Spark Plug section).
- Install the muffler (see Exhaust System section).
- Install the removed parts.
- Open and close the throttle a few times to make sure the grip operates correctly.
- Check the throttle cable play and idle speed adjustment.