2022 Kawasaki KX450X Clutch
Clutch
The motorcycle is equipped with a hydraulically operated clutch that requires no adjustment except fluid level inspection and clutch lever position.
Clutch Lever Position Adjustment
- The clutch lever position can be adjusted to suit the rider’s preference.
- To adjust the clutch lever position, slide the clutch lever dust cover back, loosen the locknut, and turn the adjuster to either side with a wrench.
- After adjustment, tighten the locknut securely.
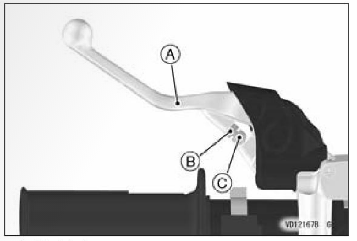
A. Clutch Lever
B. Locknut
C. Adjuster
- .Start the engine and check that the clutch does not slip and that it releases properly.
WARNING
Air in the clutch lines diminishes clutch performance and can cause an accident resulting in injury or death. If the clutch lever feels mushy when it is applied, there might be air in the clutch lines or the clutch may be defective. Has the clutch been checked immediately by an authorized Kawasaki dealer?
Clutch Fluid
- Inspect the clutch fluid level in the clutch reservoir and change the clutch fluid in accordance with the
- Periodic Maintenance Chart. The clutch fluid should also be changed when contaminated with dirt or water.
- Use only heavy-duty clutch fluid as follows.
- Clutch Fluid: DOT4
NOTICE
- Do not spill clutch fluid onto any painted surface.
- Do not use fluid from a container that has been left open or that has been unsealed for a long time.
- Check for fluid leakage around the clutch system fittings.
- Check for clutch hose damage.
Clutch Fluid Level Inspection
- With the clutch fluid reservoir positioned horizontally, the clutch fluid must always be at the upper level.
- If the clutch fluid in the reservoir is low, check for fluid leaks in the clutch line and fill the reservoir to the upper-level line.
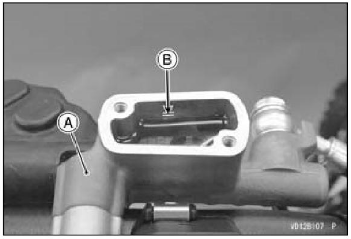
A. Clutch Fluid Reservoir
B. Upper-Level Line
WARNING
Mixing brands and types of hydraulic fluid can reduce the clutch system’s effectiveness and cause an accident resulting in injury or death. Do not mix two brands of hydraulic fluid. Change the hydraulic fluid in the clutch line completely if the hydraulic fluid must be refilled but the type and brand of the hydraulic fluid that is already in the reservoir are unidentified.
Friction and Steel Plates Removal
- Drain the engine oil (see Engine Oil section).
- Remove the brake pedal bolt and the rear brake pedal return spring.
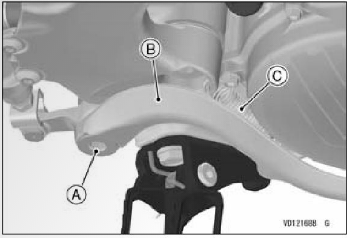
A. Brake Pedal Bolt
B. Brake Peda
C. Return Spring
- Remove the clutch cover bolts.
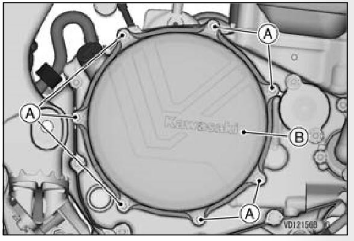
A. Clutch Cover Bolts
B. Clutch Cover
- Remove the clutch cover and its O-ring.
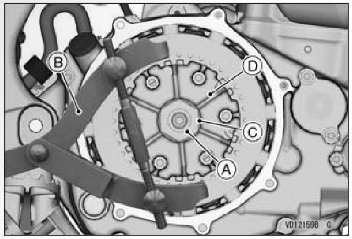
- Loosen the clutch spring bolts evenly little by little to prevent tilting the stopper plate.
- Remove the clutch spring bolts, holders, stopper plate, clutch spring, and clutch pressure plate.
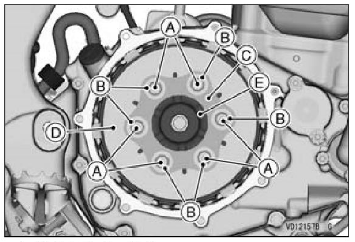
A. Clutch Spring Bolts
B. Holders
C. Stopper Plate
D. Clutch Spring
E. Clutch Pressure Plate
NOTE
Do not loosen each clutch spring bolt separately to prevent the stopper plate warpage.
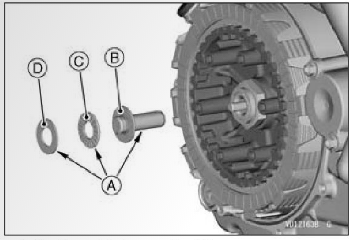
- Remove the washer, needle bearing, and push rod holder.
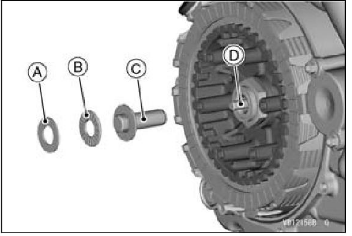
A. Washer
B. Needle Bearing
C. Push Rod Holder
D. Push Rod
NOTE
Do not remove the push rod. If the push rod is removed, clean the clutch slave cylinder and replace the O-rings of the clutch slave cylinder. Clutch slave cylinder disassembly should be serviced by referring to the Service Manual or an authorized Kawasaki dealer.
- Remove the friction plates and steel plates.
NOTE
There are 3 different friction plates installed in the clutch plate assembly
- When servicing the clutch, mark to identify each friction plate before removing them so that they can be reinstalled in the correct positions.
- Remove the clutch hub nut using the clutch holder (special tool: 57001-1900) to prevent to use permanently the hub from rotating.
- Remove the clutch hub.
A. Clutch Hub Nut
B. Clutch Holder (Special Tool: 57001-1900)
C. Spacer
D. Clutch Hub
Friction and Steel Plates Wear/Damage Inspection
- Visually inspect the friction and steel plates to see if they show any signs of a seizure or uneven wear.
- If any plates show signs of damage, replace all friction plates and steel plates as a set.
- Measure the thickness of the friction plates at several points with vernier calipers.
- If they have worn past the service limit, replace them with new ones.
Friction Plate Thickness Measurement
Friction plate B and C

Friction plate D

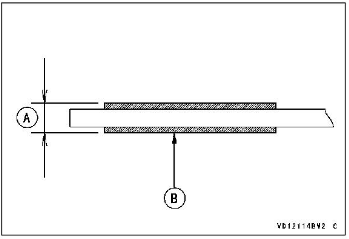
A. Thickness
B. Friction Plate
Measure the clutch plate assembly length. When measuring the clutch plate assembly length, assemble the clutch plate assembly (clutch hub, spring seat, spring, friction plates, steel plates, clutch pressure plate, clutch spring, stopper plate, holders, clutch spring bolts).
Tightening Torque
- Clutch Spring Bolts:
- 9.0 Nm (0.92 kgfm, 80 in-lb)
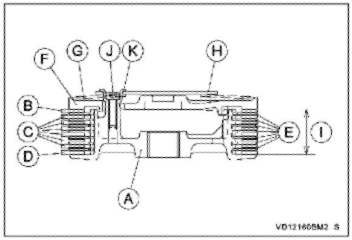
A. Clutch Hub
B. Friction Plate (Identification paint color: Pink)
C. Friction Plate (identification paint color: Green)
D. Friction Plate (identification paint color: Blue)
E. Steel Plates
F. Clutch Pressure Plate
G. Clutch Spring
H. Stopper Plate
L. Standard Length
J. Clutch Spring Bolts
K. Holders
Clutch Plate Assembly Measurement

- If they have worn past the service limit, replace all friction plates with new ones.
- If the friction plates are replaced, measure the clutch plate assembly length, and use the steel plates in the following table so that the clutch plate assembly length is standard.
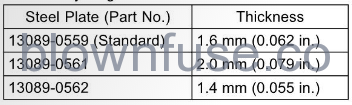
NOTE
Do not use the steel plate of 2.0 mm (0.079 in.) and 1.4mm (0.055 in.) thickness at the same time.
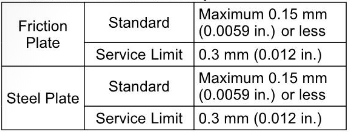
Friction and Steel Plate Warp Inspection
Place each friction plate and steel plate on a surface plate, and measure the amount of friction plate and steel plate warp with a thickness gauge (i.e., the gap between the surface plate and each friction plate or steel plate).
If any plate is warped over the service limit, replace it with a new one.
Friction and Steel Plate Warp
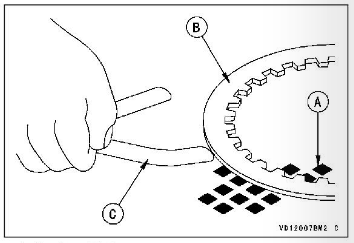
A. Surface Plate
B. Friction or Steel Plate
C. Thickness Gauge
Clutch Hub Installation
- Install all parts in the reverse order of removal.
- Install the clutch hub.
- Install the spacer with the “OUTSIDE” is facing outside.
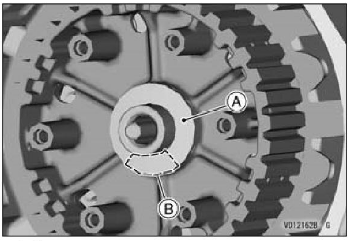
A. Spacer
B. “OUTSIDE”
- Replace the clutch hub nut with a new one.
- Tighten the clutch hub nut with using the clutch holder (special tool: 57001-1900) to the specified torque.
Tightening Torque
- Clutch Hub Nut:
- 100 Nm (10.2 kgfm, 73.8 ft-lb)
Friction and Steel Plate Installation
- Install all parts in the reverse order of removal.
- Install the friction plates and steel plates, alternating between the two; be sure to start and finish with a friction plate.
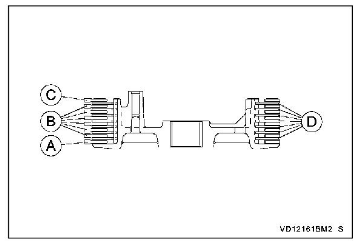
A. Friction Plate (identification paint color: Blue)
B. Friction Plate (identification paint color: Green)
C. Friction Plate (identification paint color: Pink)
D. Steel Plates
NOTICE
If dry steel plates and friction plates are installed, apply engine oil to the surfaces of each plate to avoid clutch plate seizure.
- Apply molybdenum disulfide grease to the contact area of the push rod holder, both surface of the needle bearing and washer.
- Install the push rod holder, needle bearing, and washer
A. Apply molybdenum disulfide grease.
B. Push Rod Holder
C. Needle Bearing
D. Washer
If the holders are damaged, replace it.
- Install the clutch pressure plate, clutch spring, stopper plate, and holders.
- Tighten the clutch spring bolts evenly with little by little to the specified torque to prevent tilting the stopper plate.
NOTE
Do not tighten each clutch spring bolt separately to prevent the stopper plate from warpage.
- Tightening Torque
- Clutch Spring Bolts:
- 9.0 N m (0.92 kgf m, 80 in-lb)
- Clutch Spring Bolts:
- Replace the O-ring with a new one.
- Apply grease to the new O-ring and install it to the clutch cover.
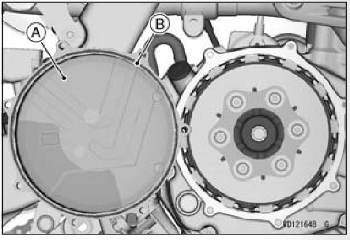
A. Clutch Cover
B. O-ring
- Install the clutch cover to the right engine cover and tighten its bolts to the specified torque.
- Tightening Torque
- Clutch Cover Bolts:
- 12 N m (1.2 kgfm, 106 in-lb)
- Clutch Cover Bolts:
- Install the return spring.
- Replace the O-rings on the brake pedal bolt with new ones and install them.
- When installing the brake pedal, apply the grease to the contact area of the brake pedal pivot and apply a non-permanent locking agent to the threads of the brake pedal bolt.
- Tightening Torque
- Brake Pedal Bolt:
- 25 Nm (2.5 kgfm, 18 ft:lb)
- Brake Pedal Bolt:
- Pour the engine oil (see Engine Oil section).