
2022 XC90 Volvo Maintenance and service

Recommended maintenance for camera and radar units
The following illustrations mark out the surfaces to be kept clean – on both the left and right-hand sides of the car.
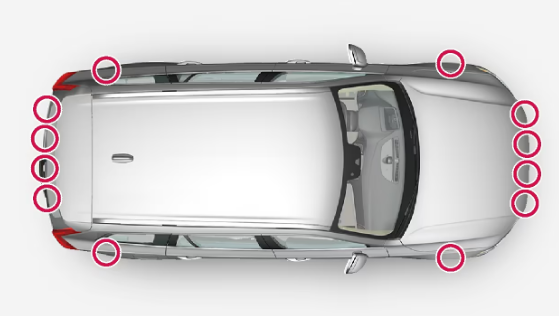 Location of the parking sensors around the car
 Location of front camera and radar unit
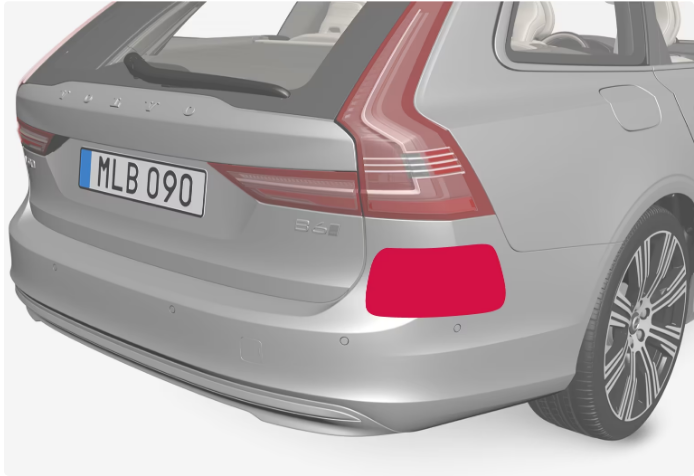 Location of rear radar units
- To ensure the best possible functionality, the surfaces in front of the sensors must be kept clean.
- Do not affix any objects, tape, or labels in the area of the sensors.
- Clean camera lenses regularly with lukewarm water and car shampoo – be careful not to scratch the lenses.
Important
Maintenance of driver support components must only be performed at a workshop – an authorized Volvo workshop is recommended.
Brake system maintenance
To keep the car as safe and reliable as possible, follow the Volvo service intervals as specified in the Service and Warranty Booklet. After replacing brake linings and brake discs, the braking effect is only adapted after they have been “worn in” for a few hundred kilometers (miles). Compensate for the reduced braking effect by depressing the brake pedal harder. Volvo recommends only fitting brake linings that are approved for your Volvo.
Contact a workshop for information about the procedure or engage a workshop to carry out the inspection – an authorized Volvo workshop is recommended.
Operational disruption
Some functions have limitations in particular situations and require that certain conditions are fulfilled in order to work. The driver display and the center display may show messages in order to inform about such a situation.
Find out more about fault tracing and the limitations of various functions in the related articles below.
If the car is not drivable
Activate the hazard warning flashers if the car has broken down or been forced to stop unexpectedly in a trafficked environment. Think about safety and, if possible, move the car out of danger from traffic. Put on a reflective vest and then position the warning triangle so that other road users are warned in good time. Call roadside assistance if the cause cannot be remedied at your location.
Data transfer between car and workshop via Wi-Fi
During a workshop visit, your service technician can perform fault-tracing and update software via the network.
Connection with a key
Press three times on the lock button on the key to connect the car to the workshop’s network. Connection is normally handled by the service technician.
When the car is connected to a Wi-Fi network, the ![]() symbol appears in the center display.
symbol appears in the center display.
It is not possible to use the key to connect to other Wi-Fi networks.
Warning
The car must not be driven when connected to the workshop’s networks and systems.
Raise the car
 Arrows along the bottom edge of the side of the car mark where the jacking points/lifting points (marked in red) are located.
The normal car jack is only designed for occasional, short-term use, such as when changing a wheel after a puncture. If the car is to be jacked up more often, or for a longer time than is required just to change a wheel, use of a garage jack is recommended. In this instance, follow the instructions for use that come with the equipment.
- Apply the parking brake and set the gear selector in Park position (P).
- Chock the wheels standing on the ground using solid wood blocks or large stones.
- Check that the jack is not damaged, that the threads are thoroughly lubricated and that it is free from dirt.
- Check that the jack is resting on a firm, level surface that is not slippery and is not slanted.
- The jack must be correctly attached in the jack’s bracket.
- Never position anything between the ground and the jack, or between the jack and the car’s jacking point.
- Passengers must leave the car when it is raised on the jack.
- If a wheel must be changed in a trafficked environment, passengers must stand in a safe place.
- Use a jack designed for the car when changing tires. Use supports to secure the car for all other work.
- Never crawl underneath the car and do not extend any part of your body under the car when it is raised by a jack.
Warning
- If the car is raised using a workshop jack, this must be placed beneath one of the four jacking points.
- Take care to position the workshop jack so that the car cannot slip off.
- Make sure that the jack plate is fitted with a rubber guard so that the car remains stable and is not damaged.
- Always use axle stands or similar.
- When not in use, the jack should be stored in its stowage space under the cargo area floor.
- Read through all instructions before beginning. Take out the tools needed before jacking up the car.
- Set up the warning triangle and activate the hazard warning lights if, for example, a tire is being changed in a trafficked location.
- Apply the parking brake and engage gear position P, or engage first gear if the car has a manual gearbox.
Note
- This applies to cars with level control: If the car is equipped with air suspension, this must be disabled before the car is raised.
- Chock in front of and behind the wheels that remain on the ground. Use, for example, heavy wooden blocks or large stones.
- Position the jack or the lift arms at the designated spots of the car’s undercarriage.
- Arrows along the bottom edge of the side of the car park where the jacking points/lifting points are located.
- There are two jacking points on each side of the car.
- There is a recess for the jack at each point.
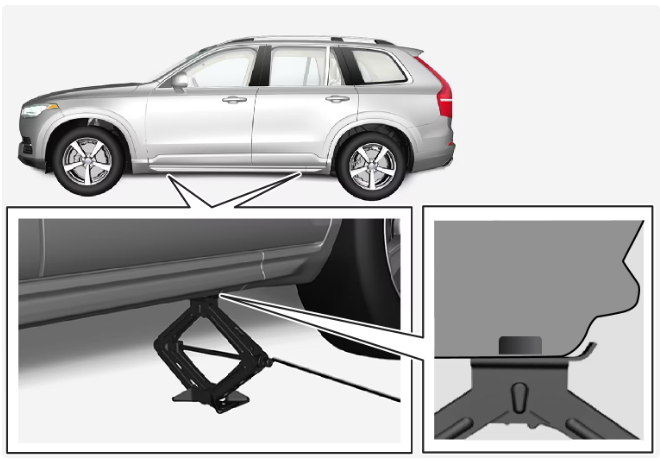 Position the jack on level, firm, and non-slippery ground under the jacking point that will be used.
- Crank up until it is correctly aligned so that it makes contact with the car’s jacking point.
- Check that the head of the jack (or lifting arms at a workshop) is correctly positioned in the jacking point so that the bump in the center of the head fits into the jacking point hole, and check that the base of the jack is positioned vertically below the jacking point.
- Turn the jack so that the crank is as far away from the side of the car as possible, at which point the jack’s arms are perpendicular to the direction of the car.
- Raise the car high enough to perform the intended measure.