2023 Volvo XC40 Recharge Pure Electric Bulb replacement
Replacing the rear direction indicator bulb
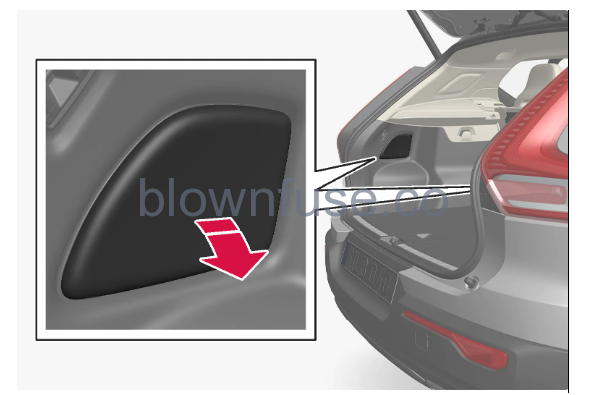
Bulbs for rear direction indicators are located behind the panel in the side of the cargo area.
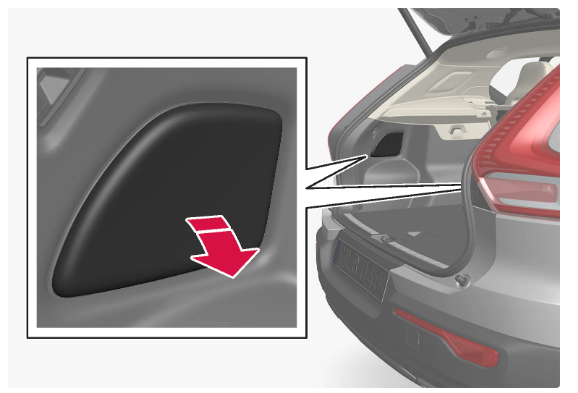
- Press in the panel hatch at the upper edge to detach it.
- Move the insulation aside to access the supporting bridge.

- Unscrew and remove the spring bolt anticlockwise, press the clips into the sides and remove the supporting bridge. It is easiest to allow the screw to remain in the supporting bridge.
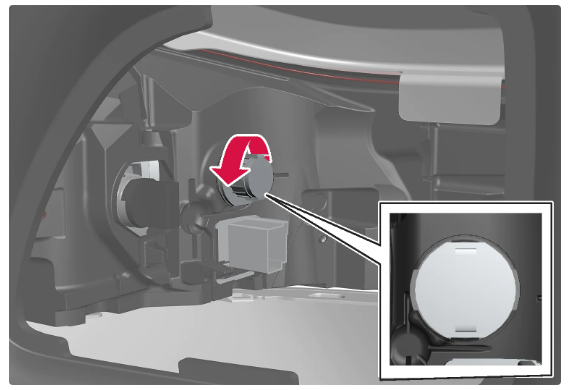
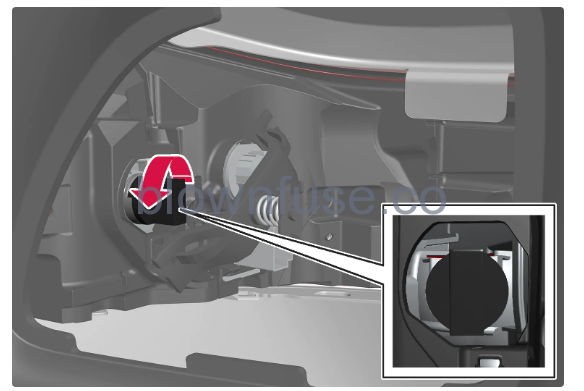
- Undo the grey bulb holder by turning it anticlockwise and pulling it out.
- Remove the bulb by pressing it in and turning it anticlockwise.
- Fit a new bulb by pressing it in and turning it clockwise.
- Attach the bulb holder by turning it clockwise.
- Fit the supporting bridge with the associated spring bolt and make sure that the clips align in the correct position. Tighten the spring bolt until it stops, max. 2 Nm (1.5 ft lbs).
- Move back the insulation and then hook in the panel and press it back into place.
Changing the brake light bulb
Bulbs for brake lights are located behind the panel in the side of the cargo area.
- Press in the panel hatch at the upper edge to detach it.
- Move the insulation aside to access the brake light bulb.
- Undo the black bulb holder by turning it anticlockwise and pulling it out.
- Remove the bulb by pressing it in and turning it anticlockwise.
- Fit a new bulb by pressing it in and turning it clockwise.
- Attach the bulb holder by turning it clockwise.
- Move back the insulation and then hook in the panel and press it back into place.
Replacing the rear fog lamp bulb
The rear foglight is fitted in the rear bumper on the driver’s side.
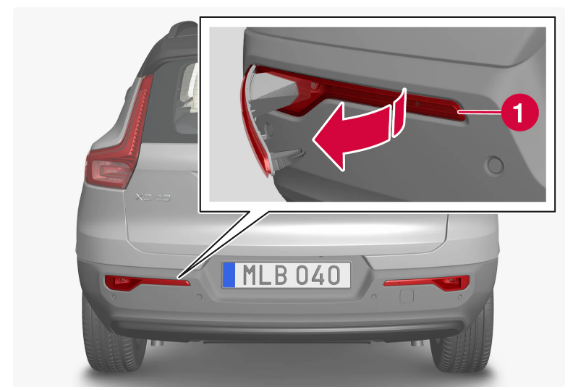
The rear fog light is only fitted on the driver’s side.
- Loosen the foglight unit on the driver’s side by inserting a flat object, such as a table knife or a screwdriver, on the bulb kit’s narrower short side of the keypad and then prize the foglight unit out.
- Unplug the connector.
- Undo the bulb holder by turning it anticlockwise and pulling it out.
- Remove the bulb by pressing it in and turning anticlockwise.
- Fit a new bulb by pressing it in and turning it clockwise.
- Attach the bulb holder by turning it clockwise.
- Plug in the connector.
- Insert the hook on the wide part of the foglight unit in the rear bumper and rotate the unit inwards so that the clips engage.
Bulb replacement
Lamp types vary depending on model and equipment level. If a bulb breaks, it can be replaced according to the method described in the Owner’s Manual.
- Contact a workshop if faults occur in lamps other than bulbs.
- If a fault occurs in LED lamps, the entire lamp unit usually must be replaced.
Exterior lamp positions
The exterior lighting of the car uses a number of different lamps. An LED-type lamp must be replaced by a workshop. An authorized Volvo workshop is recommended.
Lamps, front
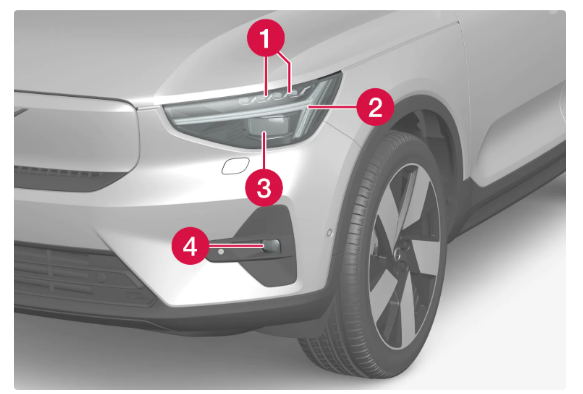
- Main beam/dipped beam (LED)
- Daytime running lights/position lamps/direction indicators (LED)
- Pixel module for main beam and dipped beam (LED)
- Front fog lamps/cornering lights (LED)
Lamps, rear
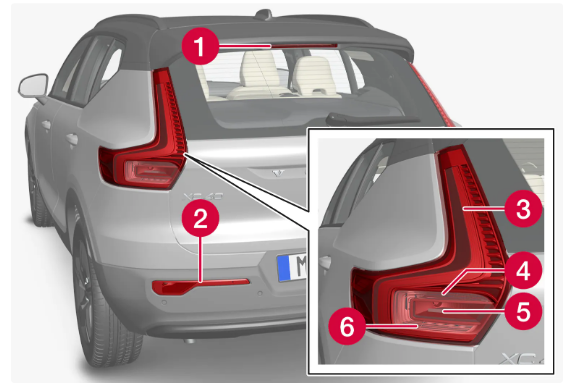
- Brake light – central, high-level (LED)
- Fog lamp
- Position lamps (LED)
- Direction indicators
- Brake lights
- Reversing lamps (LED)
Bulb specifications
Specifications for replaceable bulbs.
- Contact a workshop if faults occur in lamps other than bulbs. If a fault occurs in LED lamps, the entire lamp unit usually must be replaced.
| Function | W | Type |
|---|---|---|
| Rear direction indicators | 24 | PY24W |
| Brake lights | 21 | H21W LL |
| Rear fog lamp | 21 | H21W LL |
Checking trailer lamps
When connecting a trailer – check that the trailer lamps work before departure.
Checking trailer lamps
Automatic checkingAfter a trailer is connected electrically, it is possible to ensure that the trailer lamps are working via an automatic lamp activation. The function helps the driver check that the trailer lamps are working before starting off.
- When a trailer is connected to the towbar, Perform a trailer lamp check. the message is shown in the driver display.
- Confirm the message by pressing the right-hand steering wheel keypad’s O button.
- The lamp check starts.
- Exit the car to check lamp functionality.
- All trailer lamps start to flash – then the lamps are switched on one at a time.
- Visually check that all lamps available on the trailer are operational.
- After a moment, all lamps on the trailer flash again.
- The check is complete.
If one or more of the trailer’s direction indicators or brake light bulbs is broken, the driver display shows a symbol and a message. Other lights on the trailer must be checked manually by the driver before setting off.
| Symbol | Message |
|---|---|
 |
Right trailer turn indicator malfunction
Left trailer turn indicator malfunction |
 |
Trailer brake light malfunction |
If any lamp for the trailer’s direction indicators is broken, the driver display symbol for direction indicators will also flash more quickly than normal.