
The Toyota Genuine Dash Camera features a number of different recording modes:
The Infinite Loop: With a high quality, industrial grade micro SD card, the
footage will continuously record up to 170 minutes of 1080p HD footage
(Standard mode, Bit rate: 6.2 Mbps) in an infinite loop, allowing you to capture
every moment of your drive. The accompanying software will allow you to save
any footage to your smartphone using Wi-Fi data transmission or simply take the
microSD card out of the camera to save your files to your computer.
Incident
Recording: With the help of the G-sensor impact detection, the footage
will automatically lock on the microSD card for retrieval at a later time and you will
not have to worry about anything else but the safety of everyone involved.
Parking Surveillance: Shortly after impact, the
Dash Camera will record up to 60 seconds following
the impact and the file will be locked on the microSD
card.
Interesting event recording: At the push of a
button, automatically save 12 seconds before and
8 seconds after an event.
Adventure Mode: With Adventure mode, you
can manually save up to an hour of footage at the
highest quality video setting.
Operating Toyota Genuine Dash Camera
The Toyota Genuine Dash Camera is designed to provide a safe and memorable
driving experience in your Toyota vehicle. Safely record the on-goings of the
open road while keeping your eyes on the road. Never miss a moment in motion;
capture it! The Toyota Genuine Dash Camera will also allow you to record the
surroundings of your vehicle while it is parked.
Personal safety, as well as security for your Toyota vehicle, is our top priority.
The Dash Camera is safely installed on your front windshield. The camera will
automatically save and record data after impact in the event of a crash. The
camera automatically starts when the ignition power is on. When the vehicle is
stationary, you can access videos and change the settings via your smartphone
app or on your computer by inserting the camera’s microSD card.

(1) ACTION button: Protects the recording video. (Event protection) Press and hold for more than 1 second, the Adventure mode starts/stops.
(2) ERR LED (Amber) Indicates that the Dash Camera has a problem when it is
on or blinking. (See page 14.)
(3) REC LED (Green) Indicates that the Dash Camera is ready for recording when
the LED is on. (See page 15.)
(4) Micro SD card slot Insert the micro SD card to be used into this slot.
(5) Microphone Records audio. The microphone is built in the Dash Camera.
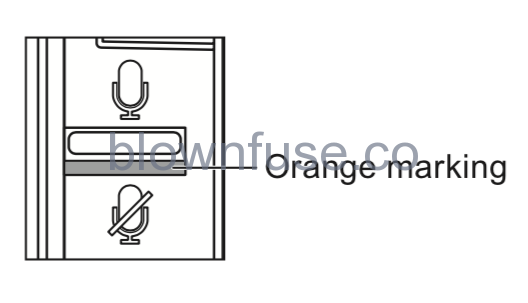
(6) Audio recording on/ off switch Switches on/off the audio recording.
(7) Side cover The camera is adjusted to an appropriate angle during installation to the vehicle. Do not touch the cover.
(8) Camera Records the video images.
(9) Wi-Fi password Default Wi-Fi password / Serial number. The same password written is in the back cover page.
NOTIFICATION BY LED INDICATOR AND BUZZER
This Dash Camera has a function to notify its condition with an ERR LED (amber), REC LED (green), and a buzzer. Symbols for LED conditions are as follows.

Abnormal Notification
This section describes the conditions, possible causes, and measures in case of abnormal conditions.
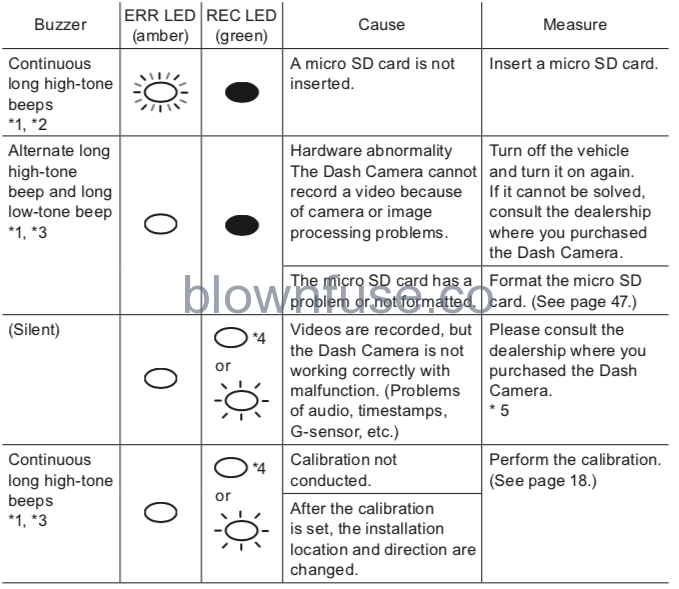
- *1: When the ACTION button is pressed, the buzzer stops. However, take note that the Dash Camera is not working.
- *2: The volume of the buzzer can be changed. The default volume setting is <High>. (See page 39 and 57.)
- *3: The volume is not adjustable.
- *4: It varies depending on the recorded condition of videos and audios.
- *5: After the vehicle battery is removed, the date and time data are returned to the default value. From the time of first activation after the GPS signal is received, the date and time data are corrected to the accurate data.
NOTIFICATION BY LED INDICATOR AND BUZZER
Normal Notification: This section describes LED and buzzer conditions while the Dash Camera is working correctly.
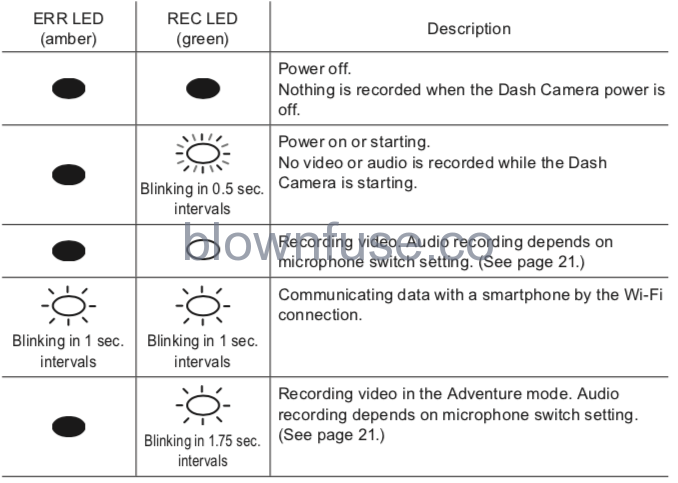
NOTE: During a power down process, the REC LED (green) lights up and then blinks.
NOTIFICATION BY LED INDICATOR AND BUZZER
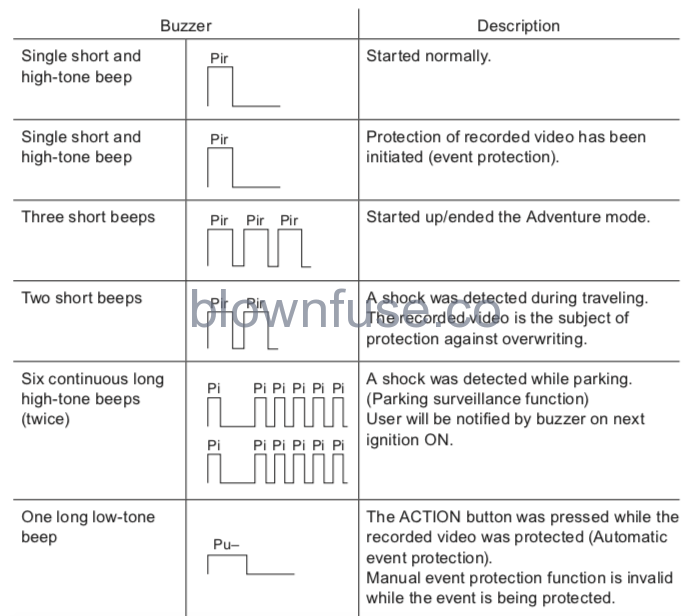
NOTE: The volume of the buzzer can be changed.
DASH CAMERA OPERATION
The Dash Camera records video, audio, location data from GPS into the micro SD card while driving. With the viewer software dedicated for this Dash Camera, video and audio can be played back as well as checking the location while driving in coordination with Google Maps. This section describes the procedure to use the Dash Camera.
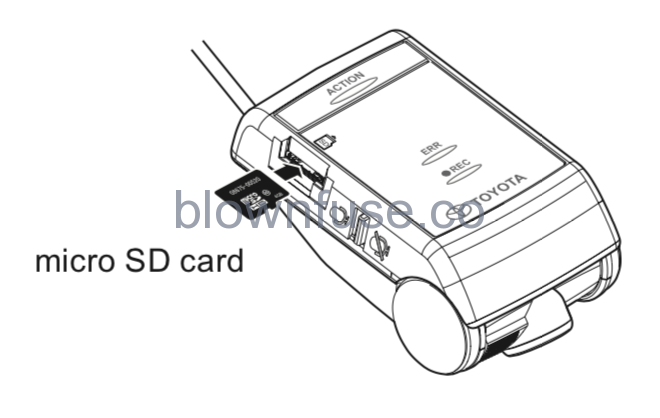
Inserting/Ejecting the micro SD card
Inserting the micro SD card
The Dash Camera does not work without insertion of a micro SD card. If the micro SD card is not inserted, insert the card while paying attention to the following items.
- Confirm that the Dash Camera power is off (LED is off).
Do not insert a micro SD card while the Dash Camera is running. Otherwise, the micro SD card may get damaged. - When inserting a micro SD card into the Dash Camera, check the direction of the card and insert it straight into the slot.
- Insert the micro SD card until you hear a click.
Ejecting the micro SD card
To play back recorded videos on a computer, eject the micro SD card. Gently push down the center of the micro SD card and then release it. The micro SD card pops out slightly.
- Never eject the micro SD card while the Dash Camera is accessing the card (LED is on or blinking). Otherwise it may damage not only the micro SD card but also the Dash Camera itself.
- Before ejecting the micro SD card, confirm that the Dash Camera power is off (LED is off).
- The Dash Camera does not work without insertion of a micro SD card. Be careful not to forget inserting a micro SD card. When the card slot is empty, you will hear continuous high-tone beeps.
DASH CAMERA OPERATION
When the calibration is not set, the buzzer sound of continuous high-tone long beep sounds at the time of startup.
- Park vehicle on flat surface. While holding down the ACTION button, turn on the ignition.
- Keep holding down the ACTION button for three seconds or longer.
When the calibration is set properly, a double high-tone short beep will sound. If the buzzer does not sound, set the calibration again.
Starting
The power of the Dash Camera is linked to the ignition key of the vehicle. While the power of the Dash Camera is off, confirm that the micro SD card is inserted.
1. Turn on the ignition key or the ignition of the vehicle.
The power turns on, and the REC LED (green) of the Dash Camera starts blinking and then turns on. (ERROR LED (amber) turns off)
When you hear a short and high-tone beep, startup is finished. However, if the buzzer setting is changed, the buzzer does not sound. (See page 39 and 57.)
NOTE
- Just after formatting the micro SD card (See page 47.), the Dash Camera creates files that are necessary for recording the videos. Therefore, the time until completion of the startup becomes longer.
- Recordingavideoisnotreadyuntilstartupisdone.TheDashCamerastarts recording just after startup is finished.
- When an abnormal vibration and/or a shock is detected while the vehicle is parked, the power turns on automatically. Then the Dash Camera records the video of surrounding area for approximately 60 seconds. (Parking surveillance function) (See page 20.) When the parking surveillance function is activated, a notification buzzer of one long high-tone beep and five short high-tone beep sounds twice at the next ignition ON. However, if the parking surveillance function is set off, the power does not turn on automatically.
Shutting Down
1. Turn off the ignition key or the ignition of the vehicle.
The recording ends and the LED turns off, the power is off.
NOTE
• LED may remain ON depends on camera setting [Surveillance Start Delay].
Recording Video and Audio
This Dash Camera is a constant-recording type drive recorder. The Dash Camera is turned on when the vehicle ignition is turned ON. When startup is done, the Dash Camera starts recording video and audio (if microphone switch is turned on). The REC LED (green) lights on while recording. When the ignition key or the ignition is turned off, recording is stopped. This Dash Camera has special video event recording modes to capture and protect important videos.
While driving, recorded videos are automatically protected when the Dash Camera detects a strong shock (Event Protection Function – Automatic) or the ACTION button on the main body is pressed (Event Protection Function – Manual, or Adventure Mode).
While vehicle is parked and vehicle ignition is OFF, video is recorded when the Dash Camera detects an abnormal vibration or shock (Parking Surveillance Function).
When the micro SD card is full, older videos are deleted and overwritten by new ones in the unit of “Chapter” files (except event-protected video files). Event- protected video files are explained below:
EVENT PROTECTION FUNCTION – AUTOMATIC (Up to Ten Videos)
When the Dash Camera detects a shock during the normal recording, the Dash Camera outputs two short high-tone beeps and protects 20 seconds of recorded video: 12 seconds before and 8 seconds after the shock is detected.
EVENT PROTECTION FUNCTION – MANUAL (Up to Five Videos)
Press the ACTION button of the main body during the normal recording.
A short high-tone beep sounds, and the total of 20 seconds of video is protected which include the video for 12 seconds before and 8 seconds after the ACTION button is pressed.
ADVENTURE MODE (Up to approx. 87 min: Standard mode)
Hold down the ACTION button for more than 1 second during the normal recording.
The Dash Camera outputs three short high-tone beeps and protects the recorded video for the set maximum recording time of the Adventure mode starting from the time when the button is pressed.
While recording in the Adventure mode, holding the ACTION button for more than 1 second will output three short high-tone beeps and ends the Adventure mode. Adventure mode will automatically end if allocated time has been reached and will be output beep sounds.
NOTE
- The recording times in the standard recording and the Adventure mode vary depending on the selected image quality.
- The maximum recording time in the Adventure mode is about half of the maximum recording time in the standard recording.
- When the Adventure Mode is turned off, the protection of recorded video up to that point will be cancelled.
- When the memory allocation of the computer or smart phone viewer is changed, partial protection of the video recorded up to that point will be canceled.
(For example, if you change the recording time from 87 minutes to 30 minutes, approximately 30 minutes of your latest video recording will be protected, but anything recorded prior to that will be overwritten.) - The settings can be changed by the viewer software for computer (See page 38.) or the viewer application for smartphones (Android/iPhone) (See page 57.).
PARKING SURVEILLANCE FUNCTION (Up to Ten Videos)
When an abnormal vibration and/or a shock is detected while the car is parked, the video is recorded for 60 seconds from the time of the detection. The recorded video is protected.
Normal Wake-Up:
When the car is parked, if an unusual vibration or shock is detected, it starts recording after 4 seconds for about 60 seconds and protects the recorded video.
Quick Wake-Up:
When the car is parked, if an unusual vibration or shock is detected, it starts recording from that point for 60 seconds and protects the recorded video.
NOTE
- The settings can be changed by the viewer software for computer (See page 38.) or the viewer application for smartphones (Android/iPhone) (See page 57.).
- When the battery voltage reaches the specified value or lower, the Normal Wake-Up is automatically activated.
On/off Selection of Audio Recording
Audio recording can be turned on/off by the audio recording on/off switch on the Dash Camera.
The REC LED (green) lights on during recording regardless of audio recording on/off condition.
Backup Power
The Dash Camera contains internal capacitors for continued recording in cases of battery power disconnection. Internal backup power enables recording of
video for approximately 5 seconds after power loss; however this time is not guaranteed. Available time may be shorter in conditions such as low temperatures or immediately after camera starts up.
NOTE
- Never take the micro SD card out of the slot while the Dash Camera is writing data to the micro SD card (REC LED (green) is on or blinking). Otherwise it may damage not only the micro SD card but also the Dash Camera itself.
- Quickly and repeatedly turning the Dash Camera on and off generates many short videos and the total amount of recording time is decreased.
Playing Back Recorded Videos
Play back the video recorded by this Dash Camera with the viewer software for Macintosh and Windows computers.
OPERATIONS OF VIEWER SOFTWARE
Videos and audio recorded by this Dash Camera can be played back on your computer. With the viewer software, various settings of this Dash Camera can be changed. This section describes the procedure to use the viewer software.
NOTE
• ScreenshotsarefromacomputerwithWindows7ProfessionalEdition(SP1). The screen may be different from the actual screens depending on the OS and settings.
• The value in “< >” is the default value.
Installing Viewer Software
1. Start up the web browser such as Internet Explorer and access to the dedicated web site page. The URL address is as follows.
http://www.e-iserv.jp/top/driverecorder/DashCamViewer/index.html?lang=en
NOTE
• Site may be down periodically for maintenance.
- Read the License agreement conditions and Disclaimers and select [I Agree].
- From the displayed web site page, download the installer for the viewer software.
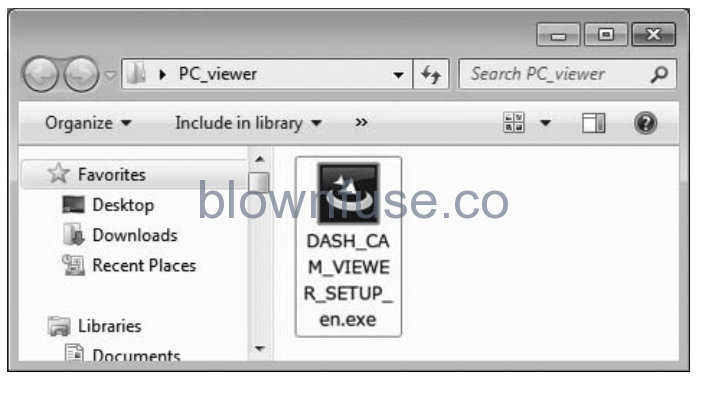
- Copy the viewer software installer “DASH_CAM_VIEWER_SETUP_en.exe” to a location on your computer (such as the Desktop).
- Double-click on “DASH_CAM_VIEWER_SETUP_en.exe”.
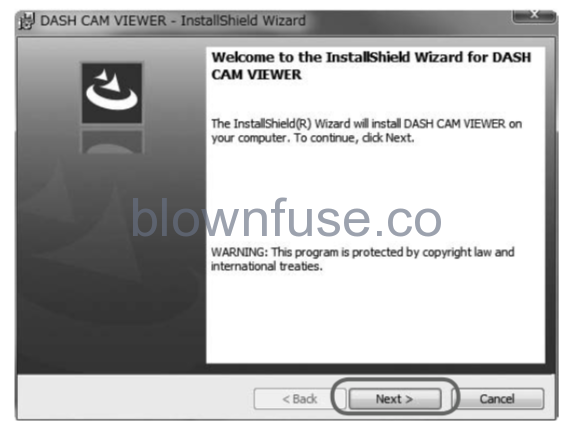
- Click [Next] on the Install Wizard screen.
Then proceed the installation by following the instructions on the screen.
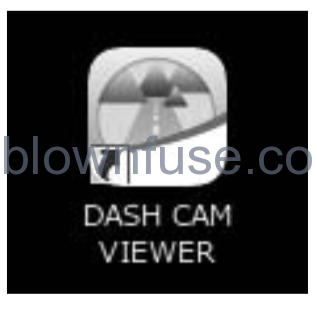
7. When installation is finished, a shortcut icon for “DASH CAM VIEWER” is created on the Desktop.
- NOTE
- To start up the viewer software as soon as the installation is completed, click [Finish] while [Launch the program] on the Installation Complete screen is checked.
- Depending on your computer, the dialog of “User Account Control” is displayed while installing or when starting up the viewer software for the first time. Follow the instruction on the screen and always click [Yes].
Playing Back Recorded Videos
Recorded videos can be played back using the viewer software.
Start up the viewer software by the following procedure and play back the video.
1. Insert the micro SD card ejected from the DASH CAMERA to the computer by using the card reader device.
NOTE
• Depending on the computer setting, “What do you want Windows to do?” dialog may be displayed when the micro SD card is inserted. In that case, click the [Cancel] button, select [Take no action], or close the dialog by using the button at the upper right section.
- Double-click on “DASH CAM VIEWER” shortcut icon on the Desktop.

3, The viewer software starts.

OPERATIONS OF VIEWER SOFTWARE
To view data on the microSD card, check that the computer has recognized the SD card drive.
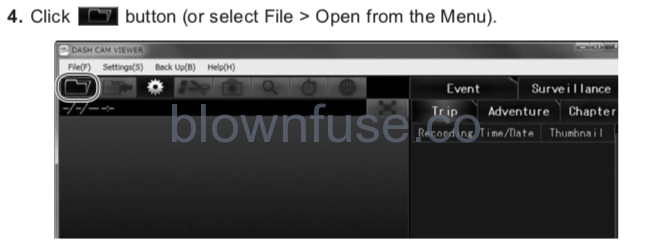
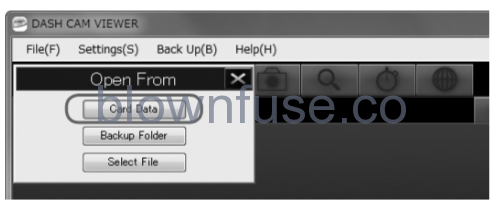
5. Click the [Card Data] (video in the micro SD card) button.
If you play back videos on the computer saved by the backup function (See page 35.), click the [Backup Folder] button. If you directly select the video file, click the [Select File] button.
6. Select a drive for the micro SD card on the Card Drive Select screen and click [OK].
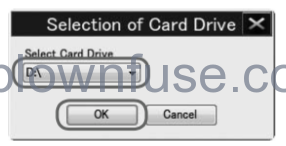
Drive letter (Volume label) is reference.
When the Backup Folder Select screen is displayed, select a saved folder and click [OK].
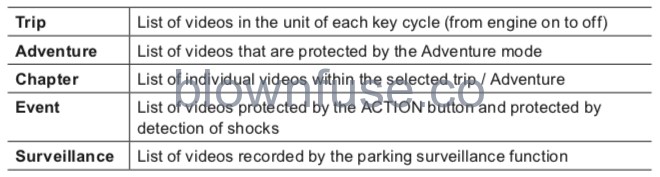
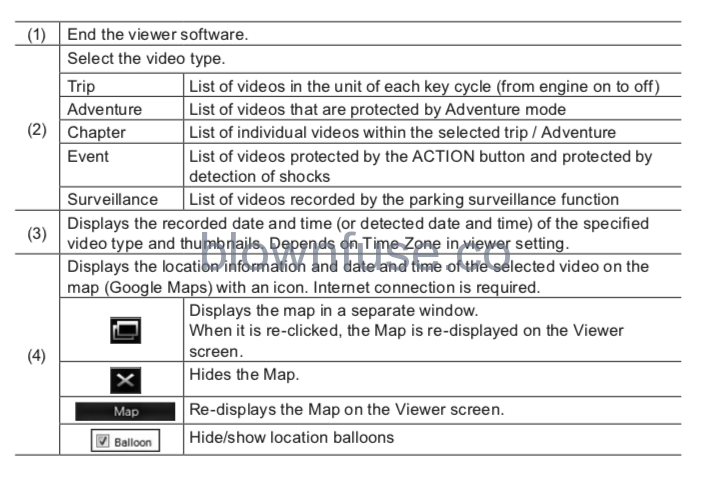
7. Select the type of video on the “Trip”, “Chapter”, “Event”, “Surveillance”, or “Adventure” tab. Then select a video to play back from the list at the right side and click play and playback will start.
The next video list is displayed on each tab.
8. Click the X button (or File > Exit from the Menu) to end the software.
• The number of videos which can be stored in the micro SD card is limited. Back up the video data from the micro SD card to your computer if necessary.
TOYOTA — DASH CAMERA
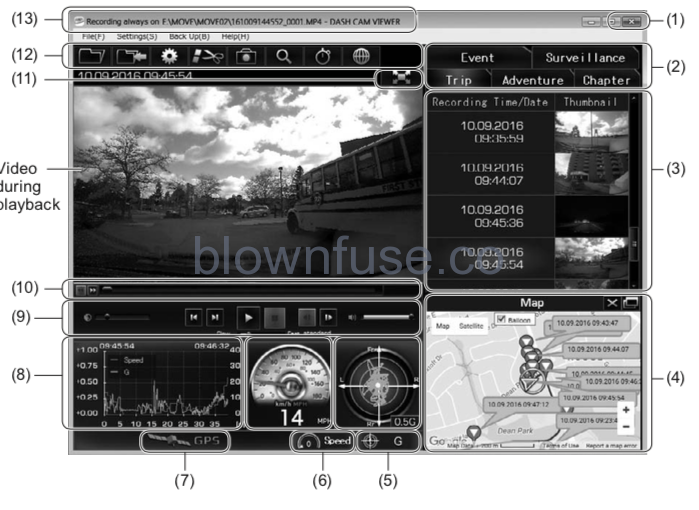
OPERATIONS OF VIEWER SOFTWARE
Configuration of the Viewer screen (example of the “Trip” tab)
NOTE
- There are cases that the GPS signals cannot be acquired correctly; for example, right after the Dash Camera is started up, in places where GPS receiving condition is poor, such as in a tunnel or high-rise area, and when the GPS satellite location is not suitable. In that case, the vehicle location and/or the speed is not indicated on the map correctly.
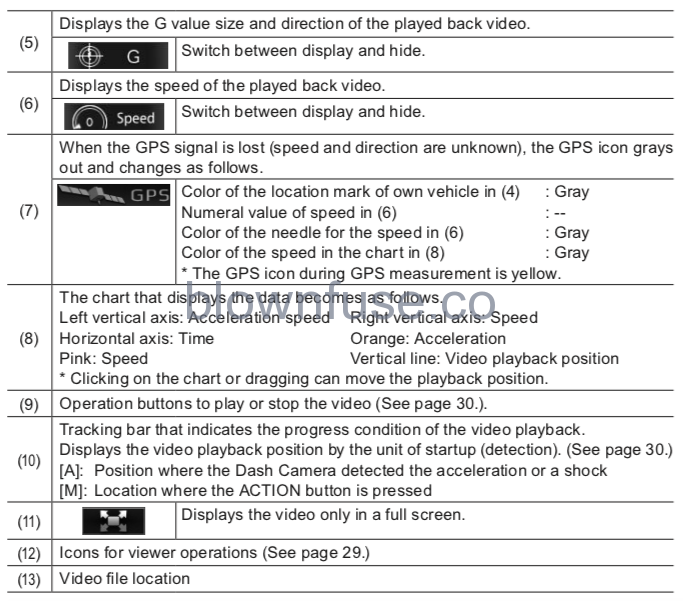
- As the size of G value gets larger, the location becomes further from the center. The direction of the G value according to the operation condition is as follows.
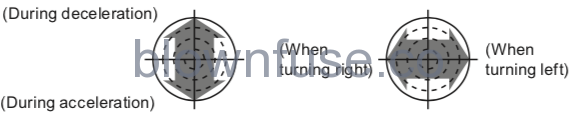
When the progressing direction of the main body is deviated, change the sensor sensitivity value.
- If an error message is displayed while loading a video or while playing back the video and when the video cannot be played back properly, the image data may be damaged. Back up the video data from the micro SD card to your computer if necessary (See page 35.) and format the micro SD card. (See page 47.)
- Make sure to eject the micro SD card properly during removal.
How to Use Icons (Buttons) for Viewer Operations
Icons (buttons) at the upper section of the viewer enables the following operations.
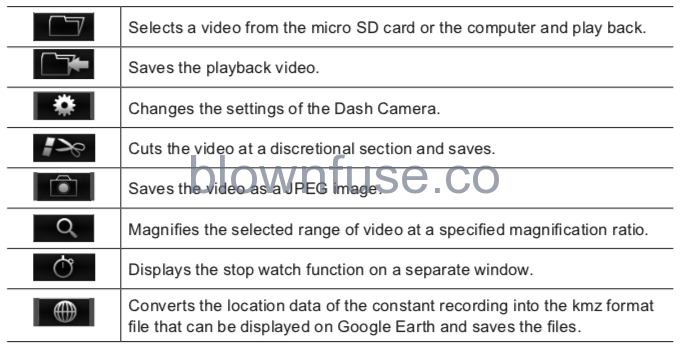
To magnify a part of video, click and select a magnification ratio and an area (range) to magnify. To cancel magnification, click the magnified image.

NOTE
• When the micro SD card is full, older videos are deleted and overwritten by new ones in the Dash Camera of “Chapter” files (except event-protected video files), so if you select the video in the “Trip” tab, it may play back from part way through a trip.
Backing Up Data in Micro SD Card to Computer
The number of files that the micro SD card can store is limited due to its capacity. When the micro SD card is full, the oldest files are overwritten by newer files.
In this case, the older overwritten files will not be available for viewing. It is recommended to back up the video data from the micro SD card to your computer before older files are overwritten in order to prevent potential data loss.
With the viewer software, the recorded data in the micro SD card can easily be saved (backed up) to your computer with simple operations from the Menu.
● Select the folder for backup.
1. On the viewer software, read the recorded data in the micro SD card and
select Settings > Backup Directory Settings from the Menu.
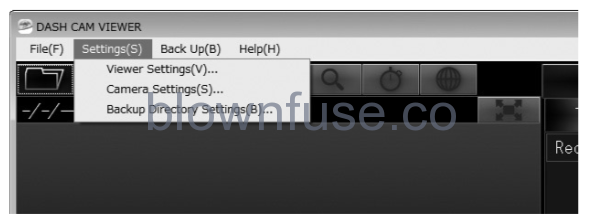
2. Select a folder to save the backup data and click the [OK] button.
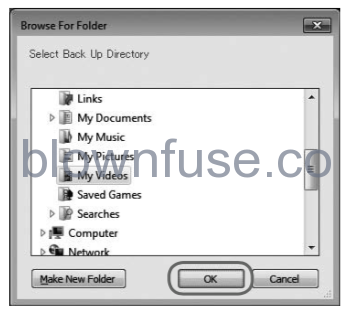
NOTE
• If the destination folder is not specified, the backup data will be saved in the “My Videos” folder.
General Specifications

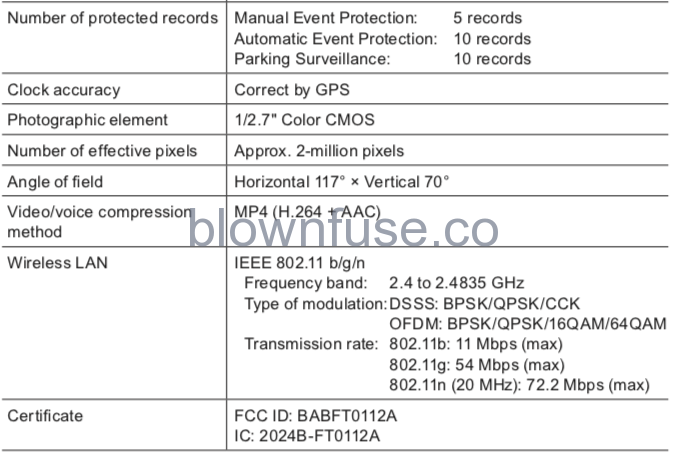
The recording time corresponds with the total time of the continuous-recording and the event protection (G detection, Adventure mode, and Surveillance mode).