2022 Polestar 2 Maintenance and service General topics
Hoisting the vehicle
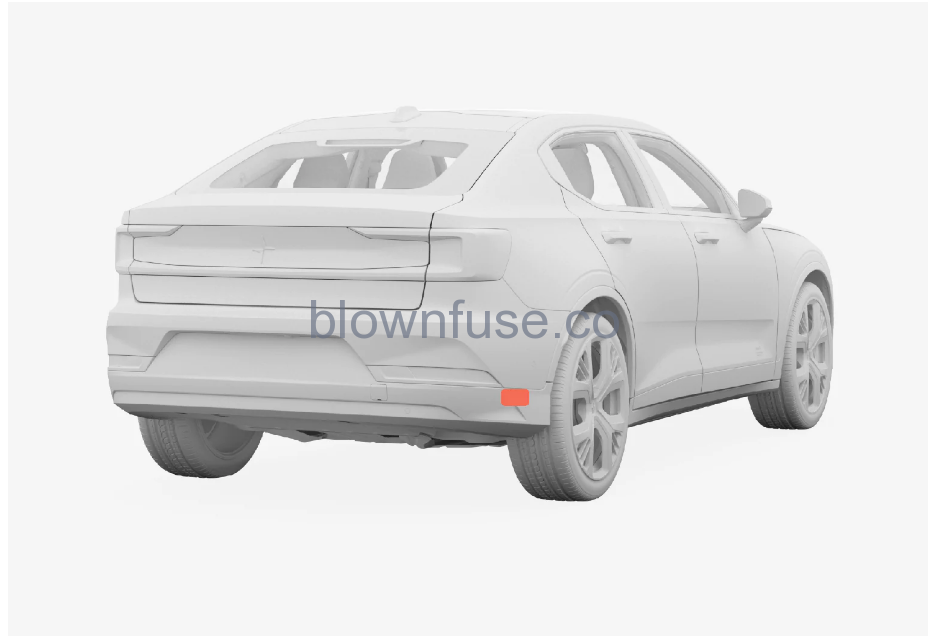
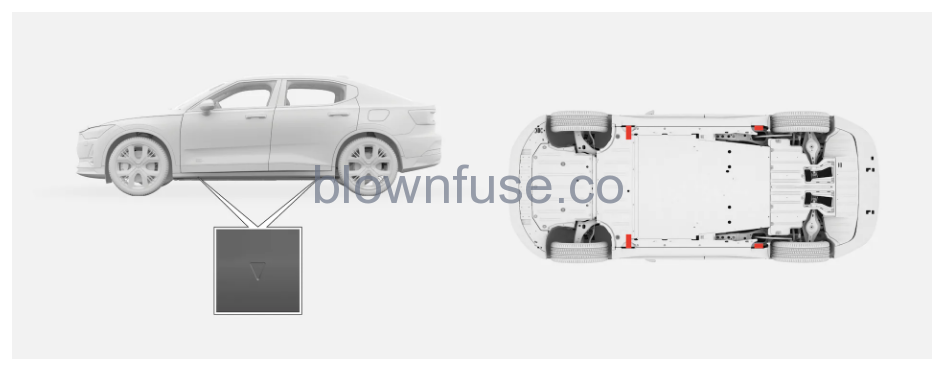 The triangles in the plastic covering indicate where the jack attachment points/lifting points (red areas) are located.
Polestar recommends only using the jack intended for your specific vehicle model. If a jack other than that recommended by Polestar is used, follow the instructions included with the equipment.
- Use a jack designed for the vehicle. If your vehicle is provided with a jack, or you have purchased one as a spare part, this jack is intended to be used only in temporary situations for short periods of time, such as when changing wheels in the event of a flat tire. If the vehicle needs to be lifted more frequently or for a prolonged period, using a garage jack or hoist is recommended. Always follow this device’s instructions for use.
- When the jack is not being used, it should be stowed in the foam block in the frunk. The jack needs to be cranked into the correct position in order to fit.
- Check that the jack is not damaged, the threads are properly lubricated and it is free from dirt.
- Be sure the jack is on a firm, level, non-slippery surface and that it is upright and not leaning.
- No objects should be placed between the base of the jack and the ground, or between the jack and the attachment bar on the vehicle.
- Never let anyone remain in the vehicle when it is raised on a jack.
- If you need to, for example, change a tire near passing traffic, make sure all passengers move to a safe location.
- Use a jack intended for the vehicle when changing a wheel. For any other job, use stands to support the vehicle.
- Never crawl under or allow any part of your body to be extended under a vehicle supported by a jack.
If the vehicle is lifted on a garage jack, the jack must be placed under one of the four lifting points. Make sure that the vehicle is correctly positioned on the jack and that it cannot slide off. Make sure the jack plate has a rubber pad to help keep the vehicle stable and prevent damage. Always use axle stands or similar.
Read through the instructions below before you begin. Before raising the vehicle using a jack or lift, take out all the tools you will need.
- Turn on the vehicle’s hazard warning flashers if e.g. a wheel needs to be changed near passing traffic.
- Make sure that the parking brake is activated.
- Place chocks in front of and behind the wheels that are still on the ground. For example, use heavy wooden blocks or large stones.
- Position the jack or the lift arms at the designated points under the vehicle. The triangle markings on the plastic cover indicate where the jack attachment points/lifting points are located. There are two jack attachment points on each side of the vehicle. There is a groove for the jack at each attachment point.

- Position the jack under the attachment point being used, ensuring that the surface is firm, flat, and not slippery.
- Crank it up until it is properly aligned and it is in contact with the vehicle’s jack attachment point. Make sure the top of the jack (or the garage lift arms) is correctly positioned in the attachment point, with the bump on the top of the jack in the recess in the attachment point and the jack base positioned vertically under the attachment point.
- Turn the jack so that the crank is as far as possible from the side of the vehicle, which will position the jack’s arms perpendicular to the vehicle’s direction of movement.
- Lift the vehicle to a suitable height for the operation you will perform.
Maintenance of the brake system
To keep the vehicle as safe and reliable as possible, follow the Polestar service intervals specified in the Status and Warranty booklet.
After replacing brake pads and brake discs, the braking effect is not adapted until they are “broken in” by driving a few hundred kilometers (miles). Compensate for the reduced braking effect by applying greater
The brake system’s components should be regularly checked for wear.
Contact Polestar Customer Support for information on procedures.
Recommendations for long-term storage
Preparing for long-term storage
- The recommended charge level for long-term storage is between 40% and 50%. Set the recommended charge level in the center display.
- If the charge level is higher than this recommended level, drive the vehicle until it has reached the recommended level.
- If the charge level is lower than recommended, charge the vehicle to the recommended level.
- The recommended tire inflation pressure during long-term storage is 330 kPA (48 PSI). Check the inflation pressure of the tires and adjust it to the correct pressure, which can be found on the vehicle’s tire information decal or certification label.
During long-term storage
- Make sure that the charging cable is plugged into a 120/240 V outlet (alternating current).
- Check the charge level regularly and charge to an appropriate level if it falls below 20%.
- If you plan to store the vehicle for longer than 3 months, it is recommended that the vehicle has a constant AC (alternating current) charge connected, with a maximum charge level set to 40% or 50%. Check regularly to make sure the AC charging is working.
Store the vehicle in as cool a location as possible to minimize battery aging during long-term storage. In the summer, park the vehicle indoors or in a shady location, whichever is cooler.
After long-term storage
- Check the brakes by driving the vehicle slowly for a short distance. Depress the brake pedal five times (hold down for five seconds each time).
Recommended maintenance for radar units and parking sensors
It is important that the surfaces in front of radar units and sensors are kept clean. Do not attach any objects, tape, or decals to the surface of the sensors.
Location of the radar units
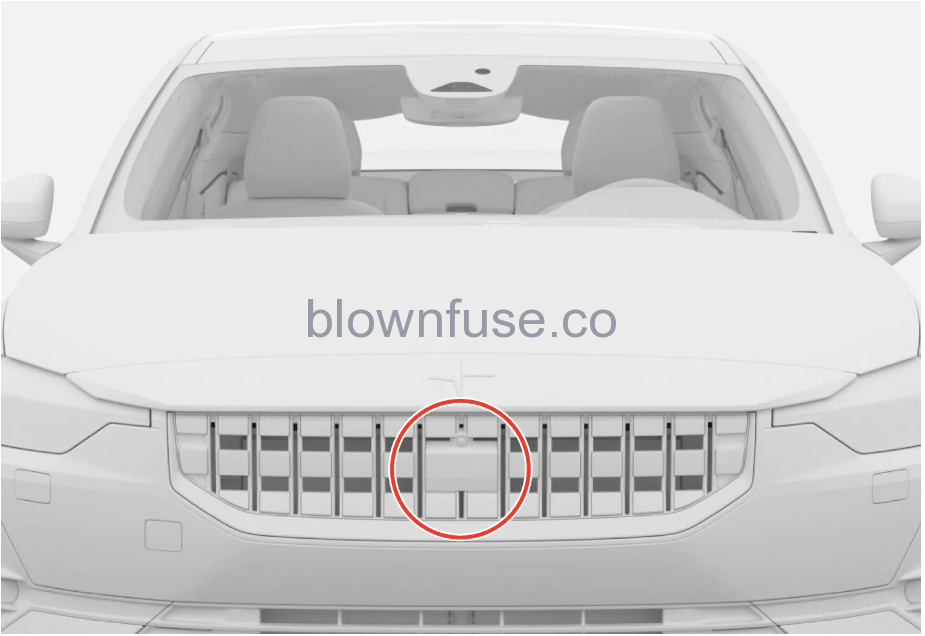 Location of the front radar sensor
Location of the rear radar sensor
Location of the Park Assist sensors
Location of the Park Assist sensors
Dirt, ice, and snow covering the sensors could cause false warnings, reduced function, or no function.
Only a workshop may perform maintenance on driver support components – contact Polestar Customer Support.
Recommended maintenance for the camera
Dirt, ice, and snow covering the sensors could cause false warnings, reduced function, or no function.
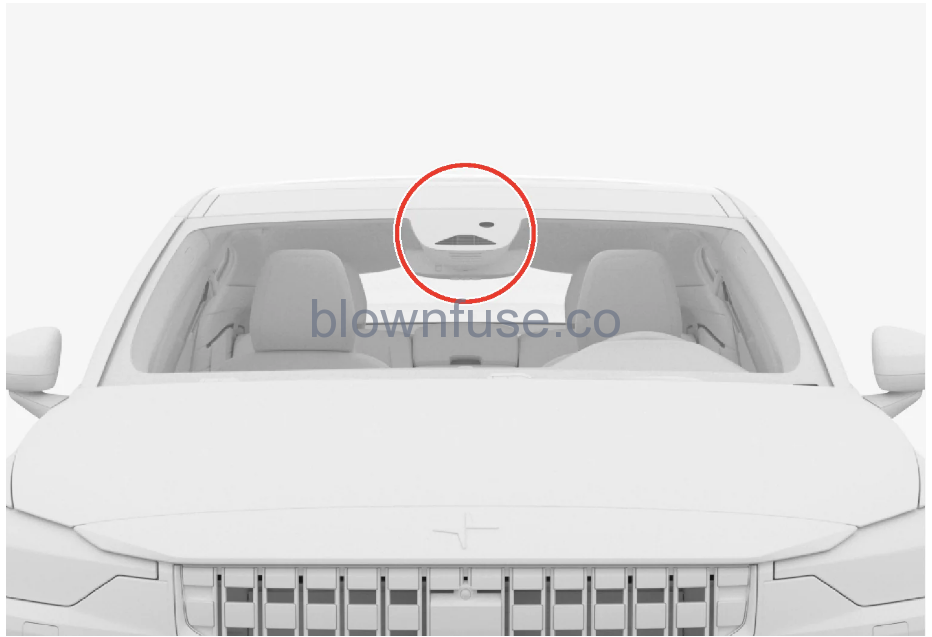 The marked area must be cleaned regularly and kept free of decals, objects, dirt, etc., which could interfere with camera-based functions. It could cause functions to be reduced, deactivated completely, or produce an incorrect function response.
- For the best possible performance, it is important to keep the areas in front of the sensors clean.
- Do not attach any objects, tape, or decals to the surface of the sensors.
Only a workshop may perform maintenance on driver support components – contact Polestar Customer Support.
Software updates over-the-air (OTA)
The vehicle’s software is updated through its connection to the cellular network via OTA (over-the-air) updates.
When a new software update is available, it will be shown in the Notifications view. Once it is downloaded, you can choose when it should be installed. Update the vehicle’s software as soon as possible when an update is available.
To download updates:
- the vehicle must be connected to the Internet.
- use of connected services must be approved.
Depending on the software version, downloads may take place automatically or be started via a notification about an available software update.
Installing updates
When a software update has been downloaded and is ready to be installed, this will be indicated in the Notifications view and via a message when the vehicle is started. You can choose to install the update immediately or be reminded again at a later time.
Installation of the software update may take up to 90 minutes. During this time, the vehicle is locked and its functions are not available. Keep this in mind when choosing a time for the installation of the update.
Do not install new software when the vehicle is plugged in for rapid charging. The vehicle can be left plugged in for charging from a regular wall outlet, but it will not be charged during the installation. Depending on the charging source, charging may resume automatically after the installation is complete.
Before installation:
- Make sure the vehicle has a charge level of at least 40%.
- If an update is ready to be installed, this will be shown in the Notifications view. Open the notification and follow the instructions in the center display.
- Exit the vehicle, close all doors, and lock the vehicle.
> Installation will begin. The vehicle must be locked within a few minutes or installation will be canceled.
- Wait until the installation is finished.
> Installation may take up to 90 minutes. When the installation is finished, the vehicle can be operated as usual.
- If possible, avoid handling the vehicle, its charging cable, and other functions during the installation.
- If you need to get into the vehicle while installation is in progress, you must use the key blade.
- To help prevent false alarms, the vehicle’s burglary alarm will be disabled during the installation.
Always read through the contents of the update so that you know how the vehicle and its functions will be affected.
If the installation fails, the vehicle’s systems will reset to the last installed version.
It is important to install software updates as soon as possible to avoid risks that may be associated with older software. If you encounter any problems with updates, please contact Polestar Customer Support.
Information on contentsYou can tap the information icon in the center display to see more information about the content of the software update.
Functionality after updating may vary depending on the market, model, model year, and options.