2023 Land Rover RANGE ROVER VELAR CLIMATE AND COMFORT
FRONT CLIMATE CONTROL
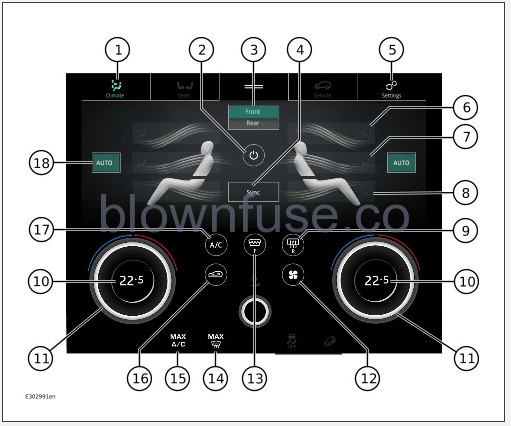
The climate control system displayed is a 4-zone system specification. Some optional features described may not be applicable to other specifications of climate control.
The climate control system is operated via the touch screen and soft buttons located in front of the gear selector:
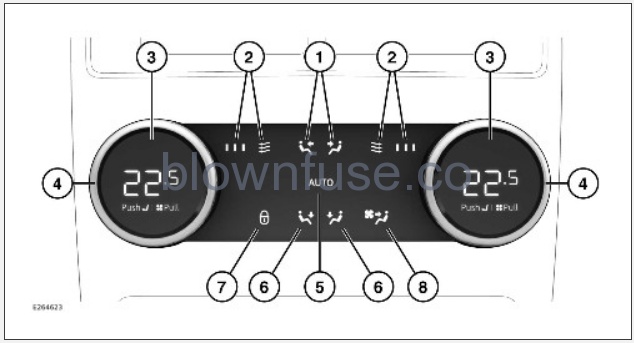
- Touch to access the Climate screen.
- Power icon: Touch to switch the climate control system on or off.
- Front or Rear icon: Touch to switch between Front climate or Rear climate menu screens. See USING VOICE CONTROL.
- Sync icon: Select to synchronize the front passenger and rear passenger’s climate settings to the driver’s settings.
- Settings icon: Touch to access the settings on the lower touchscreen, then select Climate. Alternatively, use the Climate app. See APPS SCREEN.
- Air distribution to the front windshield icon: Touch to switch on or off.
- Air distribution to the face icon: Touch to switch on or off.
- Air distribution to the feet icon: Touch to switch on or off.
- Heated rear screen icon: Touch to switch on or off to defrost the rear screen. If left on, it deactivates after a timed period, dependent on the outside temperature.
CAUTION
Do not attach labels to the rear screen. Do not scrape or use abrasive materials to clean the inside of the rear screen. Doing so may cause damage to the vehicle. - Cabin temperature and front seat temperature control displays. See HEATED SEATS and CLIMATE SEATS.
- Rotary controls: Press to switch between, and rotate to adjust cabin or seat temperature.
- Blower speed control icon: Touch to switch blower speed adjustment on or off. Rotate the passenger rotary control to manually adjust the blower speed.
NOTES
The blower speed is automatically set in AUTO mode. Adjusting the blower speed cancels AUTO mode. - Heated windshield icon: Touch to switch on or off to defrost the front windshield. If left on, it deactivates after a timed period, dependent on the outside temperature.
NOTES
In cold ambient conditions, the windshield and rear screen heaters switch on automatically when the engine is started. The function can be switched on or off via Climate Settings. See CLIMATE SETTINGS.NOTES
The heated windshield and rear screen operate only when the engine is running. - MAX demist icon: Touch and hold to switch maximum demist for the windshield on or off.
- MAX A/C icon: Touch and hold to switch maximum Air Conditioning (A/C) mode on or off.
- Recirculation icon: Touch to recirculate air inside the vehicle.
Touch briefly to select timed recirculation. Recirculation switches off automatically after a set time (dependent on the ambient temperature).
Touch and hold to select latched recirculation. Recirculation remains on until the button is pressed again.
NOTES
Prolonged use at low temperatures may cause the windows to mist.NOTES
Recirculation will deactivate when the A/C is switched off. - A/C icon: Touch to switch the A/C system on or off. The A/C system can be switched on or off independently of the other climate control functions, except when using MAX defrost or MAX A/C functions.
- AUTO icon: Touch to switch fully automatic mode on. Dependent on the vehicle’s specification, the various options for AUTO mode can be set via the Climate Settings menu. See CLIMATE SETTINGS.
- AUTO mode is the recommended normal operating mode. In AUTO mode, the system regulates cabin climate based on feedback from the vehicle’s sensors, helping maintain a stable and comfortable cabin environment.
- When a climate setting is adjusted manually the system exits full AUTO mode, the climate system overrides automatic adjustment, and delivers only the selected settings.
- To access additional climate adjustments, touch the Climate app on the touchscreen. See APPS SCREEN.
- Some of the buttons turn green, or have an LED indicator lamp that illuminates to confirm selection.
- If the climate control system is switched off, pressing an AUTO button or the defrost button switches the climate control system on.
United States of America, Federal Insecticide, Fungicide, and Rodenticide Act (FIFRA):
This vehicle, which may be fitted with a regulated pesticide device (air ionizer) was produced at the following facility: EPA Est. 93184-GBR-1

CLIMATE SETTINGS
The following items can be accessed through the Climate app in the APPS screen. See APPS SCREEN.
- Automatic heated screens: Automatic operation of the heated windshield and/or the rear heated screen can be enabled or disabled.
- Air purity: The air quality sensor, for automatic recirculation, can be adjusted. See AIR QUALITY.
- Auto Air Flow: The blower speed for automatic operation can be set to Soft and Quiet, Balanced, or Powerful and Fast.
The deployable vents always close when the climate control system is switched off or when the ignition is switched off.
AIR QUALITY
The in-cabin air quality can be enhanced via the air quality features accessible through the AIR QUALITY app. See APPS SCREEN.

Air quality menu:
- The exterior particulate (PM2.5) levels, based on exterior particulate matter concentration. Ranges from green (good) to red (hazardous).
- The interior particulate (PM2.5) levels, based on interior particulate matter concentration. Ranges from green (good) to red (hazardous).
- Information: Further information about the air quality system and its operation.
- Exterior air quality as denoted by a color scale. The scale follows the internationally recognized Air Quality Index (AQI).
- Interior air quality as denoted by a color scale. The scale follows the internationally recognized Air Quality Index (AQI).
- Air ionizing: The air quality system uses Nano-e technology to improve air quality inside the vehicle. The system condenses moisture from cabin air and breaks it into tiny electrically charged particles. These particles react with air contaminants neutralizing odors, bacteria and allergens. Shielded by water, the particles last longer and disperse even further than those from conventional ionizers, helping to maintain a healthier cabin for even longer. The Ion feature is represented by the blue dots on the vehicle graphic.
- CO₂: The CO₂ management feature ensures CO₂ does not build up in the cabin. The CO₂ management monitors the concentration of carbon dioxide gas in the cabin and selectively opens the recirculation door to let in fresh air to return balance to the cabin air environment. Controlling the CO₂ in the cabin can reduce the risk of driver drowsiness. Press the menu option to toggle CO₂ management on or off. A green dot indicates the system is active.
- Purify: When purify is enabled, the system will automatically reduces allergens and particulates at and below 2.5 microns, harmful gases and odors within the cabin. Enabling Purify also activates the air quality sensor system which stops polluted air from entering the cabin.
- CO₂: Represented by the white arrows on the vehicle graphic. These will animate when the system is actively balancing the cabin environment.
United States of America, Federal Insecticide, Fungicide, and Rodenticide Act (FIFRA):
This vehicle, which may be fitted with a regulated pesticide device (air ionizer) was produced at the following facility: EPA Est. 93184-GBR-1
California Air Resources Board (ARB), Air Cleaning Devices Regulation:
The following applies to the air ionizer device that may be fitted in this vehicle:
REAR CLIMATE CONTROL
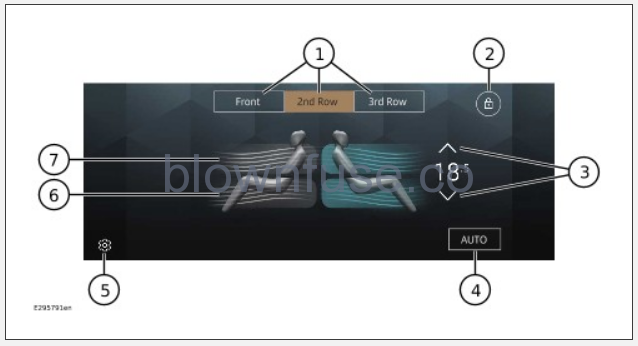
To access the REAR CLIMATE screen, use the Climate app and select 2nd Row from the top of the screen. See APPS SCREEN. Alternatively, rear seat passengers can use the rear seat controls.
In the interest of safety, only operate or adjust the system when it is safe to do so. Driver distraction can lead to accidents, potentially causing serious injury or death.
Do not adjust the touchscreen controls, or allow the system to distract the driver, while the vehicle is moving. Driver distraction can lead to accidents, causing serious injury or death.
To adjust the rear seat climate settings via the Climate app:
- Cabin zone soft keys: Touch to select a cabin zone. Available cabin zones vary, dependent on vehicle specification.
- Rear panel lock icon: Select to disable the rear climate control switches, in order to prevent the rear passengers from adjusting the rear climate settings. Select again to enable the controls. An indicator is displayed to rear seat passengers when the rear panel lock is enabled. See item 7 in the rear seat controls below.
- Temperature adjustment arrows: Select the red arrow to increase and the blue arrow to decrease the temperature. The temperature setting is displayed between the arrows.
- AUTO mode: Touch to switch automatic operation on or off.
- Settings icon: Touch to select the settings screen and then select Climate. See CLIMATE SETTINGS.
- Air distribution to the feet icon: Touch to switch on or off.
- Air distribution to the face icon: Touch to switch on or off.
The rear climate can be set with the controls located in the rear center console.
- Face level air output key. Selects air output from vents above controls for left and right-hand occupants.
- Fan speed indicator. Indicates fan speed: no LEDS = fan off, 3 LEDs = max fan speed.
- Rotary control for left and right-hand occupants: Press to switch between cabin or seat temperature adjustment. Rotate clockwise to adjust the requested temperature upwards, and counter-clockwise to adjust the requested temperature downwards.
- Rotary control display for left and right-hand occupants: The center of the rotary control displays the current requested temperature.
- AUTO control: Press to switch automatic operation on or off.
- Foot level air output key. Selects air output from vents below front seats for left and right-hand occupants.
- Rear panel lock: if the lock symbol is lit, the controls have been locked out and cannot be adjusted until unlocked by a front seat occupant via the Climate app. See item 2 in the above Climate app menu.
- Fan speed control: Toggles through fan speeds from level 0 to level 3. The current fan speed is displayed on the LEDs 2.
- Some of the buttons have an LED indicator backlight that illuminates to confirm the selection.
- In addition to the selectable controls, the REAR CLIMATE screen displays symbols that indicate the status of heating and ventilation functions.
- If the climate control system is switched off, pressing the rear AUTO button switches the system on.
- If the system is in defrost mode, all rear controls are disabled and no airflow is available to the rear occupants.
REMOTE CLIMATE
Some markets may prohibit the use of remote engines starting in specific environments or time periods. The driver is responsible for adhering to local laws.
The remote climate is an InControl app that requires installing on the user’s device before use. See DOWNLOADING AND INSTALLING SMARTPHONE APPS . The remote climate allows the engine of an automatic transmission vehicle to be started remotely, and to run for up to 30 minutes. The remote climate feature provides a comfortable temperature inside the cabin in advance of the driver entering the vehicle.
Remote climate does not function if:
- The vehicle’s fuel level is low.
- The vehicle’s battery charge level is low.
- The vehicle is not locked.
- A window, door, hood or tailgate is open.
- The engine has been manually started.
- A system error occurs.
- A theft has been reported to the stolen vehicle monitoring center.
- A crash event has been detected.
- The hazard warning lights are switched on.
- The automatic transmission is not in Park (P).
- The brake pedal or accelerator pedal is pressed.
Vehicles fitted with a clean air pack will run a purifying-cleaning cycle during a remote climate event, however, the primary function of remote climate is temperature control. See AIR QUALITY.
SEAT COMFORT AND ADJUSTMENT
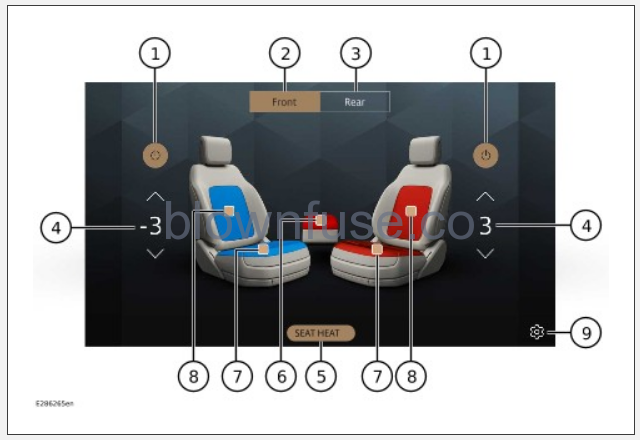
To access the Seats screen, use the Seats app. See APPS SCREEN.
Control the seat comfort and adjustment as follows:
- Climate seating on/off icon: Touch to switch seat heating or cooling on/off next to the left- or right-hand seat.
- Front seats control: Touch to access front seat climate control.
- Rear seats control: Touch to access rear seat climate control.
- Seat temperature control: A positive number and red seat color indicate seat heating. A negative number and blue color indicate seat cooling. Seat temperature intensity is available between 0 and 3 for heating, and 0 and -3 for cooling. See CLIMATE SEATS.
- SEAT HEAT seat sub-menu. The currently selected sub-menu for seat temperature adjustment.
- Heated center armrest control. Touch to activate center armrest heating.
- Seat base control. Touch to adjust. Blue color indicates seat base cooling, red color indicates seat base heating.
- Seat backrest control. Touch to adjust. Blue color indicates backrest cooling, red color indicates backrest heating.
- Settings icon: Accesses the climate control settings. See CLIMATE SETTINGS.
HEATED SEATS
Heated seats consume a large amount of battery power. They only operate when the engine is running.
The heated rear seats (non-climate) can only be operated by pressing the buttons located at the rear of the center console.
Press the relevant heated seat button to switch the required heated seat on at the maximum setting. The three LED indicators in the button illuminate.
Press a second time to set the heated seat at the medium setting. Two LED indicators illuminate.
Press a third time to set the heated seat at the lowest setting. One LED indicator illuminates.
Press a fourth time to switch off.
The heated front seats are controlled via the touchscreen. See CLIMATE SEATS.
CLIMATE SEATS
The climate seats only operate when the engine is running.
The SEATS seat climate control menu can be accessed via the Climate app. See APPS SCREEN. Select the COMFORT sub-menu.
To adjust the seat temperature:
- Touch the left-hand or right-hand seat base or seatback icon.
- Use the rotary controls to adjust the seat temperature. See FRONT CLIMATE CONTROL.
The touchscreen displays the selected temperature status for the selected seat zone. The status range is: red for heated operation and blue for cooled operation.
The rotary control displays a numeric + or – status. The outline of the rotary control illuminates red for heated operation and blue for cooled operation.
SEAT MASSAGE
Seat massage does not operate when the vehicle’s interior temperature is in extreme cold or hot climate conditions.
Seat massage only operates when the engine is switched on.
Seat massage pauses for 5 seconds if any adjustments are made to the lumbar, bolster, or shoulder sections of the seat.
To access the seat massage screen, touch the seats icon (1) on the lower touchscreen. Touch the respective seat massage icon (4). See SEAT COMFORT AND ADJUSTMENT.
- Touch the power icon for the respective seat to switch the selected seat massage on or off. See SEAT COMFORT AND ADJUSTMENT.
- Touch the top seat zone icon for the respective seat. See SEAT COMFORT AND ADJUSTMENT.
- Touch the icon of the desired massage program: Rolling, Up, Down, Upper Back, or Lower Back massage.
Touch the icon of the desired massage format: Wave, Pulse, Pulse Duo, or Combination.
NOTES
On vehicles with executive class seating, an additional format of Hot Stone is available. Hot stone provides increased central heat for the spine. - Rotate the outer part of the rotary control to adjust the seat massage intensity. See SEAT COMFORT AND ADJUSTMENT.
NOTES
The outline of the rotary control illuminates to indicate the level of seat massage intensity.
Auto Massage can be set in Seat Settings. See SEAT SETTINGS.
The massage programs have a 20 minute cycle. Reselect for repeated use.
SEAT SETTINGS
Seats settings can be accessed via the SEATS app on the touchscreen. See APPS SCREEN.
The following options can be selected:
- Auto Massage: Switch the automatic massage feature On or Off.
- Time delay: Touch to select the time delay options. A time delay for the seat massage can be set from the start of a journey.
TEMPERATURE DIFFERENTIATION
The temperature selected via the climate control system is a perceived value. The system operates to achieve these selected values. The selected value does not represent the output temperature from the air vents. Air vent output temperature varies as the system automatically compensates the vent outputs to achieve the set temperature(s).
The actual temperature in the cabin may differ from the set temperature(s) due to internal and external factors, including ambient temperature, sun load, and direction. The climate control system automatically adjusts the airflow level, direction and temperature to compensate for these internal and external factors. Automatic adjustments in the air vent outputs may result in some temperature differentiation within the cabin.