2022 Land Rover Range Rover Velar Portable Media

PORTABLE MEDIA SAFETY
Make sure the following warnings and cautions have been read and fully understood before using any of the portable media controls or features. Failure to use the portable media controls or features safely could result in an accident, leading to serious injury, death or damage to the vehicle and its components.
Make sure that any media devices are stored securely while the vehicle is in motion. Any loose objects are potential hazards during sudden maneuvers, emergency braking situations or accidents.
Sustained exposure to high sound levels, greater than 85 decibels, can damage hearing.
Read the manufacturer’s instructions for any device before it is connected to the media system. Make sure that the device is suitable. Comply with any instructions regarding connection and operation. Failure to do so may result in damage to the vehicle’s media system or the media device.
When connecting a USB device, make sure to route cables so that they do not obstruct the cubby box lid as it is closed. Some vehicles have a recess that allows cables to pass through, with the lid closed, preventing crushing of the cables.
It is recommended not to use a hard disc drive via the USB link. The devices are not designed for in-vehicle use and may be damaged.
USB memory stick devices exceeding 3 inches (70mm) in length, must not be connected to the media hub. Using devices exceeding this length can result in damage to the media device or hub on closure of the cubby box lid on the center console.
If an iPod is connected, disconnect before leaving the vehicle. Failure to do so may result in the iPod battery discharging.
On vehicles with a rear executive seat center armrest, disconnect the media device before stowing the center armrest. Failure to do so can result in damage to the media device or media hub.
Avoid spilling or splashing liquids onto the touchscreen. The spilling or splashing of liquids could cause the touchscreen to malfunction or even lead to complete failure.
PORTABLE MEDIA CONNECTIONS
Make sure the relevant safety warnings have been read and understood before driving the vehicle. See PORTABLE MEDIA SAFETY.
Optical discs can be inserted into the CD/DVD drive located, in the glovebox. See LOADING DISCS.
The front media hub, for portable media devices to be connected to, is located in the center console’s cubby box.
The rear media hub, for portable media devices to be connected to, is located in one of the following:
- On vehicles without an executive armrest: At the rear of the center console.
- On vehicles with an executive armrest: Inside the center stowed armrest.
For further information on media hub location, see AUXILIARY POWER SOCKETS.
Compatible portable devices include:
- USB mass storage devices, e.g., a memory stick. Devices must use FAT or FAT32.
NOTES
External hard drives are not recommended for use. Doing so could reduce the life of the device.It is recommended that the USB mass storage device does not exceed 128GB. USB mass storage devices exceeding the maximum recommendation could cause a malfunction of the infotainment system.
Depending on the memory size of the USB mass storage device, a time delay may be evident before the stored files can be accessed.
- Optical media: Album CDs or DVDs.
- iPod: iPad, iPod Touch, iPod Mini, iPhone, iPod Nano and iPod Classic Gen4, Gen5, Gen6 are supported. Full functionality for older devices cannot be guaranteed. iPod Classic Gen1, Gen2, Gen3, and iPod Shuffle are not supported.
NOTES
Album artwork displays if the iPod device is fully supported. Some Generation level devices cannot recognize or support the album artwork. - Media devices that support HDMI or MHL.
If connecting an iPod, mass storage, or Bluetooth® wireless technology device, use the touchscreen to operate and search the device.
The media system plays MP3, WMA, AIFF, M4A, FLAC, AAC, and ALAC files. Other formats are available.
If a software update has been activated on the connected portable media device, it is necessary to restart the media device. Restarting the device makes sure it is recognized by the media system.
To maximize playback quality, it is recommended that lossless compression is used for any media files on USB. Failing this, it is recommended that compressed files utilize a minimum bit rate of 192 kb/s. A higher bit rate is strongly recommended.
iPod is a trademark of Apple Inc., registered in the US and other countries.
Some MP3 players have a file system that is not supported by the system. To use an MP3 player, set it to USB Removable Device or Mass Storage Device mode.
For information on pairing and connecting a Bluetooth wireless technology device, see PAIRING AND CONNECTING USING THE MEDIA PLAYER.
For further information on Bluetooth wireless technology, see BLUETOOTH® INFORMATION.
For a list of compatible Bluetooth wireless technology devices, please refer to the Land Rover website at: www.landroverusa.com.
The Bluetooth wireless technology devices listed have been tested for compatibility with Jaguar Land Rover vehicles. Performance varies, based on the device’s software version and battery condition. Devices are warranted by the device’s manufacturer, not the vehicle manufacturer.
Dependent on the device being connected, certain functions, e.g., Bluetooth pairing, may not be compatible.
CONNECTING A MEDIA DEVICE
Make sure the relevant safety warnings have been read and understood before driving the vehicle. See PORTABLE MEDIA SAFETY.
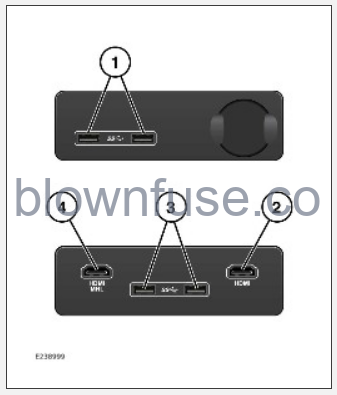
Connect the device into the appropriate socket:
- Front USB sockets.
- Rear media HDMI socket.
- Rear media USB sockets.
- Rear media HDMI/MHL socket.
Front sockets are located in the center console’s cubby box. Rear media sockets are located at the rear of the center console. For further information on media hub location, see AUXILIARY POWER SOCKETS.
Use the cable supplied with your media device to connect to the USB socket.
High quality cables are recommended to be used with Apple devices, as this enhances the operation.
A USB socket cannot be used to connect more than one USB device to the media unit.
Devices connected to the USB sockets are charged. Devices that are fully discharged do not play. Higher-rated devices that require more than 7.5W to charge may not display an indicator when charging. The devices still charge without the indicator being displayed.
HDMI devices are not charged.
Apple devices should be updated to the latest iOS version, otherwise, full support cannot be guaranteed.
Voice command is only available for newer Apple devices, i.e., devices that are connected to the system via a lightning connector.
Voice command will not operate devices connected to the system via Bluetooth®.
Options, such as Repeat and Shuffle, relate to the device currently playing. The options do not apply to any subsequent device. Previous Repeat and Shuffle selections are deactivated when a new queue has been created.
The available sockets vary, according to the vehicle specification.
The SuperSpeed USB Trident Logo is a registered trademark of USB Implementer Forum, Inc.
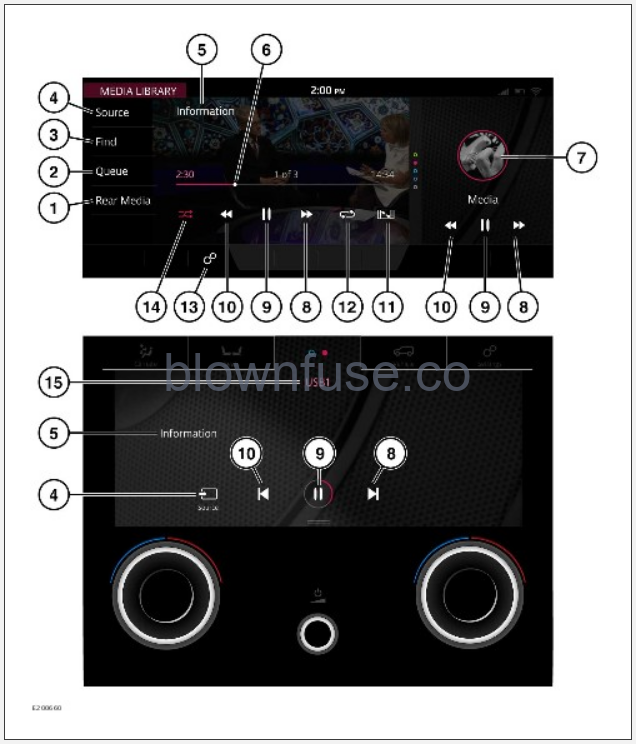
PORTABLE MEDIA CONTROLS
Make sure the relevant safety warnings have been read and understood before driving the vehicle. See PORTABLE MEDIA SAFETY.
Portable media includes Media Library (internal storage), CD, iPods, iPads, iPhones, USB mass storage, HDMI/MHL, and Bluetooth® wireless technology devices.
Select the portable media device from the SELECT SOURCE screen. See MEDIA CONTROLS.
Duplicated icons and source features can be operated on the lower touchscreen when the media device widget is displayed. Further information on the lower touchscreen can be found in the relevant section of the Owner’s Handbook. See LOWER TOUCHSCREEN CONTROLS.
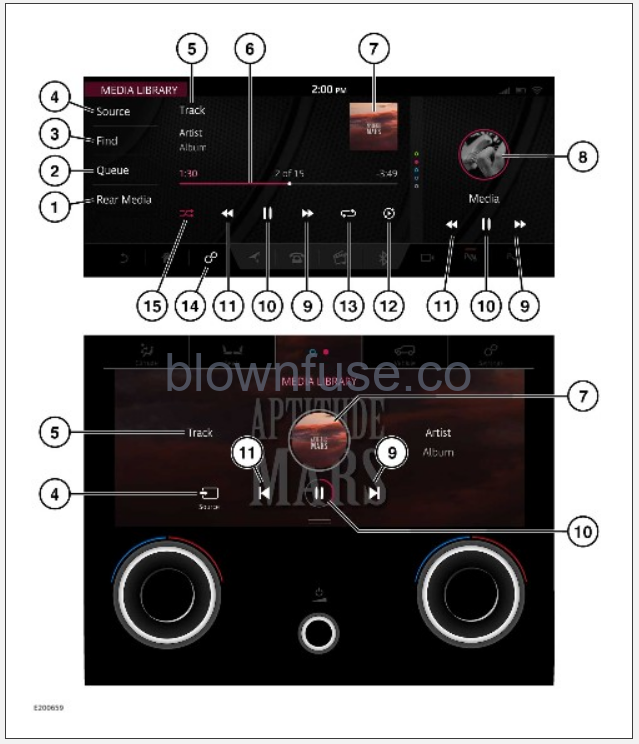
- Rear Media: Touch for rear media options.
- Queue: Opens the current queue of tracks selected from the portable media devices when supported. To add a track, album, artist, or genre to the queue, touch and hold the respective item at any time. A pop-up list gives further instructions.
NOTES
Selecting a track, album, artist, or genre not currently in the queue to play causes the current queue to be erased. - Find: Select the artist, album, or song icon to display results in alphabetical order. Select the more like this icon (12) to display a list of further available options: Genres, Videos, Folder Browse, etc.
Select Folder Browse to view the contents of the connected device, which are displayed as dictated by the file structure.
Select a file to start playback. Select a folder or sub-folder to view the contents.
To return to the MEDIA LIBRARY screen, touch the return icon.¹
NOTES
After an artist, album, or song has been selected from the Find option, the SONGS screen continues to be displayed. To return to the MEDIA LIBRARY screen, touch the return icon.¹ - Source: Displays all media sources. The list of media devices is dynamically populated, based on whether the devices are connected.
NOTES
-
Sound quality and volume levels available from connected media devices may vary widely.
- Track information display: Touch the displayed text to view a list of the tracks in album. Touch again to return to the current track information display.
NOTES
Only connected devices that support ID3 tags have the information displayed.The instrument panel also displays track information.
- Interactive time progress bar: Touch or drag to move forward or backward through the current track.
- Album image display: Touch to view the list of tracks on the album, the queue list, or information for the current track. Touch again to revert back to the previous view, or press the return icon.¹
NOTES
Album artwork is displayed if the media is recognized by Gracenote®. If the album artwork is not recognized, a generic image is displayed. - Media library shortcut: Touch to view the MEDIA LIBRARY screen. Swipe up or down to access other features.
- Skip or scan forward:
Touch and release to skip forward to the next track.
Touch and hold to scan forward through the current track. Playback resumes, when released.
Swipe the touchscreen to the left to skip to the next track.
- Pause or play: Select to pause playback. Select again to resume playback.
- Skip or scan backward:
Touch and release to skip back to the previous track.
Touch and hold to scan backward through the current track. Playback resumes, when released.
Swipe the touchscreen to the right to skip to the previous track.
- More like this icon: Select to automatically generate a smart playlist based on similar tracks. Touch, at any time, to create a new list based on the track currently being played.
NOTES
Loading time is dependent on content type.
NOTESIf the vehicle’s infotainment and market specification supports CD ripping, upon a CD being loaded, a rip icon² replaces the more like this icon. Notification is displayed when ripping of the CD is complete. If the vehicle’s infotainment system does not include a hard drive, that supports CD ripping, the option to rip a CD is not available.
- Repeat icon: Touch to repeat the current track continuously. The repeat icon is highlighted when active. Touch again to cancel.
NOTES
Additional repeat functionality options may be available depending on the portable device connected. - Settings icon: Touch to access the SETTINGS pop-up menu. Select Media Player settings to manage the importing and deleting of files stored to the vehicle’s memory.
NOTES
The option to import/rip media is dependent on the vehicle’s infotainment and market specification. Not all levels of infotainment are fitted with an internal hard drive. If the vehicle’s infotainment system does not include a hard drive, the feature to import/rip media is not available. - Shuffle icon: Touch to shuffle the current music queue continuously. The shuffle icon is highlighted when active. Touch again to cancel.

return icon.¹

CD rip icon.²
PLAYING A PORTABLE DEVICE
Make sure the relevant safety warnings have been read and understood before driving the vehicle. See PORTABLE MEDIA SAFETY.
Use the touchscreen controls to control playback, if using a USB mass storage device or compatible Apple device.
Use the touchscreen controls to control playback, if using a Bluetooth® wireless technology device. Some controls may be unavailable, depending on what the device and the media player system supports.
If using any media device via the HDMI/MHL socket, control playback from the device itself.
CONNECTING MULTIPLE DEVICES
Multiple devices can be simultaneously connected to the portable media interface. Use the touchscreen to switch between the connected devices. Select iPod, USB, Bluetooth, or HDMI/HML to switch between inputs.
USB and iPod devices only: When switching back to a previous device, from another newly connected device, playback resumes from the point at which it was left. See CONNECTING A MEDIA DEVICE.
PAIRING AND CONNECTING USING THE MEDIA PLAYER
Make sure the relevant safety warnings have been read and understood before driving the vehicle. See PORTABLE MEDIA SAFETY.
The process of pairing and connecting the media device with the vehicle, using the media device, varies depending on the type of media device.
- Switch on the ignition. Make sure that the touchscreen is active.
- Touch the settings icon¹ from any screen. Select All Settings via the SETTINGS pop-up menu. Select Connectivity. Select Bluetooth.
- The BLUETOOTH SETTINGS screen is displayed. Select Pair New Device.
- The vehicle’s Bluetooth® wireless technology system remains discoverable while in the pairing screen.
- Using the media device, search for devices. On some media devices, this is referred to as a new paired device. See the device’s operating instructions for further information. The vehicle’s name is displayed as the default discoverable name.
- When the vehicle’s discoverable name is discovered, follow the on-screen instructions. Select Yes, when prompted, to confirm the pairing. On some media devices, this completes the pairing. Alternatively, on other media devices, the vehicle’s system displays a PIN. When prompted, either enter the PIN on the device, or select Yes to confirm that the PIN displayed matches the vehicle’s PIN.
- Once the media device is paired and connected to the system, a confirmation message is displayed. Either, select the return icon or return to the previously selected media and select Source.
- Select the media device from the displayed media options.
If, when playing media through a wireless connected Apple device, the device is then also connected to a USB port, the wireless connection is disabled. To reconnect via wireless, the USB connection needs to be disconnected and the Apple device reconnected via the BLUETOOTH SETTINGS screen.
Apple devices containing a large quantity of media, can take a considerable amount of time to synchronize. During this time, playback can only be accessed from the Apple device’s media player and not via voice commands.
After the Apple device has been synced with the media system, the device can then be controlled via the media system or operated by the voice system. If the Apple device’s track list is updated after the device was previously synced, the device needs to be re-synced to the media system. During this time, the Apple device’s voice commands become temporarily unavailable.
For further information on Bluetooth wireless technology, see BLUETOOTH® INFORMATION.

settings icon.¹
CHANGING/DISCONNECTING A DEVICE
Make sure the relevant safety warnings have been read and understood before driving the vehicle. See PORTABLE MEDIA SAFETY.
To connect or disconnect a paired Bluetooth® wireless technology device:
- Touch the settings icon¹ from any screen. Select All Settings via the SETTINGS pop-up menu.
- Select Features. Select Phone. Select Bluetooth settings. Alternatively, select Connectivity. Select Bluetooth.
- The BLUETOOTH SETTINGS screen displays. Select Paired Devices.
- Paired devices are listed. Select the device’s name, followed by Connect or Disconnect.
To unpair a paired Bluetooth device:
- Touch the settings icon¹ from any screen. Select All Settings via the SETTINGS pop-up menu.
- Select Features. Select Phone. Select Bluetooth settings. Alternatively, select Connectivity. Select Bluetooth.
- The BLUETOOTH SETTINGS screen displays. Select Paired Devices.
- Paired devices are listed. Select the device’s name, followed by Forget Device.
To forget all paired Bluetooth devices:
- Touch the settings icon¹ from any screen. Select All Settings via the SETTINGS pop-up menu.
- Select Features. Select Phone. Select Bluetooth settings. Alternatively, select Connectivity. Select Bluetooth.
- The BLUETOOTH SETTINGS screen displays. Select Forget All Devices.
settings icon.¹
IMPORTING/RIPPING MEDIA
Make sure the relevant safety warnings have been read and understood before driving the vehicle. See PORTABLE MEDIA SAFETY.
The option to import/rip media is dependent on the vehicle’s infotainment and market specification. Not all levels of infotainment are fitted with an internal hard drive. If the vehicle’s infotainment system does not include a hard drive, the feature to import/rip media is not available.
The vehicle’s internal storage, is used for navigation data, speech data, and metadata databases. Media can also be imported and stored from USB memory devices, via the MEDIA PLAYER SETTINGS screen.
To select the MEDIA PLAYER SETTINGS screen:
- Select the settings icon¹ from any screen to access the SETTINGS pop-up menu.
- Select Media Player Settings.
Importing media from a loaded CD. Select the CD ripping icon. Notification is displayed when ripping of the CD is complete.
If the vehicle’s infotainment and market specification does not support CD ripping, the CD ripping icon is not displayed.
settings icon.¹
VIDEO MEDIA PLAYER CONTROLS
Make sure the relevant safety warnings have been read and understood before driving the vehicle. See PORTABLE MEDIA SAFETY.
The system supports MPEG2 (.avi, .mpg), WMV9 (.wmv) and H.264 (.mp4, .avi, .mkv, .mov) files. Other formats may work, but the playback quality cannot be guaranteed.
To maximize the stereo sound playback quality, it is recommended not to playback video files with a resolution greater than 1 080p or a speed exceeding 30fps.
The quality of video playback may be affected by the USB memory device’s speed.
Select the portable media device from the SELECT SOURCE touchscreen. See MEDIA CONTROLS.
Duplicated icons can be operated on the lower touchscreen when the media device widget is displayed. Further information on the lower touchscreen can be found in the relevant section of the Owner’s Handbook. See LOWER TOUCHSCREEN CONTROLS.
- Rear Media: Touch for rear media options.
- Queue: Opens the current queue of videos selected from the relevant device.
- Find: Touch to search, or select from, the list of videos. The list is displayed in alphabetical order.
- Source: Touch to display all media sources.
NOTES
The media sources, e.g., DVD or USB memory devices, are displayed, only if they are inserted or connected. - Video information: Touch to select full screen mode or wait for the preview screen to time-out. Touch the screen again to view the controls at any time.
- Interactive time progress bar: Touch or drag to move forward or backward through the current video track.
- Media library shortcut: Touch to view the MEDIA LIBRARY screen. Swipe up or down to access other features.
- Skip or scan forward:
Touch and release to skip forward to the next video track.
Touch and hold to scan forward through the current video track. Playback is resumed when released.
Swipe the touchscreen to the left, to skip to the next video track.
- Pause or play: Touch to pause playback. Touch again to resume playback. A second touch stops and resets the video.
- Skip and scan backward:
Touch and release to skip backward to the previous video track.
Touch and hold to scan backward through the current video track. Playback is resumed when released.
Swipe the touchscreen to the right, to skip to the previous video track.
- Zoom icon : Select to zoom in or out between the two available options.
- Repeat icon: Touch to repeat the current video continuously. The repeat icon is highlighted when active. Touch again to cancel.
- Settings icon: Touch to access the SETTINGS pop-up menu. Select Media Player settings to view all available settings options.
- Shuffle icon: Touch to shuffle the current video queue. The shuffle icon is highlighted when active. Touch again to cancel.
- Portable media source device display.
VIDEO MEDIA INHIBIT WITH VEHICLE MOVING
When the vehicle is moving, the touchscreen displays a relevant safety message, and the video picture is automatically inhibited.
FULL-SCREEN VIEW
If full-screen mode is selected, operate the seek controls in the same manner as when in preview mode.