2022 Land Rover Range Rover Velar Fluid Level Checks

FLUID FILLER LOCATIONS
Do not start the engine, or drive the vehicle, if leaked fluid could possibly make contact with a hot surface. Any leaked fluid coming into contact with a hot surface, such as the exhaust, could result in combustion. Seek qualified assistance immediately.
Always observe the safety precautions when working in the engine compartment. Potentially serious injury or death may result.
For more information on safety precautions, see SAFETY IN THE GARAGE.
A number of simple checks and routine maintenance must be carried out at regular intervals. See WEEKLY CHECKS.
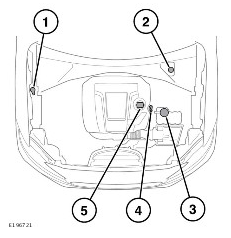
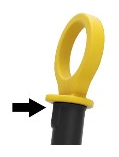
- Washer fluid reservoir filler cap.
- Brake fluid reservoir cap.
- Engine coolant reservoir filler cap.
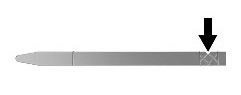
- Engine oil level dipstick.
- Engine oil filler cap.
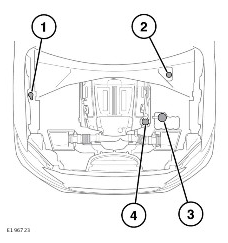
- Washer fluid reservoir filler cap.
- Brake fluid reservoir cap.
- Engine coolant reservoir filler cap.
- Engine oil filler cap.
CHECKING THE ENGINE OIL LEVEL
Check the engine oil weekly. If any significant or sudden drop in the oil level is noted, seek qualified assistance.
Never allow the oil level to fall below the lower mark on the dipstick or the oil level indicator.
If the instrument panel displays the message ENGINE OIL PRESSURE LOW, stop the vehicle as soon as it is safe to do so. Allowing the engine to continue running with low oil pressure may cause the engine to seize. Seek qualified assistance immediately. Do not start the engine until the cause has been rectified.
The engine oil should be checked frequently and topped up as required, using the correct grade for the engine.
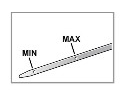
The graphic shown above is for illustrative purposes only.
The dipstick features minimum and maximum marks in order to help determine the oil level present in the engine. The marks can take the form of holes, lines or a hatched area.
The dipstick on 2.0L engines features a lug to aid correct fitment. Make sure the lug is correctly aligned with the groove in the dipstick tube. Failure to do this could result in the dipstick not fitting correctly and oil escaping from the engine.
Before checking the engine oil level, make sure that:
- The vehicle is stationary and the Electric Parking Brake (EPB) is applied.
- The vehicle is on level ground.
- The engine oil is cold.
NOTES
If it is necessary to check the oil level when the engine is hot, switch off the engine and let the vehicle stand for 5 minutes to allow the oil to drain back into the sump. Do not start the engine.
The oil level can then be checked as follows:
- Withdraw the dipstick and wipe the blade clean with a lint-free cloth.
- Fully re-insert the dipstick and withdraw again to check the oil level.
If the oil level lies within the hatched portion on the dipstick blade, do not add any more oil.
If the oil level is below half-way, add 0.5 U.S. quarts (0.5 liters) of oil. Recheck the level and add more oil, if necessary.
If the oil level is below the lower mark, add 1.1 U.S. quarts (1 liters) of oil. Recheck the level and add more oil, if necessary.
Once the oil has reached the correct level on the dipstick, wait 5 minutes and recheck.
Engines without a dipstick feature an electronic monitoring system. The engine oil level is not monitored when the engine is running, or when the vehicle is in motion.
Before checking the engine oil level, make sure that:
- The vehicle is stationary and the Electric Parking Brake (EPB) is applied.
- The vehicle is on level ground.
- The engine oil has reached its normal working temperature (oil is hot).
- The engine has been switched off for 10 minutes. The system does not give an accurate reading until the oil level has stabilized.
The oil level can then be checked as follows:
- Touch the settings icon on the touchscreen.
- Touch the ALL soft key.
- Touch the Vehicle soft key.
- Touch the My Vehicle soft key.
- Touch the Service soft key. The touchscreen displays the engine oil level indicator.
- Touch the exit icon to return to the previously displayed screen.
TOPPING UP THE OIL
The vehicle’s warranty may be invalidated if damage is caused by using oil that does not meet the required specification. See LUBRICANTS AND FLUIDS.
Before driving off-road, top up the engine oil level to the maximum mark on the engine oil level dipstick. Failure to do so could result in an insufficient oil level when driving at certain angles off-road, which could cause damage to the engine.
Failure to use an oil that meets the required specification could cause excessive engine wear, a build-up of sludge and deposits, and increase pollution. A resultant cause could be engine failure.
Overfilling with oil could result in severe engine damage. Add engine oil in small quantities. Recheck the level to make sure the engine is not overfilled.
Use of the correct oil specification is essential. Make sure the oil is suitable for the climatic conditions in which the vehicle is to be operated.
To top up the oil:
- Turn the oil filler cap counter-clockwise to remove.
- For engines with a dipstick:
Add oil to maintain the level between the lower and upper marks on the dipstick.
- For engines with an electronic monitoring system:
Add oil, as indicated by the engine oil level indicator in the touchscreen.
- Clean up any oil spilled during topping up.
- Check the oil level again after 5 minutes.
- To refit the oil filler cap, turn the cap clockwise until a resistance is felt.
CHECKING THE COOLANT LEVEL
Running the engine without coolant causes serious engine damage.
If persistent coolant loss is noticed, seek qualified assistance immediately.
Check the coolant reservoir level at least every week. Check more frequently in high mileage or arduous conditions. Always check the level when the system is cold.
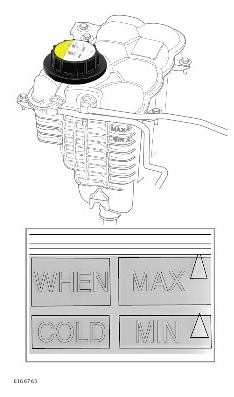
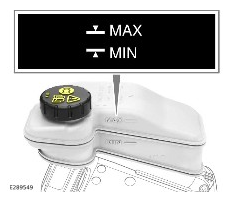
Make sure the coolant level remains between the MIN and MAX indicator marks on the side of the expansion tank.
If the coolant level has dropped suddenly, or by a large amount, arrange for the vehicle to be examined by qualified personnel. Consult a retailer/authorized repairer as soon as possible.
TOPPING UP THE COOLANT
Never remove the coolant reservoir filler cap when the engine is hot. Escaping steam or scalding water could cause serious personal injury.
Unscrew the filler cap slowly, allowing the pressure to escape before removing completely. Failure to unscrew the cap slowly may result in serious injury.
Antifreeze is highly flammable. Do not allow antifreeze to come into contact with open flames or other sources of ignition, e.g., a hot engine. A fire may result.
Antifreeze is poisonous and can be fatal if swallowed. Keep containers sealed and out of the reach of children. If consumption is suspected, seek medical attention immediately.
If the fluid comes into contact with the skin or eyes, rinse immediately with plenty of water. Failure to do so may result in serious injury.
When traveling in territories where the water supply contains salt, always make sure to carry a supply of fresh (rain or distilled) water. Topping up with salt water causes serious engine damage.
The use of non-approved antifreeze has an adverse effect on the engine’s cooling system and, therefore, engine durability. See LUBRICANTS AND FLUIDS.
Antifreeze damages painted surfaces. Soak up any spillage with an absorbent cloth immediately. Wash the area with a mixture of car shampoo and water.
Do not use any anti-leak products in the cooling system. Damage to the vehicle may result.
Antifreeze contains important corrosion inhibitors. The antifreeze content of the coolant must be maintained at 50% to 60% all year round, not just in cold conditions. To make sure the anti-corrosion properties of the coolant are maintained, the antifreeze content should be checked once a year. Regardless of the distance traveled, the antifreeze should be replaced every 10 years. Failure to do so may cause corrosion of the radiator and engine components. The specific gravity of a 50% antifreeze solution at 68°F (20°C) is 1.068 and protects against frost down to -40°F (-40°C).
To top up the coolant:
- Rotate the coolant reservoir filler cap counter-clockwise and remove.
- Top up to the MAX indicator mark on the side of the coolant reservoir.
CAUTION
Make sure that the correct mixture of water and antifreeze is used. See LUBRICANTS AND FLUIDS.
NOTESIn an emergency, and only if the approved antifreeze is unavailable, top up the cooling system with clean water. Be aware of the resultant reduction in frost protection. Do not top up or refill with conventional antifreeze formulations. If in doubt, consult a qualified technician.
- To refit the coolant reservoir filler cap, rotate the filler cap clockwise, until the cap’s ratchet clicks at least three times.
CHECKING THE BRAKE FLUID LEVEL
Seek qualified assistance immediately if brake pedal travel is unusually long or if there is any significant loss of brake fluid. Driving under such conditions could result in extended stopping distances or complete brake failure.
Brake fluid is highly toxic. Keep containers sealed and out of the reach of children. If accidental consumption of fluid is suspected, seek medical attention immediately.
If the fluid comes into contact with the skin or eyes, rinse immediately with plenty of clean water.
Brake fluid is highly inflammable. Do not allow brake fluid to come into contact with open flames or other sources of ignition, e.g., a hot engine.
Do not drive the vehicle with the fluid level below the MIN mark.
If the quantity of fluid in the brake reservoir drops below the recommended level, a red warning lamp in the instrument panel illuminates. See BRAKE (RED).
If the warning lamp illuminates while the vehicle is being driven, gently apply the brakes to stop the vehicle, as soon as safety permits. Check and top up the fluid level, if necessary.
With the vehicle on level ground, check the fluid level at least every week. Check more frequently in high mileage or arduous operating conditions.
To check the brake fluid level:
- Remove the driver’s side, under-hood cover. See FLUID FILLER LOCATIONS and UNDER-HOOD COVERS REMOVAL.
- Check the brake fluid reservoir level. The level should be between the MIN and the MAX marks.
NOTES
The fluid level may drop slightly during normal use, as a result of brake pad wear. The fluid level should not be allowed to drop below the MIN mark.
TOPPING UP THE BRAKE FLUID
Always use brake fluid which has the correct specification. See LUBRICANTS AND FLUIDS.
Brake fluid damages painted surfaces. Soak up any spillage with an absorbent cloth immediately. Wash the area with a mixture of car shampoo and water.
Only use new fluid from an airtight container. Fluid from open containers, or fluid previously bled from the system, will have absorbed moisture. Contaminated fluid will adversely affect performance, and must not be used.
Do not top up the brake fluid to the maximum mark unless the brake pads have been replaced. If unsure, seek qualified assistance.
To top up the brake fluid:
- Clean the brake fluid reservoir and the filler cap before removing, to prevent dirt from entering the reservoir.
- Rotate the reservoir filler cap counter-clockwise and remove.
- Top up the reservoir to at least the minimum mark.
- To refit the reservoir filler cap, rotate the cap clockwise.
- Refit the under hood cover. See UNDER-HOOD COVERS REFITTING.
CHECKING THE WASHER FLUID LEVEL
Some windshield washer products are flammable, particularly if high or undiluted concentrations are exposed to sparking. Do not allow windshield washer fluid to come into contact with exposed flames or sources of ignition, as this can cause a fire or explosion.
If the vehicle is operated in temperatures below 40°F (4°C), use a windshield washer fluid with frost protection. In cold weather, failure to use a windshield washer fluid with frost protection could result in impaired vision and increase the risk of a vehicle crash.
Do not use an antifreeze or a vinegar and water solution in the windshield washer reservoir. Antifreeze damages painted surfaces, while vinegar can damage the windshield washer pump.
Body panels may suffer discoloration as a result of windshield washer fluid spillage. Take care to avoid spillage, particularly if an undiluted or high concentration is being used. If spillage occurs, wash the affected area immediately with water.
Only use approved windshield washer fluid.
The washer fluid reservoir supplies the windshield, rear window and headlight washer jets.
Check and top up the reservoir level at least every week. Always top up with windshield washer fluid to prevent freezing.
Operate the washer controls periodically to check that the nozzles are clear and properly directed.
TOPPING UP THE WASHER FLUID
National or local regulations may restrict the use of Volatile Organic Compounds (VOCs) which are commonly used as antifreeze agents in windshield washer fluid. A windshield washer fluid with limited VOC content should be used only if it provides adequate freeze resistance for all climates in which the vehicle is operated.
- Clean the washer fluid reservoir filler cap before removing, to prevent dirt from entering the reservoir.
- Remove the filler cap.
- Top up the reservoir until the fluid is visible in the filler neck.
- Replace the filler cap.