
2023 Land Rover Range Rover Evoque Instrument Panel

INSTRUMENT PANEL OVERVIEW
The instrument panel displays information, warnings, and menu options to the driver.
The vehicle has one of the following instrument panels:
- Standard instrument panel. See STANDARD INSTRUMENT PANEL.
- Interactive driver display. See INTERACTIVE DRIVER DISPLAY.
STANDARD INSTRUMENT PANEL
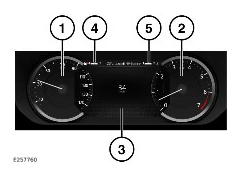
The standard instrument panel comprises permanent speedometer (1) and tachometer dials (2). The information panel (3) is only visible when the vehicle’s ignition is switched on.
The information panel displays the fuel level (4) and the engine temperature (5).
INTERACTIVE DRIVER DISPLAY
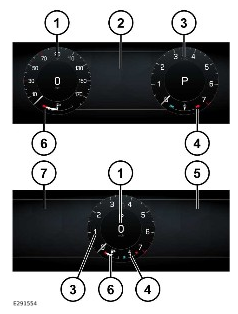
The interactive driver display comprises a:
- Speedometer.
- Info Panel.
- Tachometer.
- Engine temperature gauge.
- Right Info Panel.
- Fuel level gauge.
- Left Info Panel.
The Info Panel only displays when the Two Dial layout is selected. The Right Info Panel and Left Info Panel only display when the One Dial layout is selected. See INSTRUMENT PANEL MENU OPTIONS.
All instruments are only visible when the vehicle’s ignition is switched on.
The interactive driver display can be configured to meet personal preferences. See CONFIGURING THE INTERACTIVE DRIVER DISPLAY.
CONFIGURING THE INTERACTIVE DRIVER DISPLAY
The interactive driver display can be configured using the steering wheel controls. See INSTRUMENT PANEL MENU OPERATION and INSTRUMENT PANEL MENU OPTIONS.
To configure the interactive driver display, select Display Layout.
The following options are available:
- Two Dial: Displays the speedometer and tachometer either side of a central information panel.
- One Dial: Displays two information panels either side of a central tachometer.
- Map: Displays the navigation system information over the entire instrument panel.
- Media: Displays the current media source information over the entire instrument panel.
- Driver Assistance: Displays the currently enabled driver assistance features over the entire instrument panel.
The selected option is retained after the vehicle’s ignition is switched off.
Driving status information, e.g., the vehicle’s speed, is always displayed in the instrument panel, irrespective of the option selected.
SPEEDOMETER
The speedometer displays the current vehicle speed. Depending on market specification, the speedometer can be configured to display in mph or km/h.
To configure the speedometer, touch the settings icon on the touchscreen.
From the settings menu:
- Select ALL.
- Select Vehicle.
- Select Units.
- Select Trip.
TACHOMETER
The tachometer displays the current engine speed in revolutions per minute (rpm).
INFORMATION PANELS
The information panels display information and menu selection options. The information panels can be configured to meet personal preferences. See INSTRUMENT PANEL MENU OPTIONS.
FUEL GAUGE
The fuel gauge displays the current fuel tank level. An arrow-head symbol, next to the fuel pump symbol, indicates which side of the vehicle the fuel filler flap is located.
The low fuel warning lamp illuminates to indicate that the vehicle should be refueled in the near future.
The approximate driving distance for the current fuel level can be viewed via the trip computer. See TRIP COMPUTER.
Never allow the engine to run out of fuel. Doing so may cause serious damage to the vehicle’s fuel system.
ENGINE TEMPERATURE GAUGE
The temperature gauge displays the current engine temperature.
If the pointer moves into the red segment, the engine is overheating. In this event, the engine temperature warning lamp illuminates.
If the engine overheats, stop the vehicle as soon as safety permits. Allow the engine to idle until the temperature reduces. If the temperature does not reduce after several minutes, switch the engine off and allow it to cool.
If the problem persists, seek qualified assistance immediately.
Serious engine damage occurs if the vehicle is driven while the engine is overheating.
Engine performance may be reduced, and some vehicle systems may stop working, if the engine overheats.
INSTRUMENT PANEL MENU OPERATION
Do not operate the instrument panel menu controls while the vehicle is moving. Doing so may cause driver distraction. Driver distraction may cause an accident, leading to serious injury or death.

The instrument panel’s display settings and some vehicle features can be configured using the instrument panel menu. The instrument panel menu is operated via the left-side steering wheel controls. Press the center of the controls to display the instrument panel menu and the instrument panel menu controls.
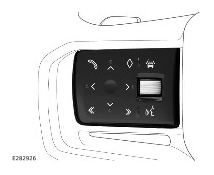
To operate the instrument panel menu:
- Press the ^ and v icons to scroll through the menu items.
- Press the > icon or the center of the controls to enter a sub-menu.
- Press the center of the controls to confirm a selection.
- Press and release the < icon to return to a higher-level menu.
- Press and hold the < icon to exit the menu.
INSTRUMENT PANEL MENU OPTIONS
Do not operate the instrument panel menu controls while the vehicle is moving. Doing so may cause driver distraction. Driver distraction may cause an accident, leading to serious injury or death.
Instrument panel menus do not display until any messages are read and cleared. Do not ignore any warning or information messages displayed in the instrument panel. Take appropriate action as soon as possible. Failure to do so may result in serious damage to the vehicle, serious injury, or death. See WARNING AND INFORMATION MESSAGES.
Not all menu options are available in all markets.
Some menu options are not available once the engine is started.
The following menu options are available:
- Phone: Contains a list of recent phone contacts.
NOTES
The phone menu only displays when a smartphone is paired and connected.
- Media: Displays information on the current media source.
- Trip: Displays trip meter information and settings. See TRIP COMPUTER.
- Info panel: Contains sub-menus and settings to allow the driver to configure the instrument panel’s display.
- Head-up display: Displays Head-Up Display (HUD) sub-menus and settings. See ADJUSTING THE HEAD-UP DISPLAY (HUD).
- Vehicle: Contains sub-menus and settings for the Tire Pressure Monitoring System (TPMS).
The following menu options are available:
- Left Info Panel: Displays when the One Dial layout is selected. Contains sub-menus for:
Media.
Trip Summary.
Driver Assistance.
- Right Info Panel: Displays when the One Dial layout is selected. Contains sub-menus for:
Navigation.
Media.
Trip Summary
- Info Panel: Displays when the Two Dial layout is selected. Contains sub-menus for:
Navigation
Media.
Trip Summary.
Driver Assistance.
- Display Layout: Contains sub-menus to allow the driver to configure the interactive driver display. See CONFIGURING THE INTERACTIVE DRIVER DISPLAY.
- Trip Selection: Displays trip meter information and settings. See TRIP COMPUTER.
- HUD Settings: Displays Head-Up Display (HUD) sub-menus and settings. See ADJUSTING THE HEAD-UP DISPLAY (HUD).
- Vehicle Settings: Contains sub-menus for:
Tire Pressure.
TPMS Load Settings.
Show Warnings.
WARNING AND INFORMATION MESSAGES
Do not ignore any warning or information messages displayed in the instrument panel. Take appropriate action as soon as possible. Failure to do so may result in serious damage to the vehicle, serious injury, or death.
The instrument panel displays warning and information messages to the driver.
Warning messages require the driver to take action as soon as safely possible. Warning messages are accompanied by a warning lamp.
Information messages provide the driver with vehicle information, or actions to be taken.
Press the thumbwheel on the left-side steering wheel controls to clear a message. See INSTRUMENT PANEL MENU OPERATION.
Clearing a warning message does not rectify the fault. The associated warning lamp remains illuminated until the fault is rectified.
If a persistent fault is detected, the instrument panel displays the relevant message each time the vehicle’s ignition is switched on. The messages are displayed in order of importance, with the highest priority message being displayed first. Each message is displayed for 2 seconds. Some messages may be accompanied by an audible tone.
Some messages may also display an Owner’s Handbook symbol. Further information on the message can be found in the relevant section of the Owner’s Handbook.
TRIP COMPUTER
The trip computer displays and stores trip information. The information panel displays the information.
The following information can be displayed:
- Date.
- Trip distance.
- Average speed.
- Average economy.
- Instantaneous economy.
- Range.
The trip computer can be configured to display in miles or km in the same way as the speedometer. See SPEEDOMETER.
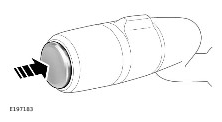
Press and release the trip button, located on the end of the lighting control, to scroll through the available options.
Some trip computer information can be reset to zero. Press and hold the trip button for 2 seconds, when the instrument panel displays the required information.
Two trip computers are available: Trip A and Trip B. Both display the same information.
To switch between the trip computers:
- Select the Trip instrument panel menu. See INSTRUMENT PANEL MENU OPERATION and INSTRUMENT PANEL MENU OPTIONS.
- Select Trip bank.
- Select Trip A or Trip B.
A third option, Trip Auto, is also available. Trip Auto allows the driver to add or remove data from either Trip A or Trip B to a running total.
To add data for the last journey to Trip Auto:
- Select Trip Auto from the Trip bank menu.
- Press the trip button for longer than 1 second.
- The instrument panel displays either Adding last journey or Removing last journey. Press the trip button for longer than 1 second to select the desired option.
- Select the Trip Selection menu. See INSTRUMENT PANEL MENU OPERATION and INSTRUMENT PANEL MENU OPTIONS.
- Select Trip A or Trip B.
A third option, Trip Auto, is also available. Trip Auto allows the driver to add or remove data from either Trip A or Trip B to a running total.
To add data for the last journey to Trip Auto:
- Select Trip Auto.
- Press the trip button for longer than 1 second.
- The instrument panel displays either Adding last journey or Removing last journey. Press the trip button for longer than 1 second to select the desired option.
HEAD-UP DISPLAY (HUD)
Do not operate or adjust the Head-Up Display (HUD) while the vehicle is moving. Doing so may cause driver distraction. Driver distraction may cause an accident, leading to serious injury or death.
The HUD projects some instrument panel information onto the windshield.
If the HUD requires cleaning, follow the recommended procedure. See CLEANING SCREENS AND DISPLAYS.
The HUD must be correctly adjusted to match the driver before use. See ADJUSTING THE HEAD-UP DISPLAY (HUD).
The HUD can only display information that is also currently displayed in the instrument panel.
The position and format of the displayed information is dependent on the priority and number of options selected.
To switch the HUD on or off:
- Select the Head-up display instrument panel menu. See INSTRUMENT PANEL MENU OPTIONS.
- Select Enable HUD.
To select which items the HUD displays:
- Select the Head-up display instrument panel menu.
- Select HUD content.
- Select the options to be displayed from the list.
- Select the HUD Settings menu. See INSTRUMENT PANEL MENU OPTIONS.
- Select Enable HUD.
To select which items the HUD displays:
- Select the HUD Settings menu.
- Select HUD Content.
- Select the options to be displayed from the list.
ADJUSTING THE HEAD-UP DISPLAY (HUD)
Do not operate or adjust the Head-Up Display (HUD) while the vehicle is moving. Doing so may cause driver distraction. Driver distraction may cause an accident, leading to serious injury or death.
The position and brightness of the HUD can be adjusted. The position of the HUD must be correctly set before use. The correct position is dependent on the height of the driver and the seat position.
Before setting the HUD to the correct position, make sure the driver’s seat is positioned correctly. See SITTING IN THE CORRECT POSITION.
Failure to sit in the correct position may result in the HUD image not being fully visible.
To set the HUD to the correct position:
- Select the Head-up display instrument panel menu. See INSTRUMENT PANEL MENU OPTIONS.
- Select Position.
- Follow the on-screen positioning instructions, using the left-side steering wheel controls.
- When correctly adjusted, press the thumbwheel on the left-side steering wheel controls.
The position of the HUD can be stored using the seat memory function. See SEAT POSITION MEMORY.
To adjust the brightness of the HUD:
- Select the Head-up display instrument panel menu.
- Select Brightness.
- Follow the on-screen instructions, using the left-side steering wheel controls.
- When correctly adjusted, press the thumbwheel on the left-side steering wheel controls.
- Select the HUD settings menu. See INSTRUMENT PANEL MENU OPTIONS.
- Select Position.
- Follow the on-screen positioning instructions, using the left-side steering wheel controls.
- When correctly adjusted, press the thumbwheel on the left-side steering wheel controls.
The position of the HUD can be stored using the seat memory function. See SEAT POSITION MEMORY.
To adjust the brightness of the HUD:
- Select the HUD settings instrument panel menu.
- Select Brightness.
- Follow the on-screen instructions, using the left-side steering wheel controls.
- When correctly adjusted, press the thumbwheel on the left-side steering wheel controls.
HEAD-UP DISPLAY (HUD) LIMITATIONS
The Head-Up Display (HUD):
- Takes longer to display information in extreme temperatures.
- Does not operate correctly if items are placed between the top of the dashboard and the windshield.
- May not view correctly if the driver is wearing polarized sunglasses.