2022 Kawasaki KX250 Valve Clearance

Valve Clearance
Valve and valve seat wear decreases valve clearance, upsetting valve timing.
NOTICE
If valve clearance is left unadjusted, wear will eventually cause the valves to remain partly open, which lowers performances, burns the valves and valve seats, and may cause seri- ous engine damage. Valve clearance for each valve should be checked and adjusted in accordance with the Periodic Maintenance Chart.
NOTE
lf the engine is hot, wait until the engine cools. Valve clearance must be checked when the engine is cold (room temperature).
Valve Clearance Inspection
Remove the spark plug cap (see Spark Plug section).
- Remove the cylinder head cover bolts and washers.
- Remove the cylinder head cover.
A. Cylinder Head Cover Bolts and Washers
B. Cylinder Head Cover
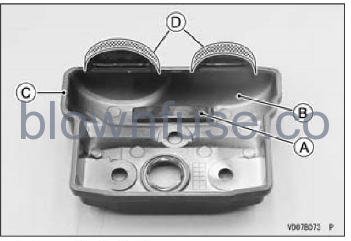
Remove the head cover gasket and spark plug hole gasket.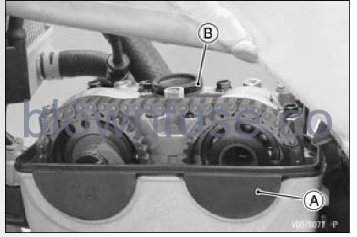
A. Head Cover Gasket
B. Spark Plug Hole Gasket
Remove the two caps from the alternator cover.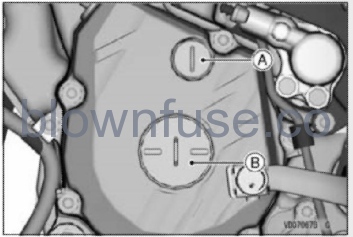
A. Timing Inspection Cap
B. Alternator Rotor Nut Cap
Bring the piston to the Top Dead Center (TDC) of its compression stroke to inspect the valve clear- ance (the position at the end of the compression stroke) by aligning the top mark with the grooves on the alternator cover while turning the crankshaft counterclockwise.
A. Top Mark
B. Grooves on Alternator Cover
C. Crankshaft
D. Crankshaft Rotation Direction
At this point, the timing marks on the camshaft sprockets must be almost aligned with the cylinder head upper surface as shown.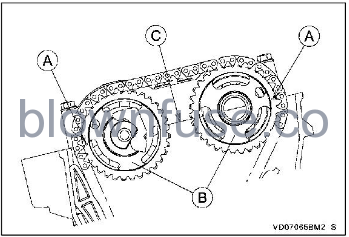
A. Timing Marks
B. Camshaft Sprockets
C. Cylinder Head Upper Surface
Using the thickness gauge, measuring the clear ance between each cam lobe and rocker arm, fo all four valves.
NOTE
Record the measured valves clearance.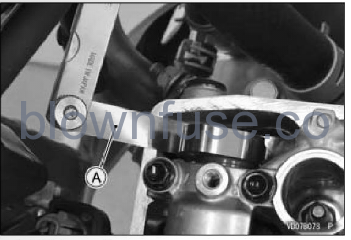
A. Thickness Gauge
Standard Valve Clearance
- If the valve clearance is not within the specified range, adjust by an authorized Kawasaki dealer or a competent mechanic following the instructions in the Service Manual.
- Using a high flash-point solvent, clean off any oil or dirt that may be on the liquid gasket coating area. Dry them with a clean cloth.
- Replace the spark plug hole gasket with a new one, and install it.

A. Spark Plug Hole Gasket
- Make sure that the upper chain guide is bottomed to the cylinder head cover.
- Replace the head cover gasket with a new one.
- Install the head cover gasket on the cylinder head cover.
- Using a high flash-point solvent, clean off any oil or dirt that may be on the liquid gasket coating area.
- Dry them with a clean cloth.
- Apply liquid gasket to the head cover gasket as shown.
A. Upper Chain Guide
B. Cylinder Head Cover
C. Head Cover Gasket
D. Liquid Gasket
NOTICE
Unless the upper chain guide is bottomed, the camshaft chain could push the cylinder head cover upward, leading to an oil leak.
- Install the cylinder head cover.
- Install the washer with the metal side upwards to the cylinder head cover, and tighten its bolts to the specified torque.
Tightening Torque
Cylinder Head Cover Bolts: 10 Nm (1.0 kgf m, 89 in-lb) Install the removed parts.