2022 Kawasaki KLX300R Tightening Torques of Nuts and Bolts
Tightening Torques of Nuts and Bolts
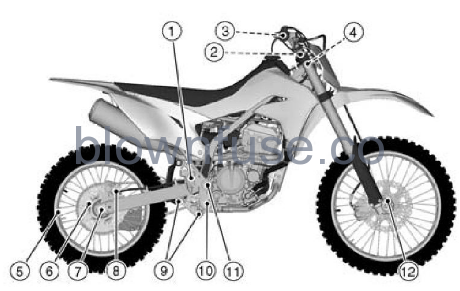
Location of nuts and bots
Before the first ride of each day of operation, check the tightness of the nuts and bolts shown below. Check also that all cotter pins are in place and in good condition.

- Front Fork Clamp Bolts (Lower)
- Handlebar Holder Nuts
- Front Fork Clamp Bolts (Upper)
- Handlebar Clamp Bolts
- Spark Plug
- Rear Shock Absorber Bolt (Upper)
- Front Wheel Spoke Nipples
- Front Brake Disc Mounting Bolts
- Front Axle
- Front Caliper Mounting Bolts
- Side Stand Bolt
- Rear Shock Absorber Bolt (Lower
- Rear Sprocket Nut
- Rear Master Cylinder Mounting Bolts
- Steering Stem Head Nut
- Front Master Cylinder Clamp Bolts
- Steering Stem Nut
- Rear Wheel Spoke Nipples
- Rear Brake Disc Mounting Bolts
- Rear Axle Nut
- Rear Caliper Mounting Bolt
- Tie-Rod Mounting Nuts
- Rocker Arm Pivot Nut
- Swingarm Pivot Shaft Nut
- Front Axle Clamp Bolts
Torque table
Tighten all nuts and bolts to the proper torque using an accurate torque wrench. An insufficiently tightened nut or bolt may become damaged or tall out, possibly resulting in damage to the motorcycle and injury to the rider. An overtightened nut or bolt may become damaged, broken, or tall out.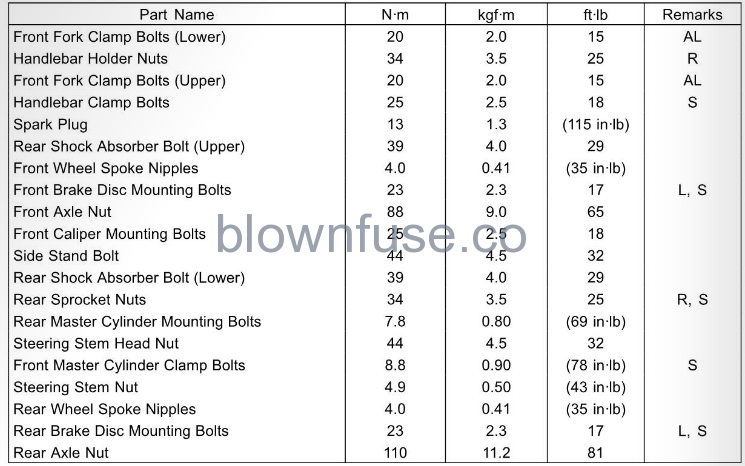

- AL: Tighten the two clamp bolts alternately two times to ensure even tightening torque.
- G. Apply grease.
- L: Apply a non-permanent locking agent.
- R: Replacement Parts
- S: Follow the specified tightening sequence.
- 21: Apply 2-stroke oil.