2022 Kawasaki KLX300R Cooling System
Cooling System
Radiator Hoses and Connections Check the water hoses for leakage, cracks, bulges, deterioration or loose connections in accordance with the Periodic Maintenance Chart.
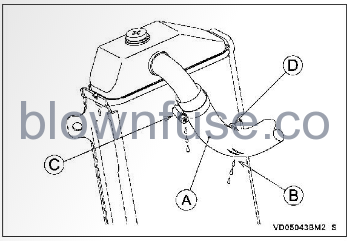
A. Water Hose
B. Cracks
C. Leakage
D. Bulges
Radiator
Check the radiator fins for obstruction by insects or mud. Clean off any obstructions with a low-pressure stream of water.
NOTICE
Using high-pressure water, as from a car wash facility, could damage the radiator fins and impair the radiator’s effectiveness. Do not obstruct or deflect airflow by in-stalling unauthorized accessories in front of the radiator. Interference with the cooling airflow can lead to overheating and consequent engine damage.
Coolant
Coolant absorbs excessive heat from the engine and transfers it to the air through the radiator. If the coolant level becomes low, the engine overheats and may suffer severe damage. Check the coolant level each day before riding the motorcycle, and re-plenish coolant if the level is low.
WARNING
Hot engine coolant can cause serious burns. To avoid burns, do not remove the radiator cap or try to inspect the coolant level or change the coolant when the engine is still hot. Wait until it cools down.
NOTE
The coolant originally filled into the cooling system contains 50% ofa permanent, ethylene-glycol -based antifreeze, has a freezing point of -35°C-31°F) and a green appearance.
Coolant Level Inspection
NOTE
- Inspect the coolant level when the engine is cold (room or atmospheric temperature).
- Check the coolant level with the motorcycle held perpendicular on the level ground.
- Check the coolant level with the level lines on the reserve tank behind the left side cover viewed from front or rear of the reserve tank. The coolant level should be between the F (FULL) and L (LOW) level lines.

A. Left Side Cover
B. Reserve Tank
C. F (FULL) Level Line
D. L(LOw) Level Line
E. Tank Cap
- If the coolant level is low, remove the left side cover (see Battery Removal) and add coolant as follows.
- Remove the tank cap and add recommended coolant which diluted in properly mixing ratio through the filler opening between the F (FULL) and L (LOW) level lines.
Water and Antifreeze Mixing Ratio
1:1 (water: antifreeze)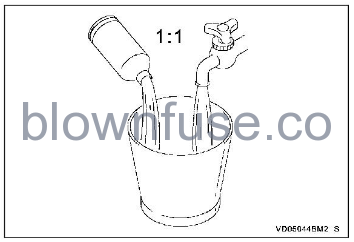
Recommended Antifreeze
Permanent type of antifreeze (ethylene glycol base plus corrosion and rust inhibitors for aluminum engines and radiators)
Coolant Total Amount
1.2L(1.3 US qt) Install the tank cap.
Coolant Change
The coolant should be changed periodically to ensure long engine life.
WARNING
The cooling system is pressurized and can get extremely hot during normal operation and cause serious burns. To prevent burns, do not touch the radiator when it is hot. Do not attempt to open the radiator cap when hot since steam and hot coolant can forcefully erupt when the cap is even loosened slightly.
- Wait for the engine to cool completely.
- Situate the motorcycle perpendicular to the ground.
- First, turn the radiator cap counterclockwise to the first stop and wait there for a few seconds.
- Then, push and turm the radiator cap further in the same direction and remove it.
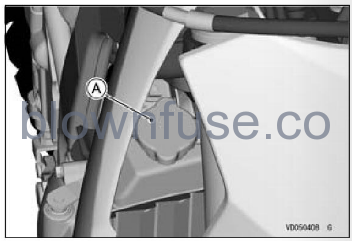
A. Radiator Cap
- Place a container under the coolant drain bolt on the clutch cover.
- Remove the drain bolt and sealing washer to drain the coolant.
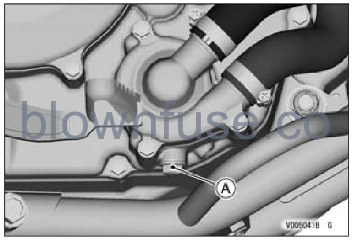
A. Coolant Drain Plug
NOTICE
Immediately wash away any coolant that spills on the frame, engine, or wheel.
WARNING
Coolant on tires will make them slippery and can cause loss of traction resulting in an accident and injury. Thoroughly clean any coolant that might have splashed on the tires.
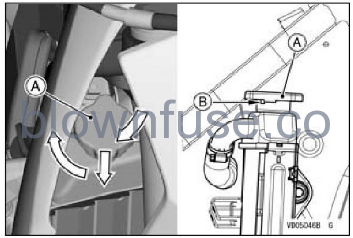
- Remove the left side cover (see Battery Removal)
- Remove the reserve tank mounting bolts and pull out the reserve tank from the frame.
- Remove the tank cap and drain the coolant to a container.
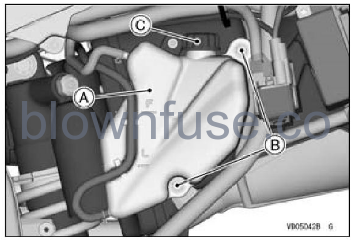
A. Reserve Tank
B. Mounting Bolts
C. Tank Cap
Install the reserve tank to the frame.
Tightening Torque
Reserve Tank Mounting Bolts: 6.9 Nm (0.70 kgf-m, 61 in-l
- Visually inspect the old coolant.
- If whitish cotton-like wafts are observed, aluminum parts in the cooling system are corroded and the system must be flushed.
- If the coolant is brown, iron or steel parts are rusting and the system must be flushed.
Install the coolant drain bolt and new sealing washer to the clutch cover and tighten it with the specified torque.
NOTE
Always replace the sealing washer with a new one.
Tightening Torque
Coolant Drain Bolt: 25 Nm (2.5 kgfm, 18 ft:b)
- Fill the reserve tank up to the F(FULL) level line with recommended coolant then install the tank cap.
- Fill the radiator up to the bottom of the radiator filler neck with recommended coolant.
NOTE
- Pour in the coolant slowly so that it can expel the air from the engine and radiator.
- Squeeze the water hoses several times to aid flow out the air bubbles accumulated in the cooling system.
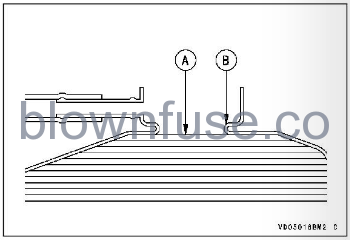
A. Coolant Level
B. Filler Neck
Situate the motorcycle perpendicular to the ground until the radiator filler neck is level to the ground so that the filler neck is located uppermost in order to exhaust the air accumulated in the radiator.
NOTICE
Use coolant-containing corrosion inhibitors made specifically for aluminum engines and radiators in accordance with the instruction of the manufacture. Soft or distilled water must be used with the antifreeze in the cooling system. If hard water is used in the system, it causes scale accumulation in the wa ter passages, and considerably reduces the efficiency of the cooling system.
Loosen the air bleeder screw on the top of the left radiator until the coolant begins to flow out from the air bleeder screw hole.
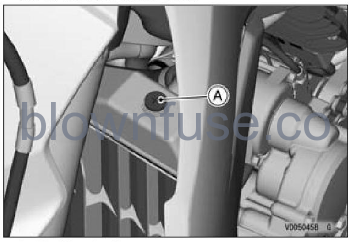
A. Air Bleeder Screw
- Replace the O-ring of the air bleeder screw with a new one
- Tighten the air bleeder screw to specified torque.
Tightening Torque
Air Bleeder Screw: 1.6 Nm (0.16 kgf m, 14 in-lb)
NOTE
- Pour in the coolant slowly so that it can expel the air from the engine and radiator.
- The radiator cap should installed in two steps.
- Turn the cap clockwise to the first stop. Then push down and further turn the cap until it stops against the stopper. Make sure that the radiator cap has been installed properly.
A. Radiator Cap
B. Stopper
- Start the engine and warm up thoroughly, then stop it.
- Check the coolant level in the reserve tank after the engine has cooled down. If the coolant level is low, add coolant between the F (FULL) and L (LOW) level lines.
- Check the cooling system for leaks.
- Install the left side cover.