
2022 Kawasaki KLX140R L Battery
Battery
- The battery installed in this motorcycle is a sealed type, so it is not necessary to check the battery electrolyte level or add distilled water.
- However, in order to maximize battery life and ensure that it will provide the power needed to start the motorcycle you must properly maintain the battery’s charge. When used regularly, the charging system in the motorcycle helps keep the battery fully charged. If your motorcycle is only used occasionally or for short periods of time, the battery is more likely to discharge.
- Due to their internal composition, batteries continually self-discharge. The discharge rate depends on the type of battery and ambient temperature. As temperatures rise, so does the discharge rate. Every 15°C (59°F) doubles the rate.
- Electrical accessories, such as digital clocks and computer memory, also draw current from the battery even when the engine stops. Combine such engine-stop” draws with hot temperature, and a battery can go from fully charged to completely dis- charged in a matter of days.
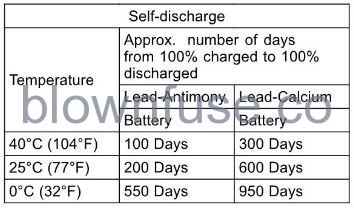

In extremely cold weather the fluid in an inadequately charged battery can easily freeze, which can crack the case and buckle the plates. A fully charged battery can withstand sub-freezing temperatures with no damage.
Battery Sulfation
A common cause of battery failure is sulfation. Sulfation occurs when the battery is left in a discharged condition for an extended time. Sulfate is a normal by-product of the chemical reactions within a battery. But when continuous discharge allows the sulfate to crystallize in the cells, the battery plates become permanently damaged and will not hold a charge. Battery failure due to sulfation is not warrantable.
Battery Maintenance
It is the owner’s responsibility to keep the battery fully charged. Failure to do so can lead to battery failure and leave you stranded. If you are riding your vehicle infrequently, inspect the battery voltage weekly using a voltmeter. If it drops below 12.6 volts, the battery should be charged using an appropriate charger (check with your Kawasaki dealer). If you will not be using the motorcycle for longer than two weeks, the battery should be charged using an appropriate charger. Do not use an automotive-type quick charger that may overcharge the battery and damage it.
NOTE
Leaving the battery connected causes the electrical components to make the battery discharge, resulting in the over-discharge of the battery. In this case, the repair or replacement of the battery is not included in the warranty. If you do not drive for four weeks or more, disconnect the battery from the vehicle.
Kawasaki-recommended chargers are:
- Battery Mate 150-9
- OptiMate 4
- Yuasa MB-2040/2060
- Christie C10122S
- If the above chargers are not available, use an equivalent one.
- For more details, ask your Kawasaki dealer.
Battery Charging
- Remove the battery from the motorcycle (see Battery Removal).
- Attach the leads from the charger and charge the battery at a rate (amperage x hours) that is indicated on the battery. If it is not possible to read the rate, charge the battery at an amperage that is about 1/10th of the battery capacity.
- The charger will keep the battery fully charged until you are ready to reinstall the battery in the motorcycle (see Battery Installation).
NOTICE
Do not install a conventional battery in this motorcycle, or the electrical system cannot work properly.
NOTE
lf you charge the sealed battery, never fail to ob- serve the instructions shown in the label on the battery
Battery Removal
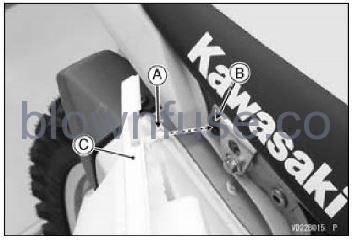
- Remove the bolt on both sides.
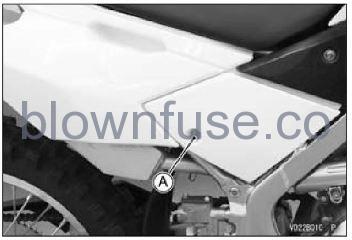
- Bolt
- Pull the side cover outward to clear the projection, and remove the side cover on both sides.
- A. Projection
- B. Side Cover
- Remove the bolt and nut on both sides.
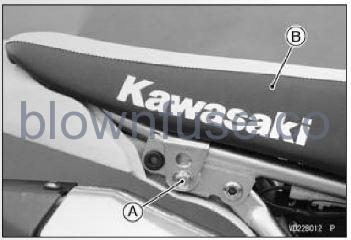
- Remove the seat.
- A. Bolt and Nut
- B. Seat
- Disconnect the cables from the battery. first from the -) terminal and then the (+) terminal.
- Remove the bolts and battery holder.
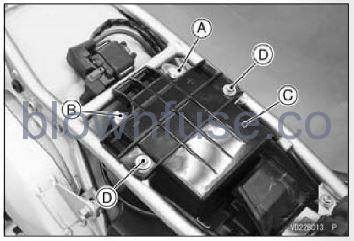
- A. (+) Terminal
- B. (-) Terminal
- C. Battery Holder
- D. Bolts
- Take the battery out of the case.
- Clean the battery using a solution of baking soda and water. Be sure that the cable connections are clean.
Battery Installation
- Place the battery in the battery case.
- Install the battery holder and tighten the bolts.
- Connect the red cable to the (+) terminal, and then connect the black cable to the (-) terminal.
NOTE
Install the battery in the reverse order of the Battery Removal.
NOTICE
Installing the (-) cable to the (+) terminal of the battery or the (+) cable to the (-) terminal of the battery can seriously damage the electrical system.
- Put a light coat of grease on the terminals to prevent corrosion.
- Insert the hooks of the seat under the flange collar and bracket.

- A. Hooks
- B. Seat
- C. Flange Collar
- D. Bracket
- Tighten the bolt and nut on both sides.
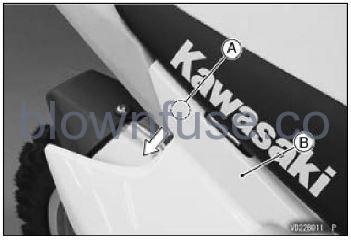
- Insert the projection of the side cover into the grommet on both sides.
- A. Projection
- B. Grommet
- C. Side Cover
- Tighten the bolt on both sides.