
2022 Kawasaki CONCOURS 14ABS Air Cleaner

Air Cleaner
This motorcycle’s air cleaner element consists of a wet paper filter that cannot be cleaned.
Air Cleaner Element Removal
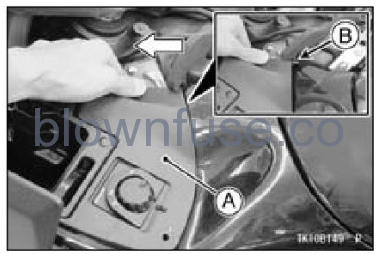
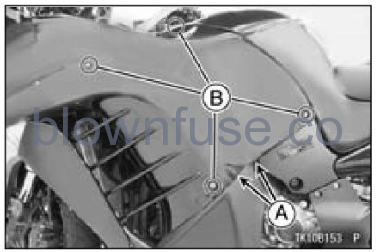
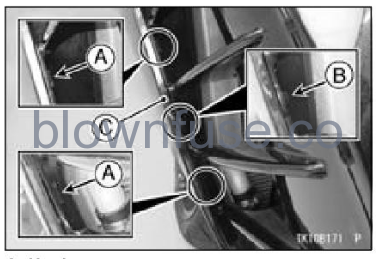
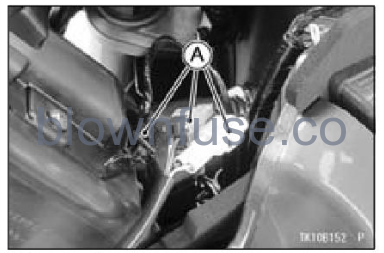
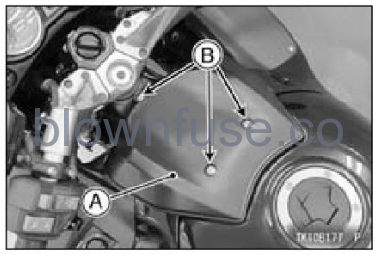
- Remove the bolts with washers.
- Remove the front fuel tank cover.

- A. Bolts with Washers
- B. Front Fuel Tank Cover
- Turn the key knob to “ON” position.
- Set the windshield position to top by pushing the electric windshield adJusting button.
WARNING
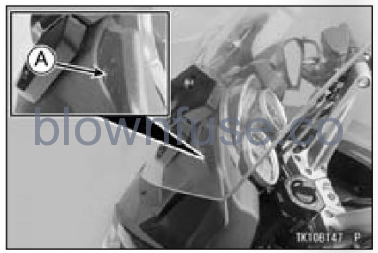
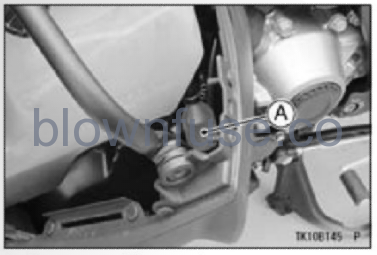
Windshield movement can trap the hands and fingers and cause injury. When the ignition switch is turneed to the “OFF” posi tion, the windshield automatically moves to the bottom position. Keep hands and fingers away from the windshield when switching the ignition to “OFF.” - Remove the quick rivet.
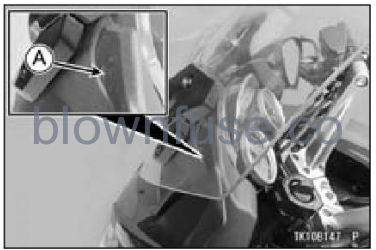
- A. Quick Rivet
NOTE
The inner cover uses a quick rivet. The quick rivet can be removed by pushing the center pin into the quick rivet, and when installing it, pull the center pin fully up first, and then push into the center pin after inserting it.
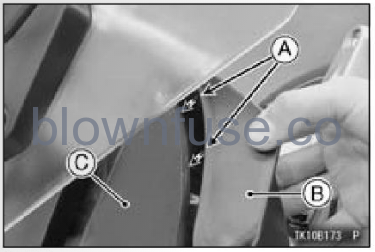
Quick Rivet Removal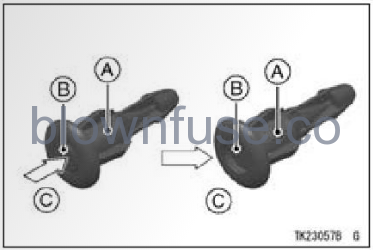
- A. Quick Rivet
- B. Center Pin
- C. Push in.
Quick Rivet Installation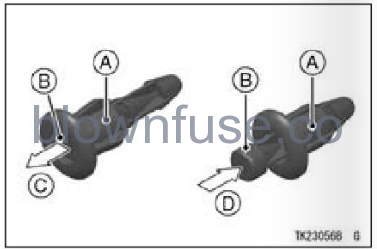
-
- A. Quick Rivet
- B. Center Pin
- C. Pull up fully.
- D. Push in.
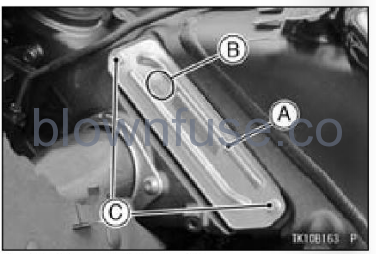
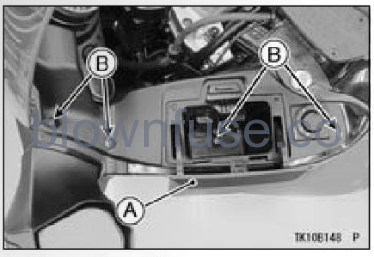
- Open the storage case lid by pushing the release button.
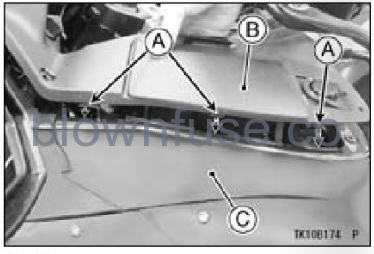
- Remove the bolts.
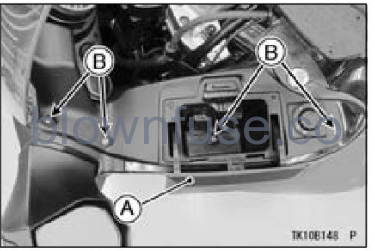
- A. Storage Case Lid
- B. Bolts
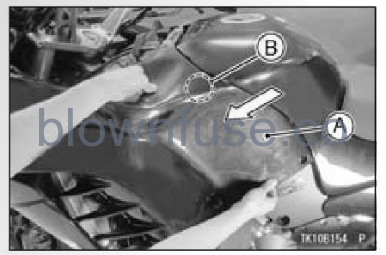
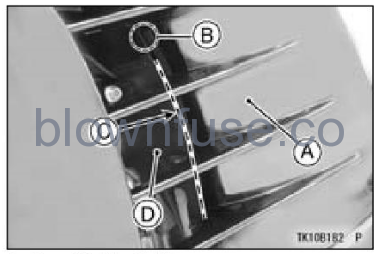
- Pull the inner cover forward to clear the hook of the inner cover.
- A. Inner Cover
- B. Hook
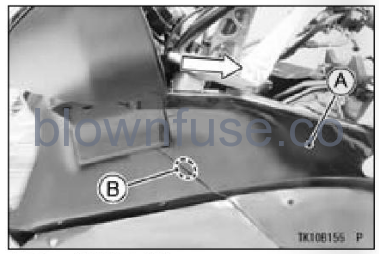
- Pull the inner cover upward to clear the tabs of the inner cover.
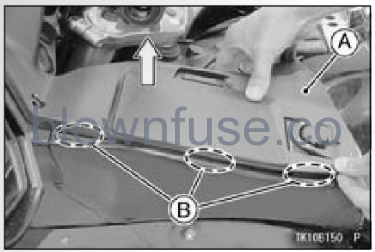
- A. Inner Cover
- B. Tabs
- Pull the inner cover upward to clear the tabs of the inner cover.
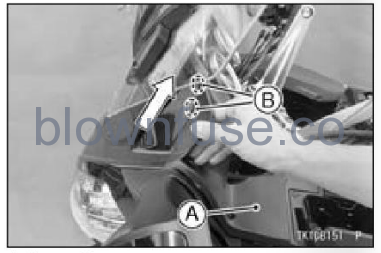
- A. Inner Cover
- B. Tabs
- Disconnect the connectors.
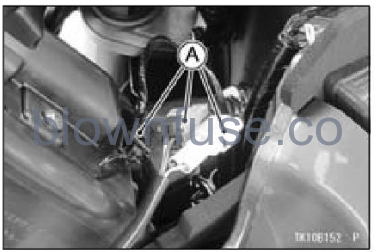
- A. Connectors
- Remove the inner cover.
- Turn the key knob to “OFF” position.
NOTE
lf the ignition switch is on for an extended time, the battery may become totally discharged.
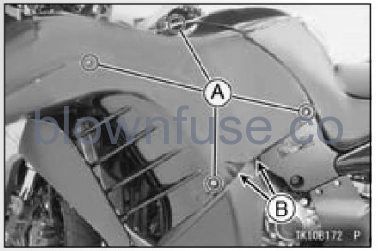
- Remove the quick rivets.
- Remove the bolts with washers.
- A. Quick Rivets
- B. Bolts with Washers
- Pull the rear middle fairing outward to clear the projection of the rear middle fairing
- A. Rear Middle Fairing
- B. Projection
- Pull the rear middle fairing backward to clear the tab of the rear middle fairing.
- A. Rear Middle Fairing
- B. Tab
- Pull the rear middle fairing upward to clear the tabs of the rear middle fairing.
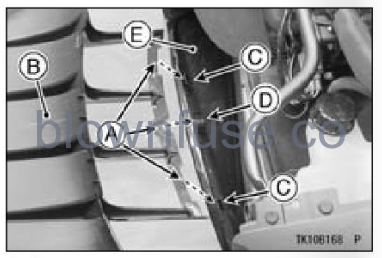
- Pull the rear middle fairing backward to clear the hooks and projection of the front middle fairing.
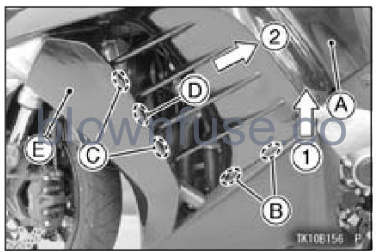
- A. Rear Middle Fairing
- B. Tabs
- C. Hooks
- D. Projection
- E. Front Middle Fairing
- Pull the relays with pad forward to clear the rivets and relays from the bracket.
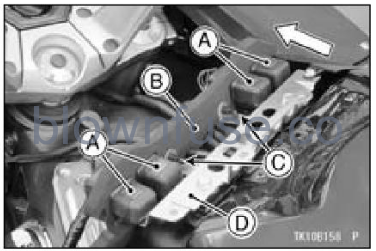
- A. Relays
- B. Pad
- C. Rivetss
- D. Bracket
- Remove the bolts.
- Clear the bracket with pad.
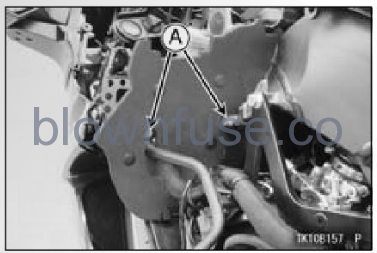
- A. Bolts
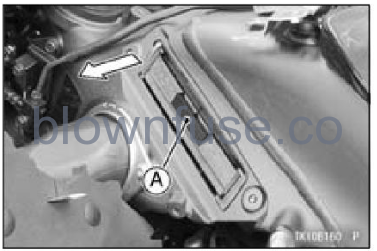
- Remove the bolts.
- Remove the air cleaner element cover.

- A. Bolts
- B. Air Cleaner Element Cover
- Pull out the air cleaner element.
- A. Air Cleaner Element
Air Cleaner Element Installation
- Install a new element so that screen side faces upward.
- A. New Element
- B. Screen Side
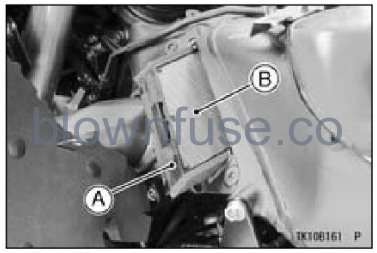
- Check that the seal is in place on the air cleaner element cover.
- A. Seal
- B. Air Cleaner Element Cover
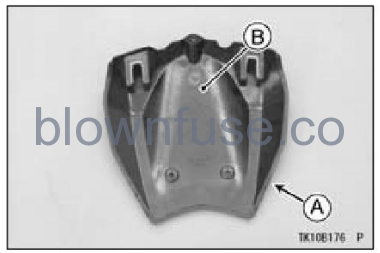
- Install the air cleaner element cover so that arrow mark faces forward.
- Tighten the bolts securely.
- A. Air Cleaner Element Cover
- B. Arrow Mark
- C. Bolts
- Install the bracket with pad to the original position.
- Tighten the bolts securely.
- A. Bracket with Pad
- B. Bolts
- Insert the rivets into the holes of the bracket.
- Insert the slit of each relay to the bracket.
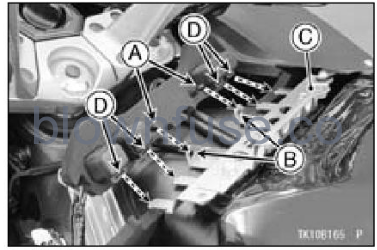
- A. Rivets
- B. Holes
- C. Bracket
- D. Slits
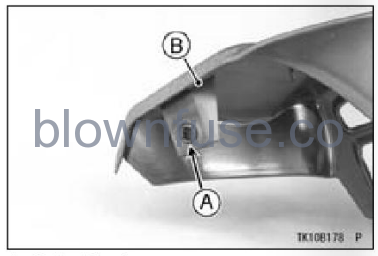
- Check that the pad is in place on the rear middle fairing.

- A. Pad
- B. Rear Middle Fairing
- Fit the grooves of the rear middle fairing to the hooks and projection of the front middle fairing.
- A. Grooves
- B. Rear Middle Fairing
- C. Hookss
- D. Projection
- E. Front Middle Fairingg
- Insert the tabs of the rear middle fairing into the slots of the lower fairing.

- A. Tabs
- B. Rear Middle Fairing
- C. Slots
- D. Lower Fairing
- Fit the groove of the rear middle fairing to the hook of the radiator cover.
- Insert the rear middle fairing into the groove of the left inner rubber cover.
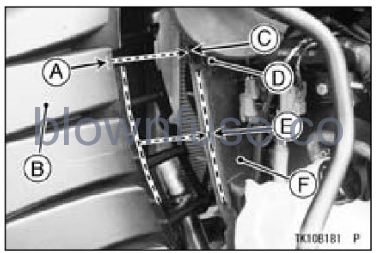
- A. Groove
- B. Rear Middle Fairing
- C. Hook
- D. Radiator Cover
- E. Groove
- F. Left Inner Rubber Cover
- Insert the tab of the rear middle fairing into the inside of the upper fairing.
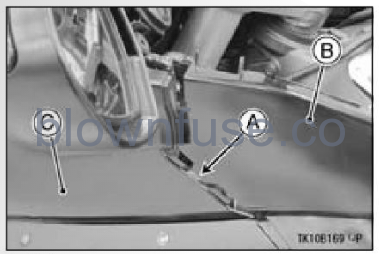
- A. Tab
- B. Rear Middle Fairing
- C. Upper Fairing
- Check that the grommet is in place on the fuel tank.
- Insert the projection of the rear middle fairing into the grommet on the fuel tank.
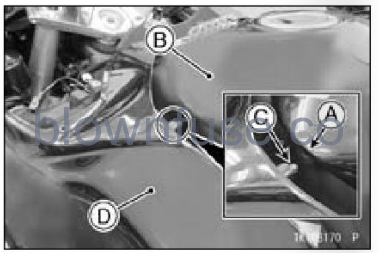
- A. Grommet
- B. Fuel Tank
- C. Projection
- D. Rear Middle Fairing
- Check that the grooves of the rear middle fairing are in place into the hooks and projection of the front middle fairing.
- A. Hooks
- B. Projection
- C. Front Middle Fairing
- Check that the groove of the rear middle fairing is in place to the hook of the radiator cover.
- Check that the rear middle fairing is in place into the groove of the left inner rubber cover.
- A. Rear Middle Fairing
- B. Hook
- C. Groove
- D. Left Inner Rubber Cover
- Tighten the bolts with washers securely.
- Install the quick rivets.
- A. Bolts with Washers
- B. Quick Rivets
- Check that the collar rivet is in place on the inner cover.
- A. Collar Rivet
- B. Inner Cover
- Connect the connectors securely.
- A. Connectors
- Turn the key knob to “ON” position.
- Set the windshield position to top by pushing the electric windshield adJusting button.
WARNING
Windshield movement can trap the hands and fingers and cause injury. When the ignition switch is turned to the “OFF” position, the windshield automatically moves to the bottom position. Keep hands and fingers away from the windshield when switching the ignition to “OFF.” - Insert the tabs of the inner cover into the inside of the upper fairing.
- A. Tabs
- B. Inner Cover
- C. Upper Fairing
- Insert the tabs of the inner cover into the inside of the rear middle fairing.
- A. Tabs
- B. Inner Cover
- C. Rear Middle Fairing
- Insert the hook of the inner cover into the inside of the rear middle fairing.
- A. Hook
- B. Inner Cover
- C. Rear Middle Fairing
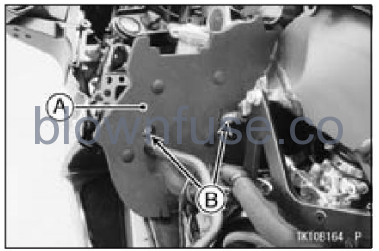
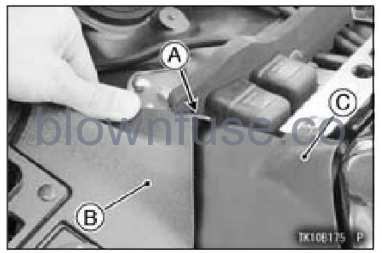
- Open the storage case lid by pushing the release button.
- Insert the projection of the inner cover into the hole of the bracket.
NOTE
ln this photo, the inner cover has been removed for clarity.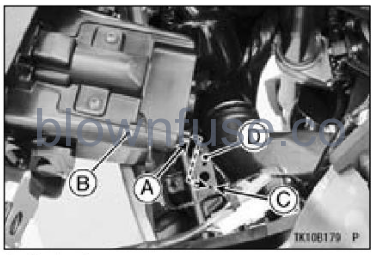
- A. Projection
- B. Inner Cover
- C. Hole
- D. Bracket
- Tighten the bolts securely.
- A. Storage Case Lidd
- B. Bolts
- Install the quick rivet.
- A. Quick Rivet
- Turn the key knob to “OFF” position.
NOTE
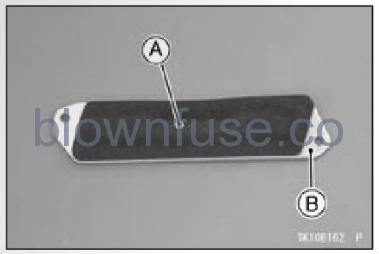
lf the ignition switch is on for an extended time, the battery may become totally discharged. - Check that the rubber trim is in place on the front fuel tank cover.
- A. Rubber Trim
- B. Front Fuel Tank Cover
- Install the front fuel tank cover.
- Tighten the bolts with washers securely.
- A. Front Fuel Tank Cover
- B. Bolts with Washers
Oil Draining
- Remove the left rear middle fairing (see Air Cleaner Element Removal).
- Inspect the transparent reservoir located to the left of the engine to see if any oil has run down.
- A. Transparent Reservoir
- If there is any oil in the transparent reservoir, remove the transparent reservoir from the lower end of the drain hose and drain the oil.
WARNING
Oil on tires will make them slippery and can cause an accident and injury. Be sure to install the reservoir in the drain hose after draining.