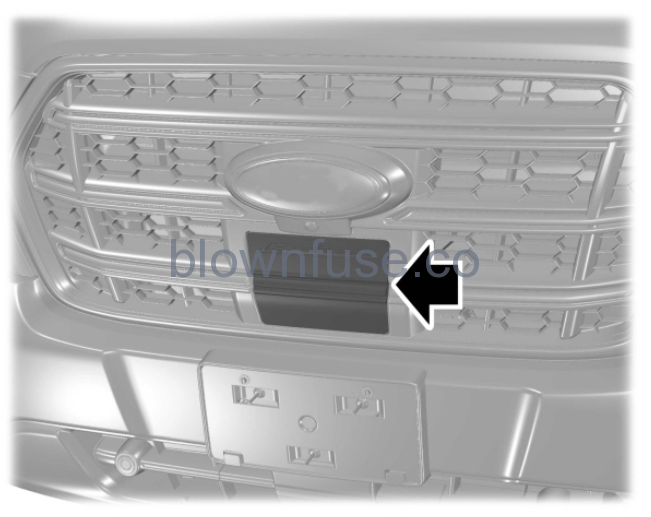
The below instructions show exactly how to charge the 2022 Ford E-Transit. You can find the charging port located on the front of the vehicle under the Ford logo. You will need either a public charging cable, or the cable supplied with your E-Transit to get the charging process started.
Locating the Charging Port
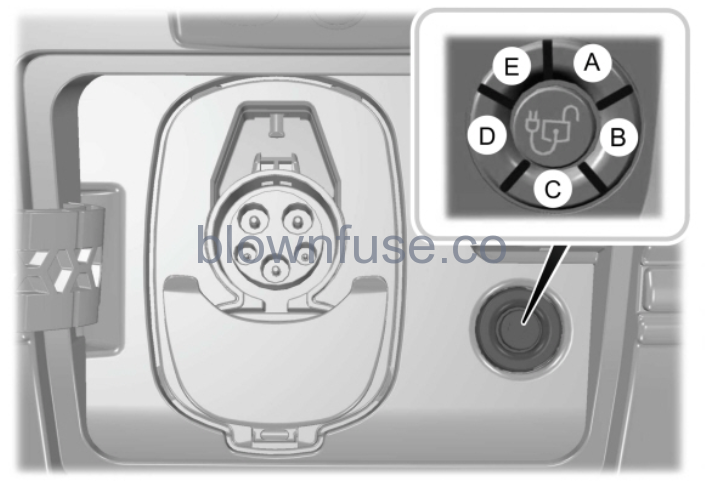
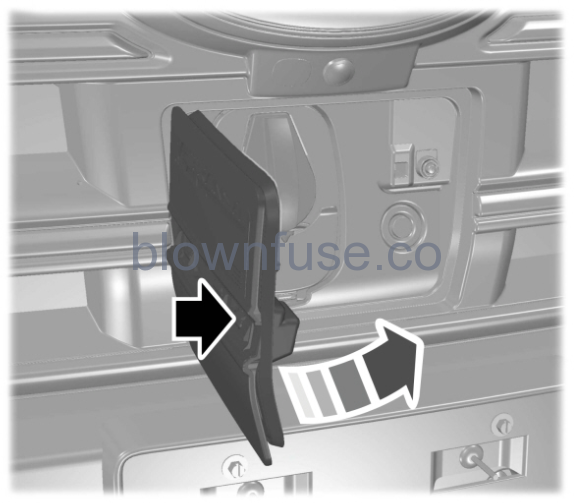
The charge port is on the front of the vehicle. To open, press the center right-hand edge of the charge port door and then release.
Connecting the Charger
To charge the E-Transit high voltage battery: You must unwrap the mobile power cord completely before charging.
- Put your vehicle in park (P).
Note: Your vehicle must be in park (P) to charge.
- Plug the connector into the control box.
Note: To insert the connector, firmly grasp the connector by the cable or plug and push into the control box until an audible click is heard. Make sure the connector is fully inserted and flush with the control box before inserting it into the outlet. Improper insertion will cause a longer charge session or faults.
- Plug the connector into the wall outlet.
- Confirm that the mobile power cord indicator lights illuminate.

5. Press the center right hand edge of the charge port door and then release to open the door.
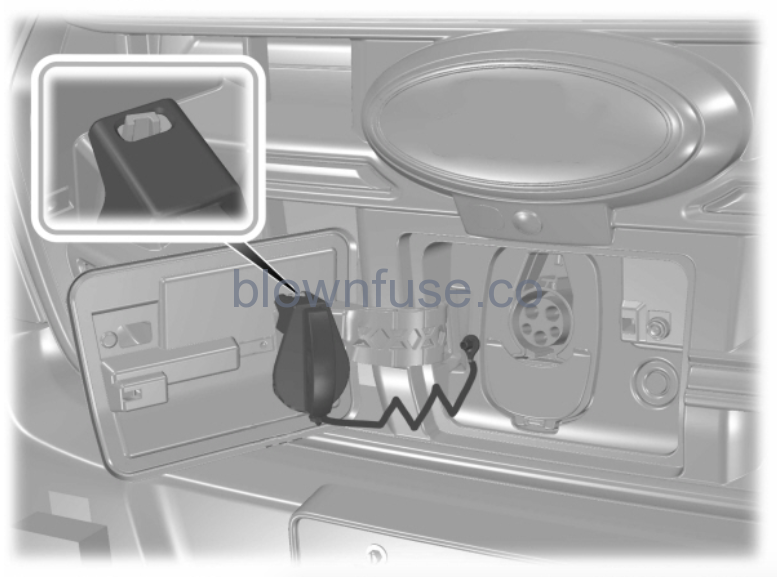
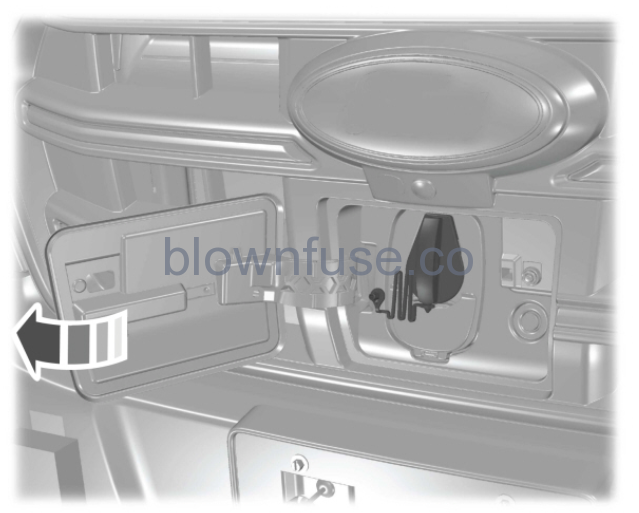
6. Remove the charge port dust cap and hang it on the pin.

7. Plug the charge coupler into the charge port receptacle on your vehicle.
Note: Make sure the button clicks confirming that you have completely engaged the coupler. When you plug in your vehicle, it starts charging to 100% by default unless scheduled charging has been set up for this location.
Note: Plug the connector into the wall outlet before connecting the charge coupler handle to your vehicle’s charge port.
Note: When the handle is properly engaged the light ring illuminates. This indicates the beginning of a normal charge cycle.
Note: There could be a delay in light ring illumination due to vehicle internal communications.
Note: If charging for your vehicle fails, please contact the Customer Relationship Center, or click on Live chat. To ensure superior service, please take note of your serial number when contacting customer support.
Charging at a Charge Station
- Put your Ford E-Transit in park (P).
Note: Your vehicle must be in park (P) to charge.
2. Press the center right hand edge of the charge port door and then release to open the door.

3. Remove the charge port dust cap and hang it on the pin.

4. Select the appropriate charge station coupler.
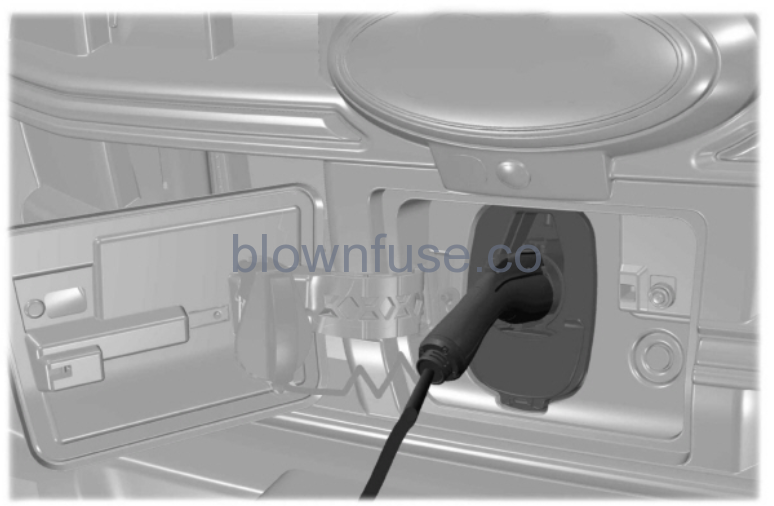
5. Plug the charge coupler handle into the charge port receptacle on your vehicle.
Note: Make sure the button clicks confirming that you have completely engaged the coupler. When you plug in your vehicle, it starts charging to 100% by default unless scheduled charging has been set up for this location.
Note: When the handle is properly engaged the light ring illuminates. This indicates the beginning of a normal charge cycle.
Note: There could be a delay in light ring illumination due to vehicle internal communications.Information about public charge stations is available through the in-vehicle screen as well as the FordPass app with pricing, power levels, and real time availability. Rates for charging varies by power level, provider, location, and time of day.When charging your vehicle at a BlueOval Charge Network station, use the FordPass app to activate and pay for charging. You can also just plug in to activate charging at Plug & Charge capable stations. If the charging station is not in the BlueOval Charge Network, use the directions on the charge station to activate the charger.
Tips For Charging
Use AC charging when possible and minimize the use of DC charging. It helps to preserve your E-Transits high voltage battery’s efficiency and lifespan. We recommend ending DC charges at 80% state of charge.
Note: The system could reduce DC fast charging rate to preserve the battery. This is based on battery temperature, battery state of charge and battery health.In cold temperatures, you may notice that DC charging takes longer when the outside temperature drops below 10°C. Shutting off climate control or reducing climate control temperature and fan settings for the first 10 to 15 minutes of DC charging will allow the battery to warm up and improve the charging rate.
Note: When the temperature is below freezing, fully turning off cabin heat for the first 10 to 15 minutes of DC charging could significantly improve the charging rate.
Note: When AC charging, keep your vehicle plugged in when the outside temperatures are very high or low. This enables the system to maintain the high voltage battery for best performance.See Maximizing Your Driving Range – Vehicles Built From: 31-10-2022 .
Charging Port Indicators
The charge status indicator on your Ford E-Transit is next to the charging port behind the charge port door. It indicates the charge status of the high voltage battery in your vehicle.Divided into five zones, the charge status indicator displays the state of charge in 20 percent increments.The charge status indicator displays how far along the charge is:
- When zone A is pulsing, the charge is between 0-20 percent.
- When zone A illuminates, and zone B is pulsing, the charge is between 20-40 percent.
- When zones A and B illuminate and zone C is pulsing, the charge is between 40-60 percent.
- When zones A, B, and C illuminate, and zone D is pulsing, the charge is between 60-80 percent.
- When zones A, B, C, and D illuminate, and zone E is pulsing, the charge is between 80-100 percent.
- When all zones illuminate, the charge is 100 percent.
Note: When charging stops, the charge status indicator shows all the completed zones solidly illuminated up in a blue color for 30 seconds before turning off. For example, if charging stops at 70 percent, then A, B, and C light up solidly to indicate a battery charge level of at least 60 percent but less than 80 percent. Charging stops when complete or when paused due to charge settings or charge station actions.
Note: If the charge status indicator does not light up or pulse after plugging in, please verify that the charge port light setting is On. If you do not wish to have the charge status indicator light up at all while charging, then you can turn it Off. Locate the charge port light under the access menu on your in-vehicle touchscreen.There are three charge port indicator light colors, which indicate a specific action:White is used as a courtesy light to help with plugging in and to acknowledge actions such as plugging in and unplugging.Blue is used when the vehicle is plugged in and either charging or waiting to charge.Amber is used to indicate charge faults.

Note: Charging faults are identified by the color amber on the charge status indicator. Faults can occur within the vehicle charging system or outside the vehicle, such as with the mobile power cord, charge station or electrical supply.
Note: If the system detects a fault in the vehicle charging system at any point in a charge cycle, the entire charge status indicator illuminates solidly in an amber color for 30 seconds and then turns off. If this happens, unplug the charge coupler and then plug it back into the charge port receptacle. If the problem persists, have your vehicle serviced as soon as possible.
Note: If the system detects a fault outside the vehicle, such as with the charge station or mobile power cord, the entire charge status indicator flashes amber continuously for 30 seconds and then turns off. If this happens check the mobile power cord, charge station or electrical supply.
Charging Cable Information
Your vehicle comes with a mobile power cord that has a low power connector to use with a 120V plug NEMA 5-15 and a high power connector to use with a 240V plug NEMA 14-50.
| Specification Type | Specification Value |
|---|---|
| Charger Model | SAE |
| Voltage | 120-240 VAC |
| Maximum Current | 32 amps max continuous |
| Frequency | 60Hz |
| Power draw when idle | < 2 Watts |
| Power draw when charging | < 4 Watts |
| Cable length | Approximately 6.1 m |
| Weight | 3.9 kg |
| Operating temperature | -30°C to 50°C |
| Storage temperature | -30°C to 85°C |
| CCID Environmental | IP67 |
| Ventilation | Not required |
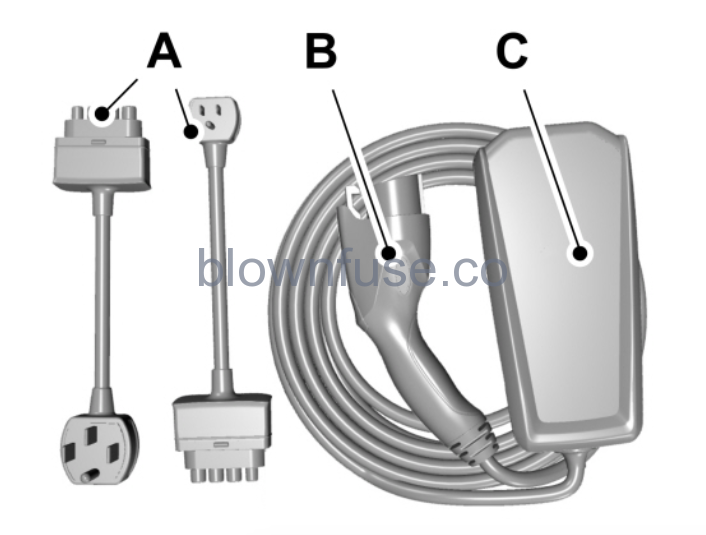
| A | Connector |
| B | Coupler |
| C | Control Box |
The E-Transit mobile power cord is located under the passenger seat and allows you to charge the vehicle’s battery using a standard household outlet.You must plug the connector into the control box first. Then plug the connector into the household outlet, and then plug the coupler into the vehicle charge port.The power indicator illuminates blue when the connector is properly inserted into the control box and dedicated wall outlet.
Note: To insert the connector, firmly grasp the connector by the cable or plug and push into the control box until an audible click is heard. Make sure the connector is fully inserted and flush with the control box before inserting it into the outlet. Improper insertion will cause a longer charge session.
Note: Follow the installation instructions provided with the mobile power cord.
Note: We recommend using the supplied plugs and connectors.
Note: If you do not use a dedicated circuit, the circuit breaker could trip or open. If a dedicated circuit is not available, contact a licensed professional electrician regarding the installation of a dedicated outlet.
Note: The mobile power cord does not charge and gives a fault indication, if ground is not present.Note: Plug the connector for the mobile power cord directly into the wall plug receptacle. Do not plug the mobile power cord into any form of extension cord.
Note: If the wall bracket is not used for mounting the charging equipment, plug the charging equipment into an outlet closer to ground.
Mobile Power Cord Indicator Light Meanings
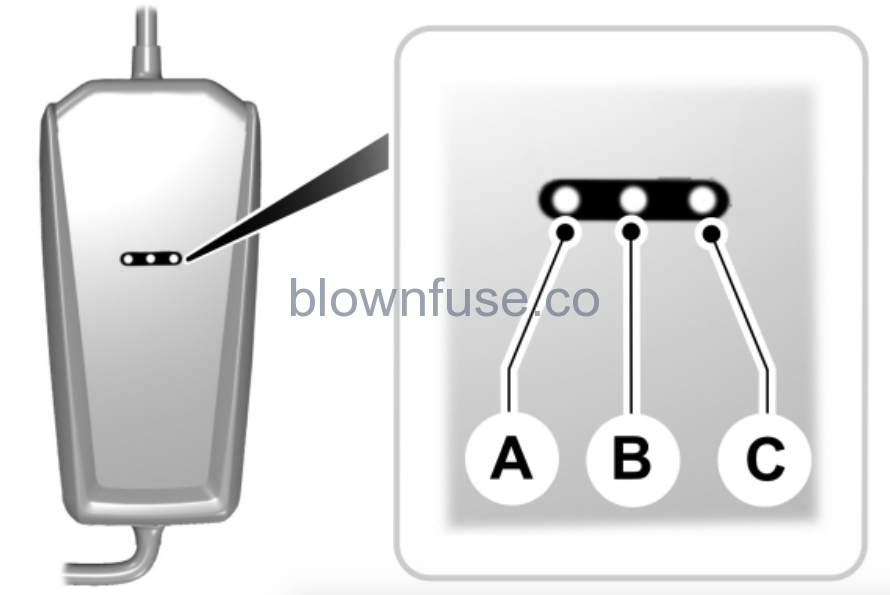
| A | Amber Fault Indicator Light. |
| B | Blue Status Indicator Light. |
| C | Red Trouble Indicator Light. |
| Mobile Power Cord Fault Indicator Type | Indicator Description |
|---|---|
| AMBER | The amber fault indicator illuminates to communicate that the charger is rebooting after an error. |
| BLUE | When plugged into the wall outlet, the blue indicator illuminates to communicate that the charger is ready to use. |
| RED | The red indicator illuminates when the charger has detected an error. If the red indicator is illuminated, the charger will not deliver power to the vehicle. The error must be corrected before a charging cycle can begin or continue. |
| AMBER | BLUE | RED | MODE | ACTION |
|---|---|---|---|---|
| OFF | OFF | OFF | UNPOWERED; The mobile power cord is not powered. | Make sure the outlet is operational, and the circuit breaker is in the ON position or try using another outlet. Ensure the connector is fully inserted into the mobile power cord. Ensure the plug is not severely degraded. If the error persists, contact us. |
| OFF | PULSING | OFF | CHARGING; The mobile power cord is charging. | No action required. |
| OFF | ON | OFF | STANDBY; The mobile power cord is powered and ready to charge. At the current time the mobile power cord is not charging the vehicle. | If you expect the mobile power cord to be charging the vehicle, make sure the vehicle coupler is properly inserted into the vehicle. Check and adjust your charging time preferences in the on-screen display. If your vehicle is still not charging, contact us. |
| ON | ON | ON | REBOOTING; The mobile power cord is recovering after encountering an error. | Wait for the mobile power cord to return to standby. If the mobile power cord cycles for more than 2-3 minutes, unplug the vehicle coupler. Unplug and replug in the connector. If the issue persists, contact us. |
| ON | PULSING | OFF | CHARGING REDUCED; The mobile power cord is charging at a reduced rate due to overheating. | Make sure the connector and the control box are properly connected. Unplug and replug in the connector. If the mobile power cord is warm or in a hot environment, try charging in a cooler area. Try a different outlet. Try a different connector if you have one available. If the error persists, contact us. |
| 1 FLASH | PULSING | OFF | CHARGING REDUCED, AC PLUG OR WALL OUTLET; The mobile power cord is charging at a reduced rate due to overheating of the connector or the wall outlet. | Make sure the connector and control box are properly connected. Unplug and replug in the connector. If the mobile power cord is warm or in a hot environment, try charging in a cooler area. Try a different outlet. Try a different connector if you have one available. If the error persists, contact us. |
| ON | OFF | OFF | USER TROUBLESHOOTING; The mobile power cord has encountered a fault that requires troubleshooting. | Make sure the connector and control box are properly connected. Unplug and replug in the connector. If the mobile power cord is warm or in a hot environment, try charging in a cooler area. Try a different outlet. Try a different connector if you have one available. If the error persists, contact us. |
| OFF | OFF | ON | NON – RECOVERABLE FAULT; There is an internal fault in the mobile power cord that cannot be recovered. | Try a different connector if you have one available. If the error persists, contact us. |
| OFF | OFF | 1 FLASH | NON – RECOVERABLE FAULT; There is an internal fault in the connector that cannot be recovered. | Try using another connector if you have one available. If not, contact us about obtaining a replacement. If your warranty has expired, you can order a replacement from your Ford dealer. |
| OFF | OFF | PULSING | GROUND LEAKAGE FAULT; Electrical current is leaking through a potentially unsafe path. | Potential shock hazard – immediately turn off circuit breaker for the outlet within home. Discontinue use. Contact us about obtaining a replacement. |
Note: When plugging into an unfamiliar wall outlet, let the vehicle charge for several minutes before leaving it unattended. The red indicator will illuminate if not charging. The unit will turn off if breaker or infrastructure ground fault circuit interrupter (GFCI) is tripped. You can view vehicle charging status remotely via the Ford Pass App.Mobile Power Cord Auto-RestartAuto-restart helps to make sure that your vehicle will be charged and ready for use when needed. A charge could be interrupted if errors are detected. Charging resumes once the error is no longer detected. The red indicator illuminates during an error condition.The exception to the immediate auto-restart is when the interruption is due to a charger ground fault circuit interrupter (GFCI) event. The charger attempts to restart 15 minutes after a ground fault circuit interrupter (GFCI) event. After the fourth attempt to restart, the charger shuts down and the red indicator stays on.If the fault persists, do not continue to try to charge your vehicle. Contact your authorized dealer.MOVING AND STORAGE INSTRUCTIONSMake sure you wrap the mobile power cord after charging.Store the mobile power cord in the storage bag supplied with the mobile power cord.When charging is complete, replace the mobile power cord under the passenger seat.
Note: Do not hold the mobile power cord by the power cable. Hold the complete unit and carefully place back in the storage bag.
Note: To remove the connector, firmly grasp the connector by the cable or plug and pull away from the control box.CARE INSTRUCTIONSDo not use cleaners or solvents as this could damage your mobile power cord. Do not place stress on the charger cables. If unit overheats, remove the mobile power cord from direct sunlight.SAFETY FEATURESThe charger includes the following safety features to protect against the risk of electric shock:
- Service Ground Check: The charger constantly checks for the presence of a service ground connection. If the service ground ever fails, the charger red indicator turns ON and shuts down power to the vehicle.
- Thermal Event Sensor: Charger module senses out-of-ordinary thermal events and decreases the charging current or shuts the unit down if required.
- Ground fault circuit interrupter (GFCI) Protection: The charger has a ground fault circuit interrupter (GFCI) reaction system to protect against electric shock. If the charger module detects an output ground fault, it shuts down power to the output cable and illuminates the red indicator.
- Insulation: The charger module, connector, cable assembly, and charge coupler are completely insulated. There are no exposed live parts, to protect against electric shock.
- Unintentional Disconnection: The charge coupler is designed to minimize unintentional disconnection. A pilot signal wire in the cable and charge coupler eliminates the possibility of electric shock when not connected to a vehicle or if an unintended disconnect occurs during a charge. Disconnection during charging is safe.
Setting Charging Schedule and Preferences

- Press Features on the touchscreen.
- Press Charge Settings on the touchscreen.
Charge Settings Screen
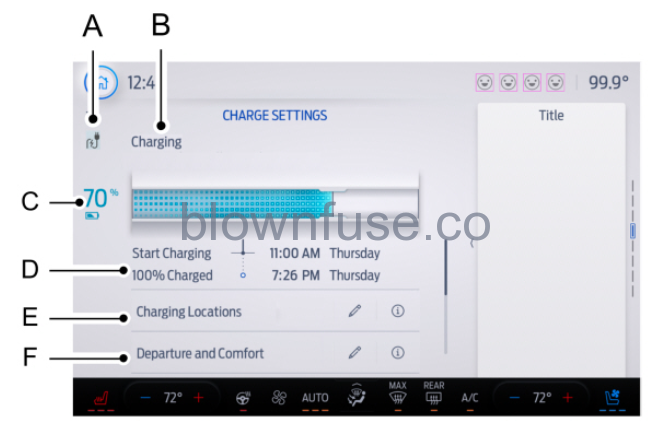
| A | Charge status icon. |
| B | Charge status. |
| C | High voltage battery state of charge. |
| D | Charging time information. |
| E | Charging location preferences. |
| F | Departure and comfort preferences. |
Charge Status IconsDisplays when your vehicle is plugged in.
| Not charging due to a fault. |  Not currently charging. Not currently charging. |
 Charging. Charging. |  Waiting to charge based on charge time settings. Waiting to charge based on charge time settings. |
Charge StatusShows the present state of the charging system.
| Charge Status | Action |
|---|---|
| Will charge when plugged in | The vehicle is unplugged and will start charging once plugged in. |
| Will wait for preferred charge time | The vehicle is unplugged at a location with charge times enabled. Charging is scheduled to start at the time displayed based on your settings. You must plug in prior to the start time shown for the vehicle to begin charging at that time. |
| Waiting for preferred charge time | The vehicle is plugged in at a location with charge times enabled. Charging will start at the time displayed, which is based on your charge time settings. |
| Charging stopped | The vehicle is plugged in and charging has been stopped through the FordPass app. |
| Charging | The vehicle is plugged in and charging. |
| Fast charging | The vehicle is plugged into a DC Fast Charge station and charging. |
| Charged | The vehicle finished charging to the target state of charge setting. |
| Charging 12V battery | The vehicle is plugged in and charging the 12V battery. |
| Cabin conditioning | The vehicle is plugged in and the climate control system is operating according to the departure and comfort settings. |
| Battery conditioning | The vehicle is plugged in and conditioning the high voltage battery. |
| Vehicle charge fault | The vehicle is plugged in and there is a fault within the vehicle charging system. Unplug and plug back in. If the fault is still present, contact your authorized EV certified dealer. |
| Charge station fault | The vehicle is plugged in and a fault has been detected with the charge station or charging cord. Please check the charging cord and the charging station or electrical supply. |
| Charge station not detected | A charging coupler has been plugged into the vehicle but there is no connection with a charging power source. |
| Charge station paused | The vehicle is plugged in and charging has been paused at the charge station. |
High Voltage Battery State of ChargeDisplays the remaining charge percentage with 100% representing the total amount of energy you can get from an external charge.Charging Time InformationWhen charging, the start and estimated end times are displayed.When fast charging, the estimated time is displayed for 80% charge. Above 80% state of charge the estimated time is displayed for 100% charge.When your vehicle is at a stored charging location and not plugged in, the start and end times display is based on known charging infrastructure.
Note: Charging time information is estimated. Certain conditions could result in longer charging times.

Note: Your vehicle will charge during your preferred time windows. Charging outside these windows only occurs when additional charging time is needed to reach the maximum charge level set for this location by your next departure time.
Note: You can also access this feature using the FordPass app.Charging Location SetupFollow these steps to set time and charge level preferences for a charging location.
- Select an address from the list of recent charge locations. If the previously saved charge locations are not listed, then you must first select add new location. You can also edit settings for previously saved locations.
Note: In order to save a charge location, the vehicle must have previously charged at that location.
- Confirm that this is the location you want to save with the help of the map view. Edit the location name if desired and set a maximum charge level. Press next.
Note: Depending on the GPS location, the address on the navigation may not precisely match up with your charging location. Confirm on the map that the pin is in the expected location.
Note: Charging will stop when your vehicle reaches the maximum charge level setting.

3. Set preferred charging times for weekday and/or weekend by pressing and dragging along the 24 hour time wheel. You can set up to two blocks of time (charge windows). Press next once you have your desired time settings for weekday and weekend.
4. The summary screen displays your settings for this location. Press save or press the left arrow to go back and change your settings. Whenever your vehicle is at a saved charging location, the charge settings screen displays the location name, and the charging times are based on your preferred time settings for that location plus the next departure time.
Note: Reaching your max charge level by your next departure time is always the priority. When charge times are set, charging outside your preferred charging time windows could be necessary in order to finish by your next departure time. In this case, the vehicle will typically begin charging right away after plugging in. Charging will pause when the rest of the charge can be done within the preferred charge windows.Departure and Comfort
Note: By using energy from your charging source while plugged in, battery temperature can be managed for best driving performance and less energy will be needed for heating or cooling of the cabin at the start of your drive. This helps maximize your driving range.
Note: You can also access this feature using the FordPass app.Departure and Comfort SetupFollow these steps to set departure times and cabin comfort level.
- Press the edit button for departure and comfort on the charge settings screen.
- Select a time for each day of the week you want your settings to apply. Select the hour and minutes as well as your desired comfort level. Your selected days/times now display your departure and comfort settings. Press Save to apply your settings. The next departure display on the charge settings screen will update appropriately.
Note: Save your departure settings before selecting additional days/times. The process must be repeated in order to add additional unique departure times and comfort levels.
Note: Cabin conditioning comfort level may vary depending on whether you plug into a normal household outlet or a higher power outlet or charging station. The power available for conditioning is limited to the charging station power available. At low ambient temperatures and low charge power, a small amount of high voltage battery power in addition to the charging power could be used to heat the cabin.Additional information and settings are displayed on the charge settings screen once charging locations and departure and comfort have been set up.
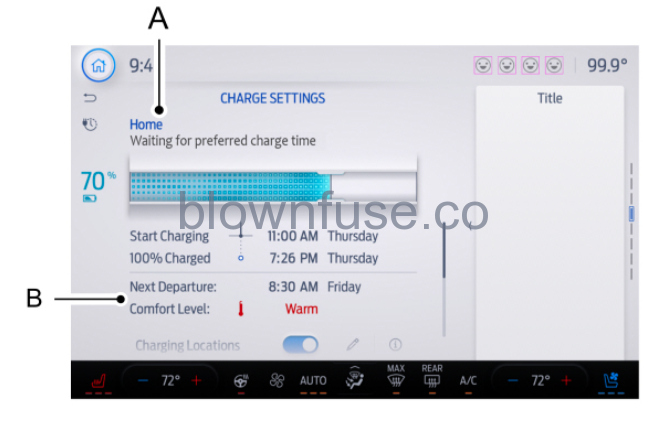
| A | Charging location name. |
| B | Next departure time and cabin temperature. |
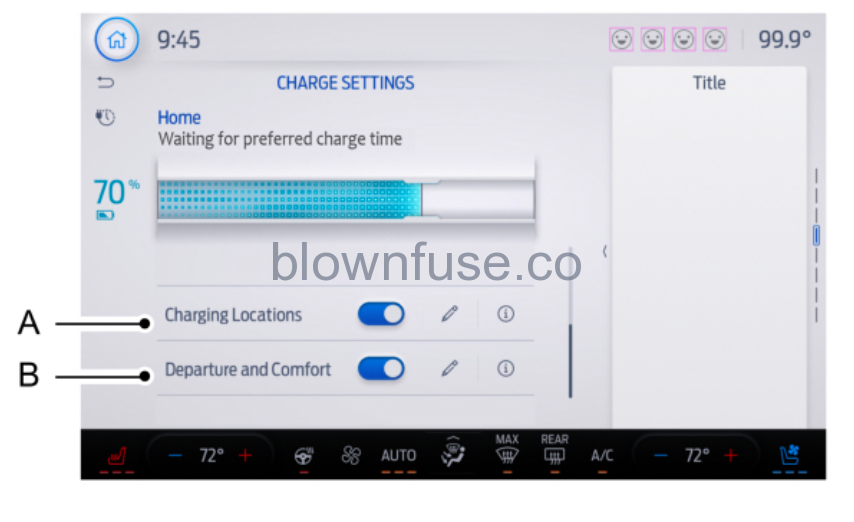
| A | On/Off switch for charging locations. |
| B | On/Off switch for departure and comfort. |
Charging Location Name: Displays when your vehicle is at a stored charging location. Next Departure Time and Cabin Comfort Level: Displays the next departure time and associated cabin comfort setting. On/Off Switch for Charging Locations: This switch is visible when your vehicle is at a saved charging location. Use this switch to turn your settings off and on for this location only. Switching off for this location does not delete your settings, however, you must switch back on to re-enable them.
Note: If the charging locations switch is off, the target state of charge returns to 100%.On/Off Switch for Departure and ComfortThis switch is visible when you have at least one departure time set. Use this switch to turn all departure times off and on. Switching off departure and comfort does not delete your settings, however, you must switch back on to re-enable them.
Stopping Charging
Using the mobile power cord:
- Press the latch on the charge coupler and remove it from the vehicle charge port.
- Remove the connector plug from the wall outlet.
- Reinstall the charge port dust cap.
- Press the center right-hand edge of the charge port door to close.
Note: Do not pull the wall plug from the wall outlet or the connector from the mobile power cord control box, while your vehicle is charging. Doing so could damage the outlet and the cord.
Note: You cannot shift your vehicle out of park (P) until you remove the charge coupler.
Using FordPass and Charging
Note: FordPass may not be available in some countries or fleet vehicles.The FordPass app allows you to do the following:
- Monitor and manage your vehicle’s charging, including charge schedules and preferences.
- Locate a charger and activate a charger on the BlueOval Charge Network.
- Plan a trip and charging options along your route.
- Check charging station plug availability.
- Initiate a charge session automatically at Plug and Charge capable charge stations.
- Control your Ford Connected Charge Station remotely.
- Override charge preferences and starting and stopping charging.
D/C and A/C Charging
AC charging is the preferred method of charging. AC charging preserves the health of the high voltage battery for longer high voltage battery life.
DC charging allows you to charge the vehicle’s high voltage battery in significantly less time than the standard charge method. You can charge on the go before the battery has exhausted all of its power, or when traveling using the trip planner as part of your FordPass App.For the convenience of DC charging and time, there is a different fee structure depending on the charging station and network you choose.
Note: Charge times vary depending on outside air temperature, power level, charger type, and location in which you are charging.
Note: The system could reduce the DC charging rate to maximize the life of the battery.
Common Questions While Charging
Why does my vehicle not charge with the mobile power cord? Ensure you properly connect the connector and control box. Unplug the charge coupler from the vehicle and unplug the connector from the wall outlet. Then check the connector to be sure that the connector is connected properly into the mobile power cord control box. If the mobile power cord is warm or in a hot environment, try charging in a cooler area. Try a different outlet or a different connector if you have one available. If the problem persists, contact an authorized EV certified dealer.
Why does my vehicle have a hum or fan noise when charging? A hum or a fan noise could be present when charging the high voltage battery. This is a normal operation as your vehicle is keeping the battery cool while charging.
Why does my information display say that the vehicle is charged when it is still pulling power from the charging source? In order to keep your battery at the current level, a small amount of power needs to be sourced from the wall to power the vehicle electronics. Once the vehicle is shut down, the vehicle will stop drawing power.
Information Messages When Charging
| Message | Action |
|---|---|
| Vehicle Plugged In ? Yes No | Your vehicle needs confirmation it is unplugged before allowing a start. You must make sure your vehicle is unplugged and you respond to the message promptly before starting your vehicle. |
| Plug in to Maintain 12V Battery | Indicates that HV battery can no longer support the 12V battery. Plug In your vehicle to charge the high voltage battery and maintain the 12V battery at a healthy state. |
| Charge Station Fault See Manual | The vehicle is plugged in and a fault has been detected with the charge station or charging cord. Please check the charging cord and the charging station or electrical supply. |