
2023 Volvo C40 Recharge Maintenance and service

Recommended maintenance for camera, sensor and radar units
In order that the cameras, parking sensors and radar units shall work correctly, they must be kept clean of dirt, ice and snow, and be cleaned regularly with water and car shampoo.
- Do not affix any objects, tape or decals in the areas described below.
- Clean camera lenses regularly with lukewarm water and car shampoo – be careful not to scratch the lenses.
- Avoid fitting auxiliary lamps or similar in the grille as this may affect the performance of the front radar unit.
- Use only Volvo genuine emblems in the grille in front of the front radar unit so as not to affect the function of the front radar unit.
Radar unit locations

Location of front radar unit
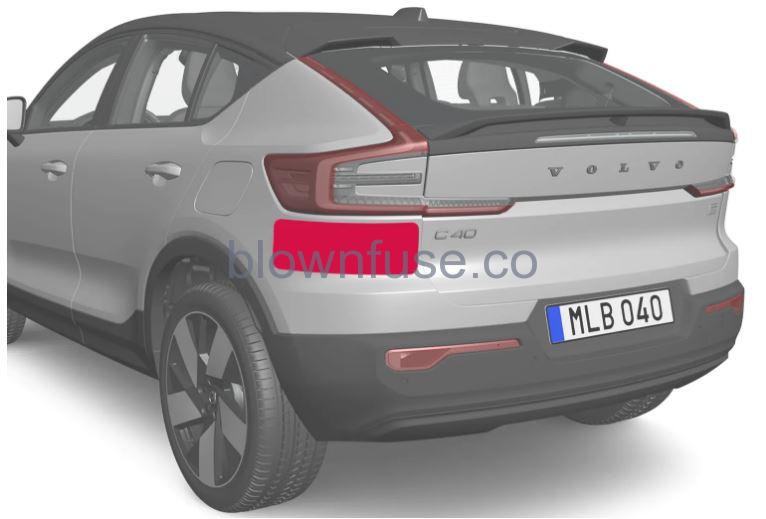
Location of rear radar units
Location of the parking sensors
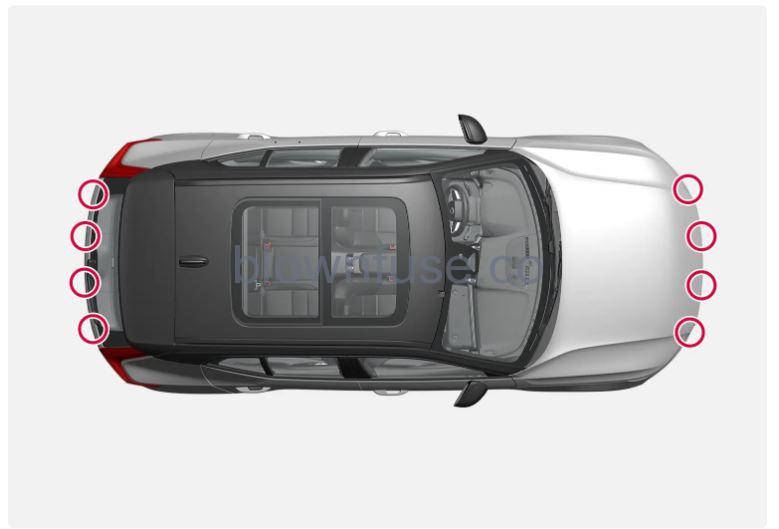 Location of the parking sensors around the car
Note
Dirt, ice and snow covering the sensors may cause incorrect warning signals, reduced or no function.
Camera location
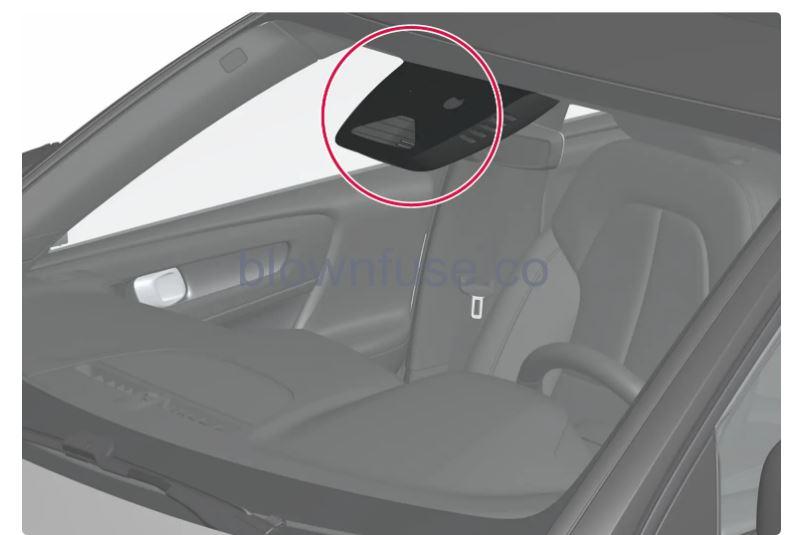
Location of the camera unit
Maintenance of driver support components must only be performed at a workshop – an authorised Volvo workshop is recommended.
Software updates
The car’s software is updated through its connection to the mobile network, which is designated OTA (over-the-air).
The notification view shows when a new software update is available. You can choose when to install it after it has been downloaded. Update the software in the car as soon as possible when an update is available.
Download
The download takes place in the background via the mobile network when the car is running. It may take several hours, depending on the size of the update and the speed of the connection. If the car is switched off while the download is in progress, it is resumed automatically the next time the car is started.
The following is required in order to download updates:
- the car is connected to the Internet (Use of the Internet involves data transfer (data traffic), which may involve charges. Volvo meets the cost of data traffic for system updates unless a personal SIM card is installed).
- approval of the use of online services.
Depending on software version, download may start automatically, or be started via the notification of an available software update.
Installing an update
Once a software update has been downloaded and is ready for installation, this is shown in the notification view and by a message when the car is started. You can choose to install the update immediately, or have a further reminder at a later date.
The installation of the software update may take up to 90 minutes. During this time, the car will be locked and its functions unavailable. Bear this in mind when scheduling the update.
Do not install new software when the car is connected to rapid charging. The car can be left connected for charging from a normal socket but is not charged during the installation. Depending on charging source, charging can be resumed automatically after completed installation.
During installation:
- Check that the car has been charged to at least 40%.
- If the car is connected for charging – end charging and unplug the charging cable. The car cannot be charged during the update.
- The notification view shows when an update is ready for installation. Open the notification and follow the instructions in the centre display.
- Leave the car, close all doors, and lock the car.
>The installation is started. The car must be locked within several minutes otherwise the installation is cancelled. - Wait until the installation is finished.
>The installation may take up to 90 minutes. When the installation is finished the car can be used as normal.
Note
- If possible, avoid handling the car, its charging cable and other functions during the installation.
- Do not connect or disconnect the charging cable during installation.
- If you need to enter the car while installation is in progress, you must use the key blade.
- The car’s anti-theft alarm is disarmed during installation in order to avoid false alarms.
Always read through what the update contains so that you know how the car and its functions are affected.
If the installation fails, the car’s systems are reset to the latest installed version.
Information on contents
Tap on the information symbol in the centre display for more information on the content of the software update.
Brake system maintenance
Check brake system components regularly for wear.
To keep the car as safe and reliable as possible, follow the Volvo service intervals as specified in the Service and Warranty Booklet. After replacing brake linings and brake discs, braking effect is only adapted after they have been “worn in” for a few hundred kilometres (miles). Compensate for the reduced braking effect by depressing the brake pedal harder. Volvo recommends only fitting brake linings that are approved for your Volvo.
Operational disruption
If you experience an operational disruption or deviation from the car’s normal function then it may be due to a fault or the specific circumstances of the situation. Some functions have limitations in particular situations and require that certain conditions are fulfilled in order to work. The driver display and centre display may show messages in order to inform about such a situation. Find out more about fault-tracing and the limitations of various functions in related articles below.
If the car is not drivable
Activate the hazard warning flashers if the car has broken down or been forced to stop unexpectedly in a trafficked environment. Think about safety. If possible, move the car out of danger from traffic. Put on a reflective vest and then position the warning triangle so that other road users are warned in good time. Call roadside assistance if the cause cannot be remedied at your location.
Data transfer between car and workshop via Wi-Fi
Volvo’s workshops have a specific Wi-Fi network for data transfer between the car and the workshop. The car is connected using the key’s buttons, so it is important to take along a key with buttons in the event of a workshop visit. During a workshop visit, your service technician can perform fault-tracing and update software via the network.
Connection with a key
Press three times on the lock button on the key to connect the car to the workshop’s network. Connection is normally handled by the service technician. When the car is connected to a Wi-Fi network, the ![]() symbol appears in the centre display. It is not possible to use the key to connect to other Wi-Fi networks.
symbol appears in the centre display. It is not possible to use the key to connect to other Wi-Fi networks.
Raise the car
It is important to use the correct lifting points on the car’s chassis when using a jack (Option/accessory) to raise the car. Read through all of the instructions before raising the car. The car can be raised using a jack designed for short-term raising, or using a garage jack if the car needs to be raised regularly, or by authorised workshop personnel that have access to larger lifting devices.
Warning
- The car must not be allowed to roll while it is being raised. Apply the parking brake and set the gear selector in Park position (P).
- Chock in front of and behind the wheels that remain on the ground using solid wooden blocks or large stones.
- When changing a wheel, use a jack intended for the car model. Use additional stands to support the car for all other work.
- Do not use a jack in poor condition. Check that the threads are lubricated, and that it is free of damage and dirt.
- Check that the jack is stable. The surface underneath must be firm, flat and not slippery.
- Never position anything between the ground and the jack, or between the jack and the car’s lifting point.
- Never allow passengers to remain in the car while the car is being supported by the jack. Make sure that they are standing in a safe location if a wheel needs to be changed in a trafficked location.
- No part of your body may be extended under the car while it is raised on the jack.
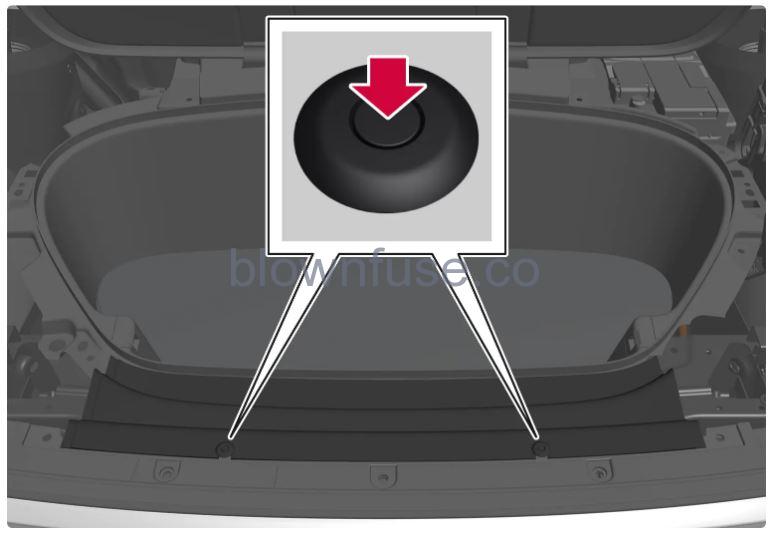
Lifting points
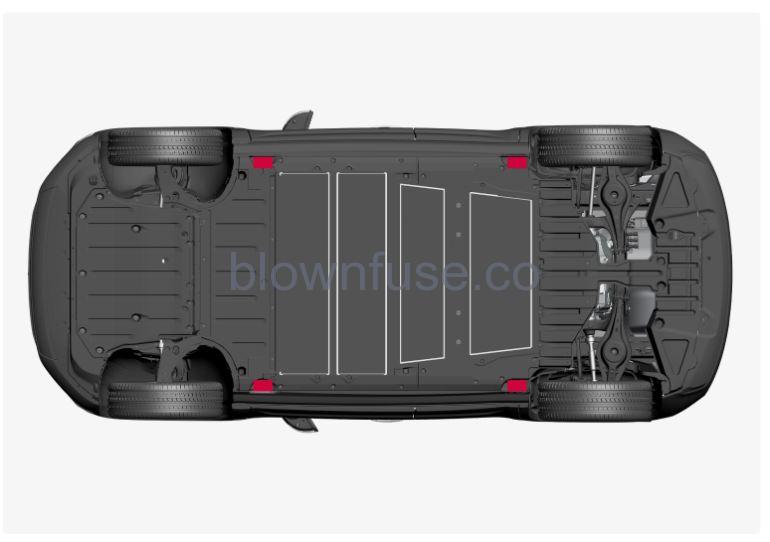 The car’s lifting points for lifting with a jack.
Warning
If the car is raised using a garage jack, the enclosed instructions must be followed. Make sure that the jack is correctly positioned so that the car cannot slide off during lifting. Make sure the head of the jack is fitted with rubber guards so that the car remains stable and is not damaged. Use axle stands or similar when the car is in the raised position.
Lifting a wheel using a jack
Read through all instructions before beginning. Take out the tools needed before jacking up the car.
- Activate the hazard warning flashers if the car has to be raised in a trafficked location. Set up the warning triangle.
- Activate the parking brake. Select gear position P.
- Position chocks in front of and behind the wheels that remain on the ground. Use, for example, heavy wooden blocks or large stones.
- Position the jack under one of the car’s lifting points with the crank handle pointing straight out from the side of the car. The positions of the lifting points are marked with triangular arrows along the lower edge of the side of the car. There are special notches for the head of the jack behind the markings.
- Ensure that the jack is stable on flat firm ground and that the surface underneath is not slippery.
- Crank up the jack so that it makes contact with the car’s lifting point. Check that the edge of the lifting point is aligned with the slot in the head of the jack.
 Check that the jack is completely vertical and at right angles to the side of the car.
>The car is now ready to be raised.- Raise the car just high enough to carry out the work intended. Lower the car using the jack immediately after the work has been completed.
When the jack (Option/accessory) is not in use, it is recommended to store it in the car, protected from moisture and dirt.
Removing the panels under the bonnet
There is the option to remove a number of protective panels in the space under the bonnet in order to access certain components, e.g. fuses and charging points for jump starting.
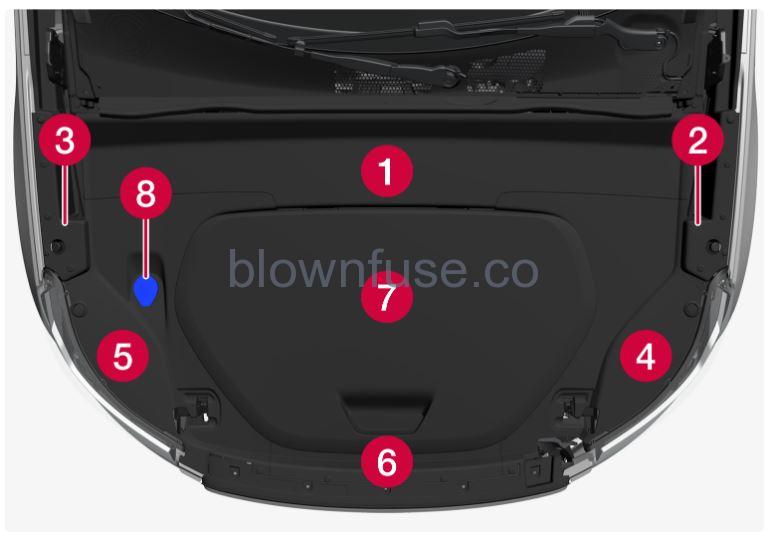 Location of different panels and parts under the bonnet.
- Panel A – provides access to the negative charging point for jump starting.
- Panel B
- Panel C
- Panel D – provides access to the positive charging point for jump starting and fuses under the bonnet.
- Panel E
- Panel F
- Hatch for storage compartment under the bonnet.
- Cap for filling the washer fluid.
Only loosen the panels around the storage area under the bonnet if the instructions in the owner’s manual explicitly state that this is necessary. Contact a workshop in the event of a problem or if maintenance is required – an authorised Volvo workshop is recommended.
The panels are designed to protect the components behind them − fully reinstall the panels before driving the car.
Several components in the car work with high-voltage current that could be dangerous in the event of incorrect intervention. Do not touch anything that is not clearly described in the owner’s manual.
The protective panels are held in place using plugs. Loosen them by pressing in the locking pin in the centre of the plug, e.g. using a screwdriver or a pen. Once you have pressed in the pin a sufficient distance, you can pull the plug out. Avoid pressing the pin the whole way through the plug in order to prevent it from falling between components. Pull the locking pin out completely when reattaching the plug to reinstall the panel. Once the plug is positioned in the mounting hole, the locking pin can be pressed into place again, which secures the panel. A specific sequence should be followed when removing or installing the protective panels due to the way in which they overlap each other. To detach the panels, follow the steps below:
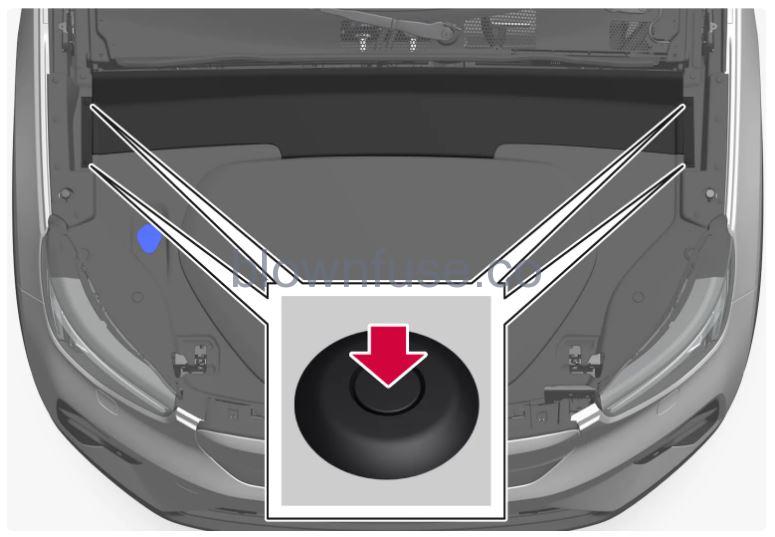 Plug positions for panel A.
Panel A
- Loosen the 4 marked plugs that attach the panel by pressing in their lock pins a short way.
- The panels are now held in place by hidden snap fasteners. Carefully lift the panel until they release.
>You can lift the panel away completely. This provides access to the negative charging point and the panels B and C. Panel B must be removed for access to panel D, located under which are the positive charging point and fuses under the bonnet.
To refit the panel, pull the lock pins out fully, and press them in again when the plugs are positioned in their assembly holes. Make sure that the snap fasteners are correctly positioned before pressing the panel into place.
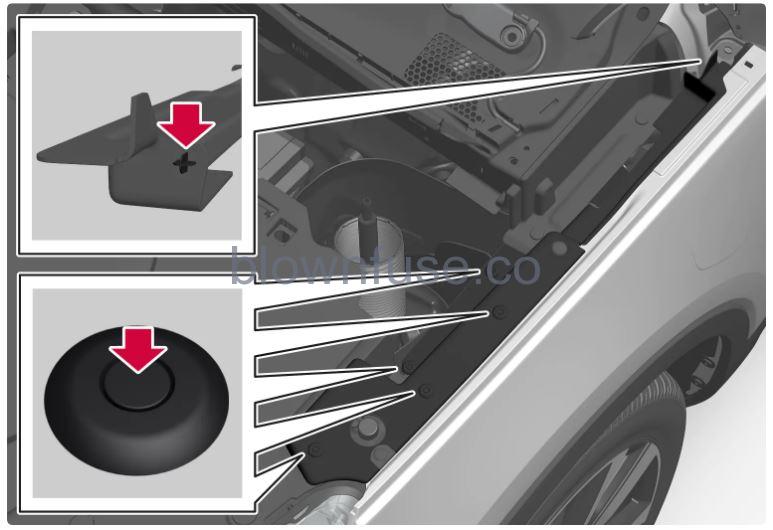 Plug positions for panel B. Panel C is reversed in relation to B.
Panel B/C
- First, fully remove panel A according to the instructions above.
- Release the 5 marked plugs.
>The panel is loose and can be lifted away completely. This provides access to the plugs that attach panels D or E, depending on the side. Panel D must be removed for access to the positive charging point and fuses under the bonnet.
To refit the panel, pull the lock pins out fully, and press them in again when the plugs are positioned in their assembly holes. The panel also has a protruding part in the rear end that holds it in place when it has been fitted into its hole.
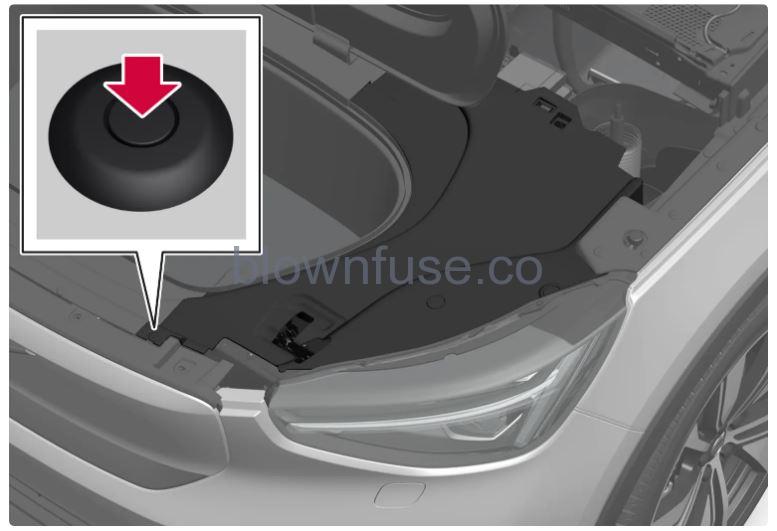 Plug positions for panel D. Panel E is reversed in relation to D.
Panel D/E
- First remove panels A and B/C, depending on the side, and open the hatch for the storage compartment under the bonnet (7).
- Release the marked plug. To remove panel E, the cap for filling the washer fluid (8) must also be removed.
- The panels are now held in place by hidden snap fasteners. Carefully lift the panel until they release.
>The panel is loose and can be lifted away completely. Located under panel D are the positive charging point and the fuses under the bonnet.
To refit the panel, pull the lock pins out fully, and press them in again when the plugs are positioned in their assembly holes. Make sure that the snap fasteners are correctly positioned before pressing the panel into place.
 Plug positions for panel F.
Panel F
- First remove panels A, B, C, D and E.
- Release the 2 marked plugs.
- The panels are now held in place by hidden snap fasteners. Carefully lift the panel until they release.
>The panel is loose and can be lifted away completely.
To refit the panel, pull the lock pins out fully, and press them in again when the plugs are positioned in their assembly holes. Make sure that the snap fasteners are correctly positioned before pressing the panel into place.