2022 Polestar 2 Starting and switching off vehicle
Electronic immobilizer
The vehicle can only be started with the right key.
The following instrument panel error messages are related to the electronic immobilizer:
| Symbol | Message | Meaning |
|---|---|---|
 |
Vehicle key not detected See Manual | Key not recognized during start. Place the key on the key symbol in the cupholder and try to start the vehicle again. |
Gear selector positions
To facilitate parking and other low-speed maneuvers, the gear selector can be moved between D and R at very low speeds without depressing the brake pedal.
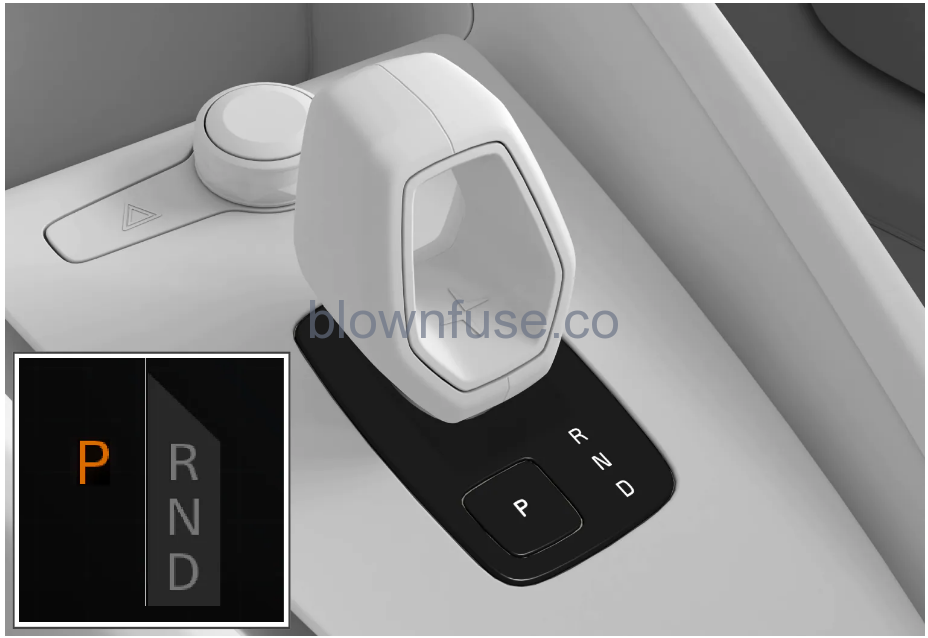
The instrument panel shows the gear currently in use.
The vehicle has three different gear selector positions and a button for the parking brake:
R, N, D, or P button for the parking brake.
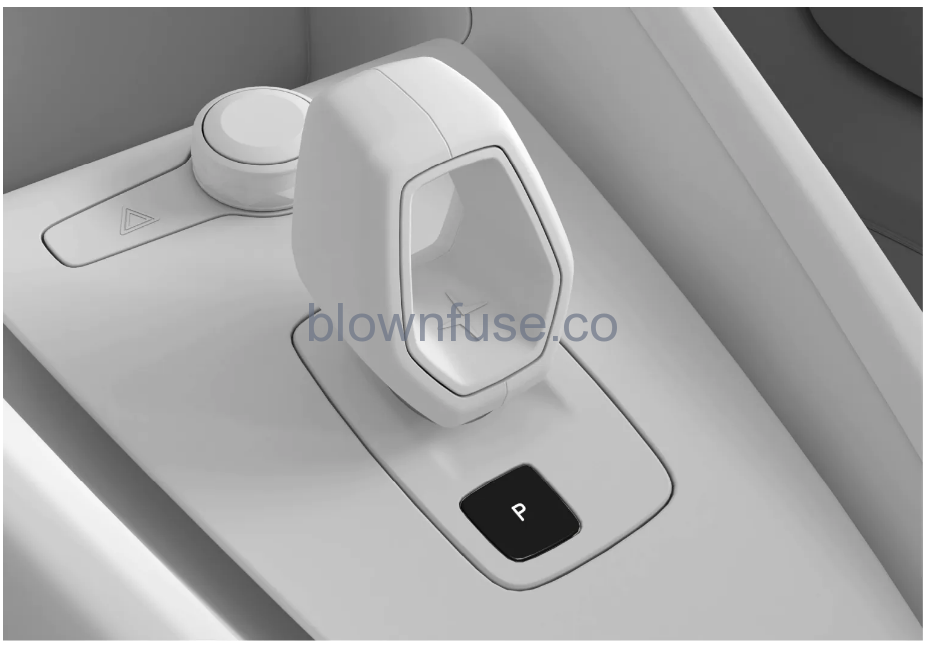
- Tap the button.
> The symbol in the instrument panel will illuminate when the parking brake is activated.
Make sure that the parking brake symbol is illuminated when you leave the vehicle.
The parking brake must be activated in order to lock the vehicle and arm the alarm.
In an emergency, the parking brake can be activated when the vehicle is moving by pressing and holding the button.
The brakes will then be applied with force in order to break the vehicle. The braking process is canceled when the button is released or if the accelerator pedal is depressed.
In case of emergency braking at high speeds, a signal sounds during the brake procedure.
- Buckle your seat belt.
- Depress the brake pedal.
- Move the gear selector all the way forward.
> You can now back up.
- Buckle your seat belt.
- Depress the brake pedal.
- Move the gear selector one step forward or one step rearward.
> The vehicle will now roll freely when the brake pedal is not depressed.
- Buckle your seat belt.
- Depress the brake pedal.
- Move the gear selector all the way rearward.
> You can now drive.
It is not possible to start the vehicle or switch gear positions when the charging cable is plugged in.
Jump starting using another battery
Under normal conditions, the 12 V battery is charged when the vehicle is charged, and through electrical current transfer directly from the high-voltage battery when the vehicle is not plugged in for charging.
If the 12 V battery becomes discharged for any reason, it can be jump-started. There are several reasons why a battery may become discharged, such as the vehicle not being used for a long period of time, a temporary malfunction, or a blown fuse in the vehicle’s charging circuit. A discharged 12 V battery needs to be recharged to a level high enough that it can start the vehicle’s electrical system. After startup, it is possible to start charging the vehicle using a charging cable, which is necessary when the high-voltage battery is also discharged. If the vehicle is out of range for charging, it must be towed.
To jump-start the vehicle, you will need to connect jumper cables to the charging points on the 12 V battery.
When reinstalling the panel, pull the locking pin out completely before reinserting the plug. When the plug is inserted in the attachment hole, push the pin into place again to secure the panel.

Remove the 5 plugs and lift up the panel.
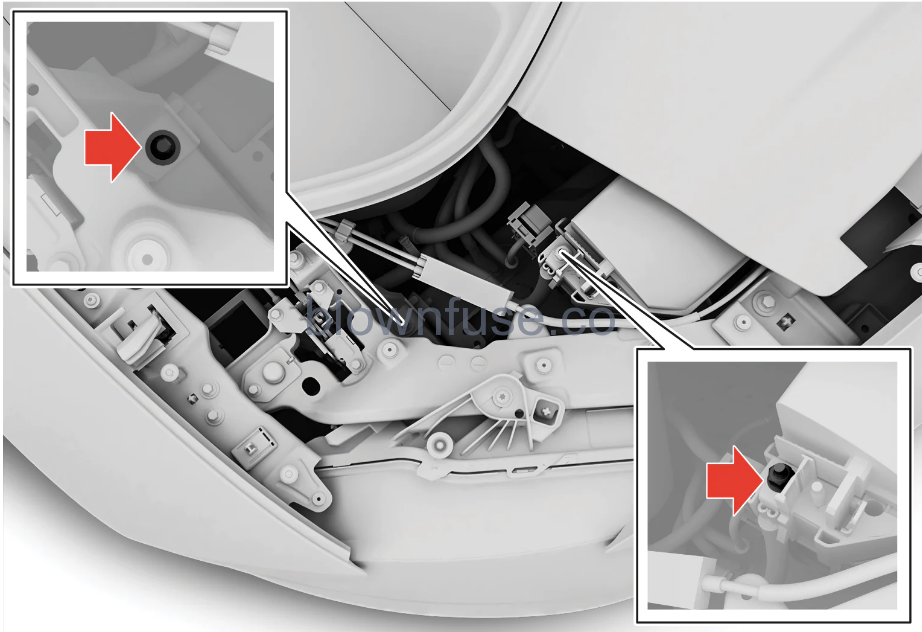
The charging points are under the panel. The positive is at the rear next to one of the vehicle’s fuse boxes, and the negative is a bolt toward the front of the vehicle that is in contact with the vehicle’s chassis.
The vehicle’s charging points are only intended for jump-starting your own vehicle. The charging points are not intended for jump-starting another vehicle. Using the charging points to jump-start another vehicle could cause a fuse to blow, which would cause the charging points to stop working.
If the message 12 V battery fuse failure Service required is shown in the instrument panel, a fuse has blown and must be replaced.
To avoid short circuits or other damage, the following steps are recommended when jump-starting the battery using another battery:
- Put the vehicle’s electrical system in Passive usage mode.
- Make sure the assisting battery has a voltage of 12 V.
- If the battery is in another vehicle, turn off that vehicle’s motor and make sure that the vehicles are not touching each other.
- Clamp one end of the red jumper cable onto the assisting battery’s positive terminal, often marked in red or with a plus sign (+).
Use caution when connecting the jumper cables. A short circuit can occur if the ends come in contact with any other surface than the charging points.
- Open the cover over the positive charging point by pressing on its side to release the catch while lifting the cover upward. There are two charging points under the cover. Use the one closest to the center of the vehicle.
- Clamp the other end of the red jumper cable to the positive charging point.
- Clamp one end of the black jumper cable onto the assisting battery’s negative terminal often marked in black or with a minus sign (-).
- Clamp the other end of the black jumper cable to your vehicle’s negative charging point. Because the vehicle’s chassis serves as a ground for the 12 V system, the bolt head marked in the illustration can be used.
- Make sure the jumper cables are securely attached to help prevent sparks while jump-starting.
- Start the motor of the assisting vehicle.
- Start the vehicle with the discharged battery by depressing the brake pedal and selecting gear position D or R.
Do not touch the connections between the cable and the vehicle during the start attempt. Risk of sparking.
The full startup is indicated by the indicator lights on the instrument panel going out and the panel’s preselected theme illuminating.
- If the high-voltage battery is also discharged, begin charging the vehicle using the charging cable.
- Remove the jumper cables in the reverse order ‒ first the black cables and then the red cables.
Make sure that none of the clamps of the black jumper cables come into contact with the vehicle’s positive charging point, the assisting battery’s positive terminal, or either of the red jumper cable’s connected clamps.
A discharged 12 V battery must be recharged until the charge level is high enough to power the vehicle’s electrical system. At an ambient temperature of about +15 °C (about 60 °F), the battery must be charged by the vehicle for at least 30 minutes. At lower ambient temperatures, the charging time can increase to 3-4 hours. If possible, the battery should be charged using an external battery charger.
PROPOSITION 65 WARNING! WARNING! Battery posts, terminals, and related accessories contain lead and lead compounds, chemicals known to the state of California to cause cancer and reproductive harm. Wash hands after handling.
WARNING
- Batteries generate hydrogen gas, which is flammable and explosive. A spark caused by an incorrectly connected jumper cable could be enough to make the battery explode.
- Do not connect the jumper cable to any part of the fuel system or to any moving parts. Avoid touching hot manifolds.
- The battery fluid contains sulfuric acid. Do not allow battery fluid to contact eyes, skin, fabrics, or painted surfaces.
- If contact occurs, flush the affected area immediately with water. Obtain medical help immediately if your eyes are affected.
- Never expose the battery to open flame or electric spark. Do not smoke near the battery. Failure to follow the instructions for jump starting can lead to injury.
Starting the vehicle
Before starting:
- Buckle your seat belt.
- Adjust the seat, steering wheel, and mirrors.
- Make sure you can fully depress the brake pedal.
Make sure the key is in the vehicle.
- Buckle your seat belt.
- Depress the brake pedal.
- Move the gear selector to D or R.
> The vehicle is now in drive mode.
- Release the brake pedal.
> If creep mode is activated, the vehicle will move slowly in the selected direction. If auto-hold brakes are activated, the accelerator pedal needs to be pressed down for the vehicle to move in the selected direction.
> If creep mode is deactivated, the vehicle will not move forward.
- Never use more than one inlay mat at a time on the driver’s floor. If any other type of floor mat is used, remove the original mat from the driver’s seat floor before driving. All types of mats must be securely anchored in the attachment points on the floor. Make sure the floor mat does not impede the movement of the brake pedal or accelerator pedal in any way, as this could be a serious safety hazard.
- Polestar’s floor mats are specially manufactured for your vehicle. They must be properly secured in the attachment points on the floor to help ensure they cannot slide and become trapped under the pedals.
The vehicle cannot be started if the charging cable is plugged in. Make sure that the charging cable is unplugged from the charging socket before attempting to start the vehicle.
Switching off the vehicle
- Activate the parking brake.
- Open the driver’s door.
> The vehicle is now not in drive mode.
- Activate the parking brake.
- Tap.
- Tap More.
- Select Power off the vehicle.
> The vehicle is now not in drive mode.
To start the vehicle again, tap the play/pause button under the center display.
Usage mode
The vehicle automatically goes into different modes: passive, comfort, and drive. The table shows which functions are available in the different modes.
| Position | Functions |
|---|---|
| Passive | When the vehicle is unlocked, the following functions are available:
In this mode, the functions are available for a limited time and then switch off automatically. |
| Comfort |
When someone sits in the driver’s seat or when the center display is used or started via the media button in the tunnel console:
|
| Drive | When the driver sits in the driver’s seat and selects a gear:
All functions are available and the vehicle can be driven. |