2021 Polestar 1 Settings
Activating and deactivating data sharing
- Tap Settings in the Top view in the center display.
- Tap .
- Select to activate or deactivate data sharing for individual services and all apps.
If data sharing for a connected service or downloaded apps is not activated, this can be done when they are started in the center display. If this is the first time that a service is started, or e.g. after a factory reset or certain software updates, Polestar’s terms and conditions for connected services must be accepted. Note that data sharing will then also be activated for other services or apps that sharing has already been accepted for.
After visiting a workshop, you may need to reactivate data sharing so that services and apps will work again.
Changing appearance in the center display
- Tap Settings in the Top view.
- Tap .
- Select a theme, e.g. Minimalistic.
In addition to these themes, you can also choose between Normaland Bright. In Normal, the background of the screen is dark and the text is light. This option is the default setting for all themes. If the bright version is selected, the background will be light and the text will be dark. This option can, for example, make the screen easier to see in bright daylight conditions.
These alternatives are always available for selection and are not affected by the ambient lighting.
Changing settings in the center display’s Top view
- Open Top view by tapping the tab at the top of the screen or by dragging/swiping from the top of the screen downward.
- Tap Settings to open the Settings menu.
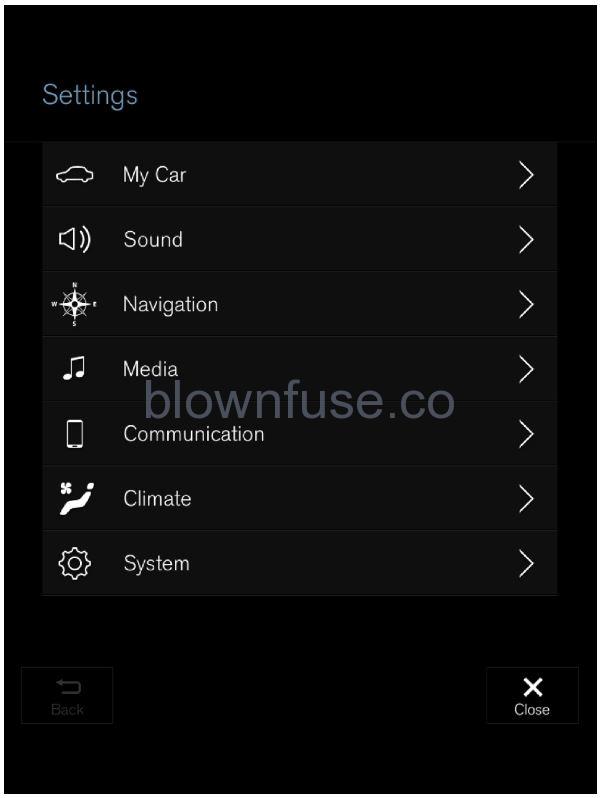
The top view with the button for .
- Tap one of the categories and sub-categories to navigate to the desired setting.
- Change the setting(s). Different types of settings are changed in different ways.
> Changes are saved immediately.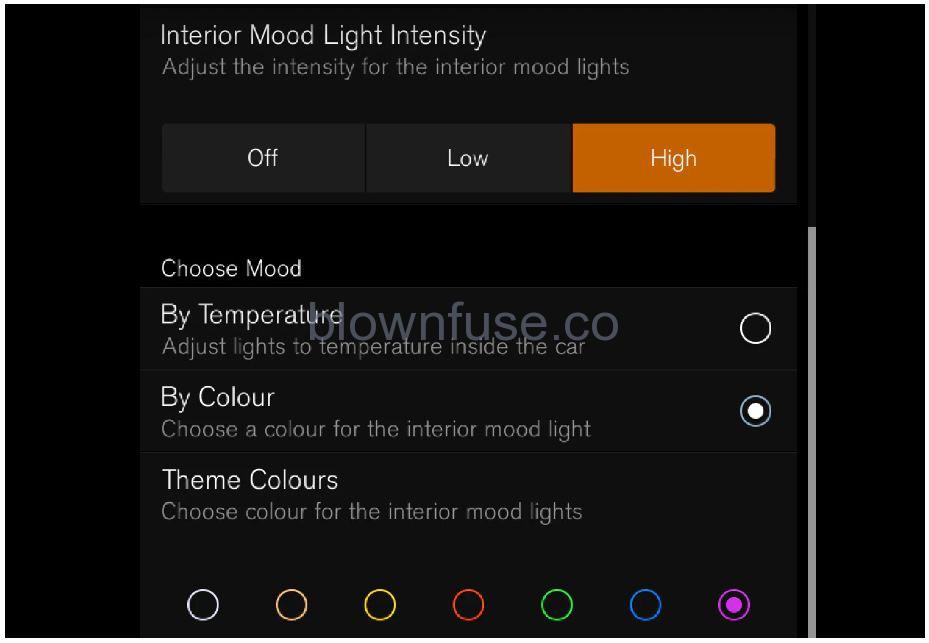
A sub-category in the Settings menu with various possible settings; has a multi-selection button and radio buttons.
Changing system language
Changing languages in the center display could mean that some information in the Manual will not comply with national or local laws and regulations. Do not change to a language you do not speak well, as it can be difficult to find your way back through the menu.
- Tap Settings in the Top view in the center display.
- Proceed to .
- Select System Language. A voice control symbol indicates that the language can be used for voice control.
Languages in the instrument panel, center display and head-up display are changed.
Changing system units of measurement
- Tap Settings in the Top view in the center display.
- Proceed to .
-
Choose a measurement standard:
- Metric – kilometers, liters and degrees Celsius.
- Imperial – miles, gallons and degrees Celsius.
- US – miles, gallons and degrees Fahrenheit.
The units in the instrument panel, center display and head-up display are changed.
Date and time
Location of clock
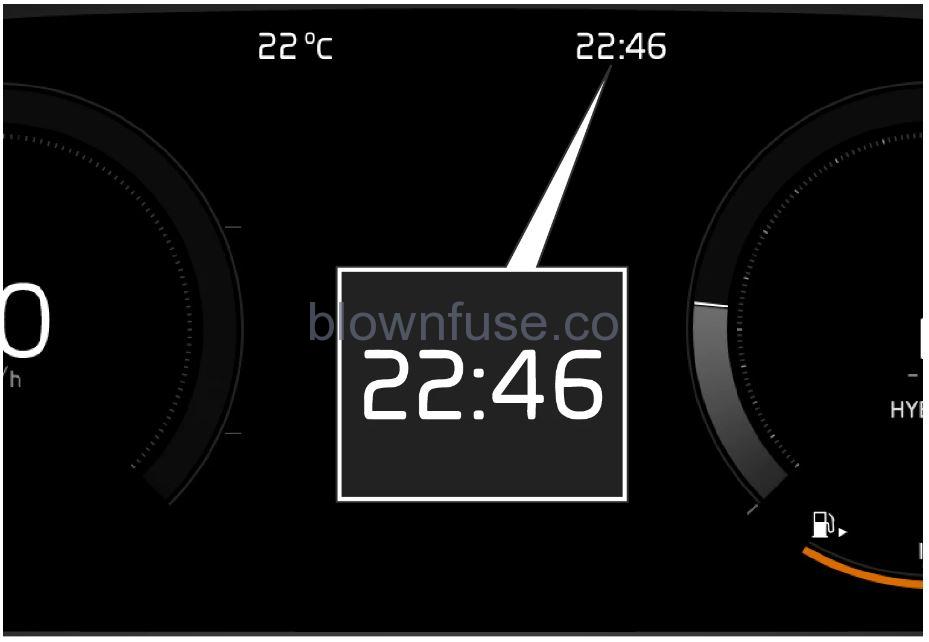
Certain messages and other information may obscure the clock in the instrument panel.
In the center display, the clock is located on the upper right-hand side in the status bar.
Settings for date and time
- Select in the center display’s Top view to change settings for time and date format.Adjust the date and time by tapping the up or down arrows on the touchscreen.
Automatic time with GPS
You can select Auto Timevia the navigation system. The time zone will then be automatically set to the vehicle’s location. In some navigation systems, the current location must also be set to determine the correct time zone. If Auto Time is not selected, the time and date can be adjusted using the up and down arrows on the touchscreen.
Daylight savings time
In some countries, the Auto Daylight Saving Timesetting can be selected to automatically change to daylight savings time. For other countries, the Daylight Saving Time setting can be selected manually.
If the battery has been disconnected
If the clock was reset after the vehicle’s battery was disconnected, e.g. after a visit to a service workshop, you many need to reset the clock. If the clock is not set, it can affect the vehicle’s Internet connection.
Displaying trip data in the instrument panel
- Data recorded and calculated by the trip computer can be displayed on the instrument panel.
- This data is stored in a trip computer app. You can choose which information the instrument panel will display in the app menu.
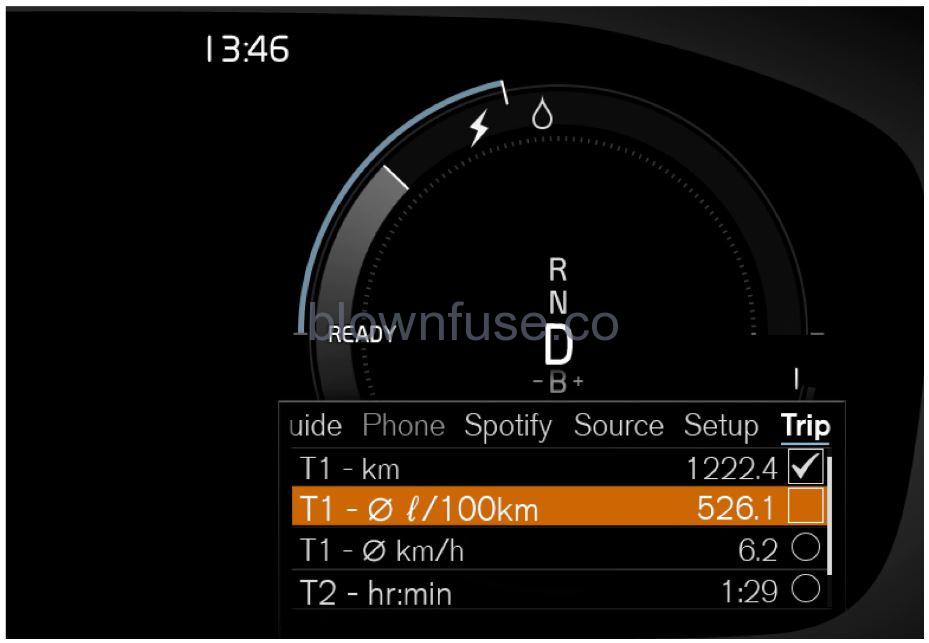
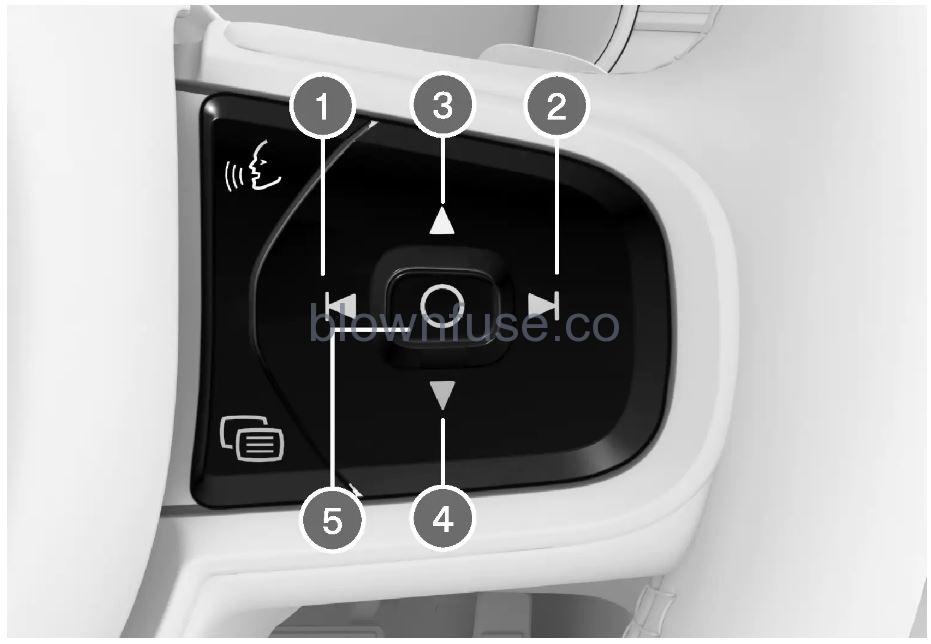
- Open and navigate in the app menu using the right-hand steering wheel keypad.
- App menu
- Left/right
- Up/down
- Confirm
- Open the app menu in the instrument panel by pressing (1).(The App menu cannot be opened while there is an unacknowledged message in the instrument panel. The message must be acknowledged by pressing the O button (4) before the App menu can be opened).
- Navigate to the trip computer app by moving left or right using (2).
> The top four menu rows show measured values for trip odometer TM. The next four menu rows show measured values for trip odometer TA. Scroll up or down in the list using (3).
Scroll down to the option buttons to choose which information to show in the instrument panel:
- Odometer
- Distance to empty tank
- Distance to discharged battery
- Tourist (alternative speedometer)
- Mileage for trip odometer TM, TA or no display of mileage
- Current fuel consumption, average fuel consumption for TM or TA, or no display of fuel consumption
Select or clear a selection using the O button (4). The change will apply immediately.
Head-up display settings
Settings can be adjusted when the vehicle is started and a projected image is displayed on the windshield.
Selecting display options
Select the functions to be shown in the head-up display.
- Tap Settings in the center display’s Top view.
- Tap .
- Select one or more functions:
- Show Navigation
- Show Road Sign Information
- Show Driver Support
- Show Phone
This setting is stored as a personal setting in the driver profile.
Adjusting brightness and height position
 Press the Head-up Display Adjustments button in the center display’s Function view.
- Adjust the brightness of the projected image and the height position in the driver’s field of vision using the right-side steering wheel lever.
- Decreasing brightness
- Increasing brightness
- Raising position
- Lowering position
- Confirm
The brightness of the graphic is automatically adapted to the light conditions in its background. Brightness is also affected by adjustments to the brightness of the other displays in the vehicle.
The height position can be stored in the front power seat’s memory function using the keypad in the driver’s door.
Calibrating the horizontal position
If the windshield or display unit has been replaced, the head-up display’s horizontal position may need to be calibrated. Calibration means that the projected image is rotated clockwise or counterclockwise.
- Tap Settings in the center display’s Top view.
- Select .
- Calibrate the horizontal position of the image using the right-side steering wheel keypad.
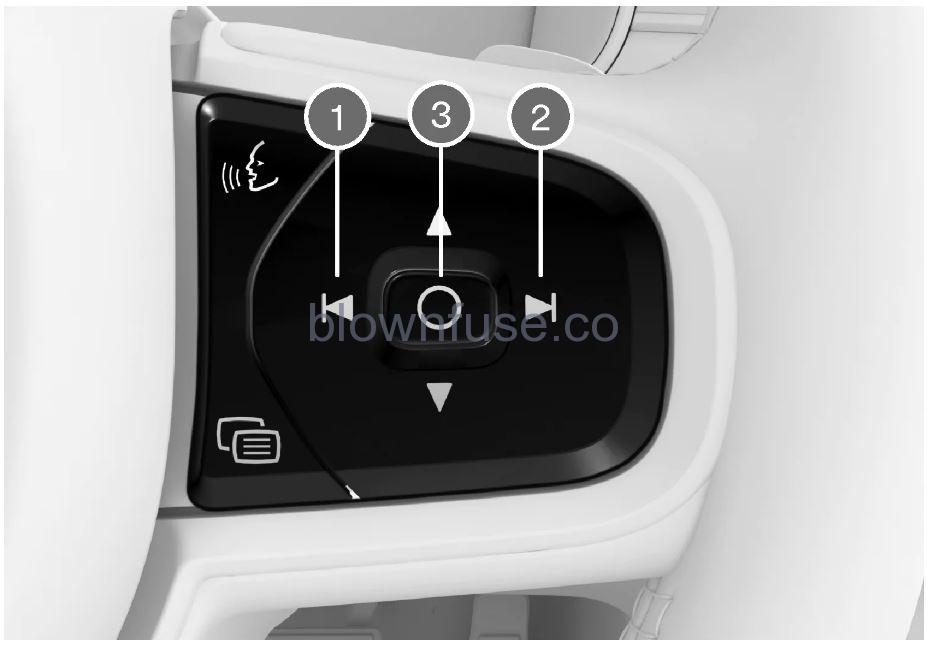
- Rotate counterclockwise
- Rotate clockwise
- Confirm
Instrument panel settings
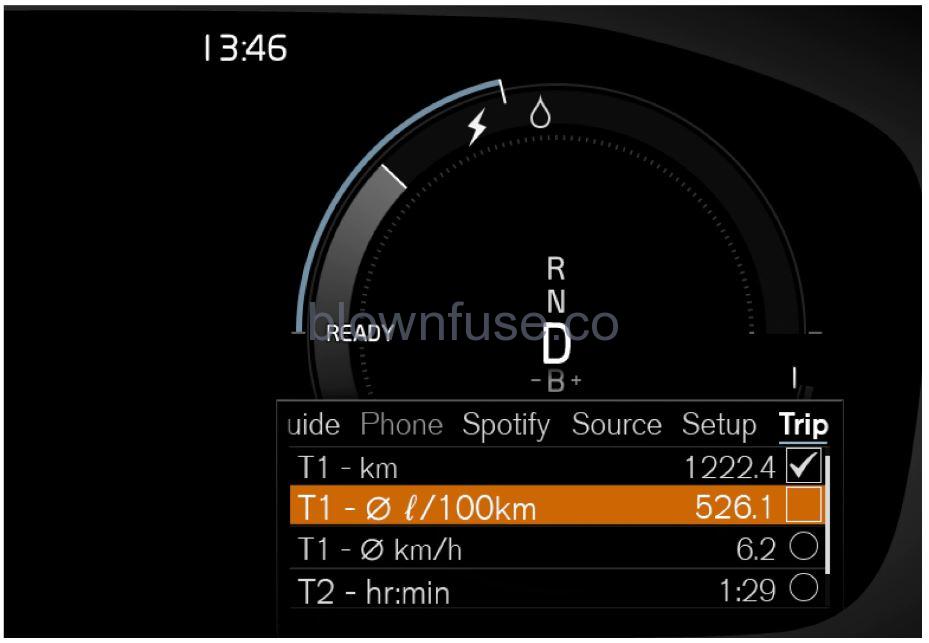
The app menu will open and can be controlled using the right-side steering wheel keypad.
The app menu can be used to set what information will be displayed in the instrument panel
- trip computer
- media player
- phone
- navigation system.
Settings via center display
Selecting type of information
- Tap Settings in the center display’s Top view.
- Tap .
- Select a background:
- Show no information in the background
- Show information for current playing media
- Show navigation even if no route is set
Select theme
- Tap Settings in the center display’s Top view.
- Tap
- Select a theme (appearance) for the instrument panel:
- Polestar
- Minimalistic
Select language
- Tap Settings in the center display’s Top view.
- Tap to select language.
> A change made here will affect the language in all displays.
The settings are personal and saved automatically in the active driver profile.
Keyless unlock settings
To change this setting:
- Tap Settings in the center display’s Top view.
- Tap
- Select alternative:
- All Doors – unlocks all doors at the same time.
- Single Door – unlocks the selected door.
Lock confirmation settings
To change the locking response settings:
- Tap Settings in the center display’s Top view.
- Tap .
- Tap Visible Locking Feedback to select when the vehicle should provide a visible response:
- Lock
- Unlock
- Both
Or turn off the function by marking Off .
- Select to receive an audible response when locking the vehicle by marking Audible Locking Feedback.
To change the settings for folding door mirrors when locking:
- Tap Settings in the center display’s Top view.
- Tap .
- Select Fold Mirror When Locked to activate or deactivate the function.
Opening contextual setting in the center display
- Most of the settings for the vehicle’s basic apps can be changed directly in Top view in the center display via contextual settings.
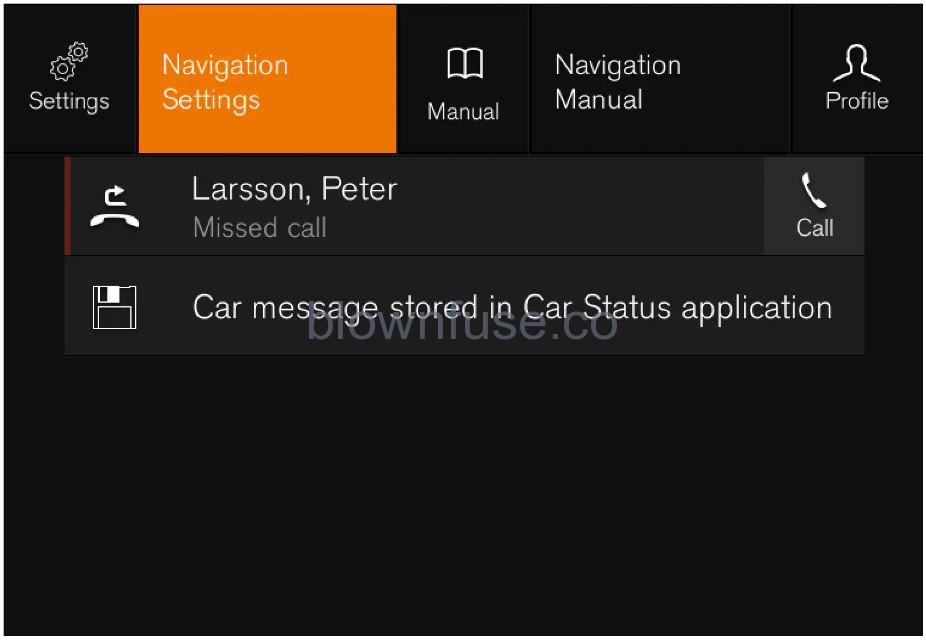
- Top view with button for contextual settings.
- Contextual setting is a shortcut for accessing specific settings related to the active function displayed on the screen. Apps that are factory-installed in your vehicle, e.g. FM radioand USB, are part of Sensus and are used to control the vehicle’s integrated functions. The settings for these apps can be changed directly via contextual setting in Top view.
When contextual setting is available:
- Pull down Top view when an app is in expanded form, e.g. Navigation.
- Tap Navigation Settings.
> The navigation settings page will open.
- Change the desired settings and confirm.
Tap Close or press the Home button under the center display to close Settings view.
Most of the vehicle’s basic apps have this contextual setting option, but not all.
Third-party apps
Third-party apps are apps that are not factory-installed in the vehicle’s system, but can be downloaded, e.g. Polestar ID. Settings for these apps are changed in the apps themselves, not in Top view.
Resetting center display settings
Two types of reset
There are two ways to reset the settings in the Settings menu:
- Factory Reset– erases all data and files and resets all settings to factory default.
- Reset Personal Settings– erases personal data and resets personalized settings to factory default.
Resetting settings
Follow these instructions to reset the settings.
Factory Reset is only possible when the vehicle is stationary.
- Tap Settings in the center display’s Top view.
- Proceed to .
- Select the type of reset you would like to do.
> A pop-up window will appear.
- Tap OK to confirm the reset.For Reset Personal Settings, confirm the reset by tapping Reset for the active profileor Reset for all profiles.
The selected settings will be reset.
Resetting user data when the vehicle changes owners
- If the vehicle changes owners, all user data and system settings should be reset to factory defaults.
- Vehicle settings can be reset at different levels. Reset all user data and system settings to their original factory defaults when the vehicle changes owner. In the event of a change of ownership, it is also important to change the owner of the Polestar Connect service.
Settings for automatically activating the parking brake
- Tap Settings in the center display’s Top view.
- Tap and select or deselect the Auto Activate Parking Brake function.
Switching off and changing system sound volume in the center display
- Tap Settings in the Top view in the center display.
- Tap .
- Pull the control under Touch Sounds to adjust the volume or turn off screen tap sounds. Pull the control to the desired sound level.
Table of settings in the center display
- The center display’s Settings menu has a number of main categories and sub-categories that contain settings and information for many of the vehicle’s features and functions.
- There are seven main categories: My Car, Sound, Navigation, Media, Communication, Climate and System.
- Each category, in turn, contains a number of sub-categories and possible settings. The table below shows the first level of sub-categories. The possible settings for a function or an area are described in more detail in their respective sections of the Manual.
- Some settings are personal, which means that they can be saved to a Driver Profiles. Others are global, which means that they are not linked to a driver profile.
My Car
| Sub-categories |
|---|
| Displays |
| IntelliSafe |
| Drive Preferences/Individual Drive Mode |
| Lights and Lighting |
| Mirrors and Convenience |
| Locking |
| Parking Brake and Suspension |
| Wipers |
Sound
| Sub-categories |
|---|
| Tone |
| Balance |
| System Volumes |
| Sub-categories |
|---|
| Map |
| Route and Guidance |
| Traffic |
Media
| Sub-categories |
|---|
| AM/FM Radio |
| SiriusXM |
| SiriusXM Travel Link |
| Gracenote® |
| Video |
Communication
| Sub-categories |
|---|
| Phone |
| Text Messages |
| Android Auto |
| Apple CarPlay |
| Bluetooth Devices |
| Wi-Fi |
| Vehicle Wi-Fi Hotspot |
| Vehicle Modem Internet |
| Polestar Connect |
Climate
The Climate main category does not have any sub-categories.
System
| Sub-categories |
|---|
| Driver Profile |
| Date and Time |
| System Languages and Units |
| Privacy and Data |
| Keyboard Layouts |
| Voice Control |
| Factory Reset |
| System Information |
Terms of use and data sharing
- The first time certain services and apps are started, a pop-up window with the heading Terms and conditions and Data sharing may open.
- The aim is to inform the user about Polestar’s terms of use and data sharing policy. By accepting data sharing, the user accepts that certain information will be sent from the vehicle. This is required for certain services and apps to work with full functionality.
- The data sharing function for connected services and apps is deactivated by default. For certain connected services and apps in the vehicle to work, data sharing must be activated. Data sharing can be set from the center display’s Settings menu.
Settings for privacy and data sharing are unique for each driver profile.
Trip statistics settings
- Open the Driver performance app in the App view to display trip statistics.
-
 Tap Preferences to
- change the graph scale. Select 1, 10 or 100 km/miles for the bar.
- reset data after each trip. Performed when the vehicle remains stationary for more than 4 hours.
- reset data for current trip.
Trip statistics, calculated average consumption, and total driving time are always reset simultaneously.
Unit standards for distance, speed, etc. can be changed via system settings in the center display.
