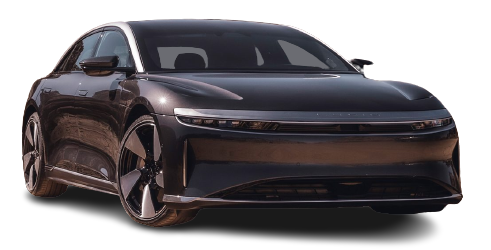
2022 Lucid Air HomeLink Owners Manual


2022 Lucid Air HomeLink


What Is HomeLink?
HomeLink is a wireless control system that enables you to remotely operate up to 15 Radio Frequency (RF) devices, such as garage doors, gates, lights, and home security systems.
Additional system information can be found online at www.homelink.com.
HomeLink FCC/ISED Advisory
This device complies with Federal Communications Commission (FCC) rules part 15 and
Innovation, Science, and Economic Development Canada RSS-210. Operation is subject to the
following two conditions:
- This device may not cause harmful interference,
- This device must accept any interference that may be received including interference that may cause undesired operation.
WARNING: The transmitter has been tested and complies with FCC and ISED rules. Changes or modifications not expressly approved by the party responsible for compliance could void the user’s authority to operate the device.
This equipment complies with FCC and ISED radiation exposure limits set forth for an uncontrolled environment. End-Users must follow the specific operating instructions for satisfying RF exposure compliance. This transmitter must be at least 20 cm (8 in) from the user and must not be co-located or operating in conjunction with any other antenna or transmitter.
Programming HomeLink
WARNING: Do not use HomeLink with any garage door opener that cannot detect an object and signal the door to stop and reverse as required by U.S. Federal Safety Standards (including any garage door opener manufactured before April 1st, 1982). A garage door opener which does not have the safety stop and reverse feature does not meet current federal safety standards. Using a garage door opener without these features increases the risk of serious injury or death.
To set up a new HomeLink program, have the remote for the garage door or gate you are programming ready, and follow these steps:
- On the Pilot Panel, select
NOTE: Press CANCEL during any step of programming to return to the main HomelLink® screen. No information will be stored. - Use the on-screen keyboard to enter a name for your HomeLink®, then press CONTINUE.
- Prepare your surroundings as instructed on the screen, and press CONTINUE when you are ready to proceed.
NOTE: Select Program with D-Mode only if your device requires D-Mode programming per the HomeLink website or operator’s manual. - To record the remote signal, press and hold the remote 2 in (5 cm) below the letter L on the front of your vehicle until the horn sounds and the headlights flash.
- Once the Pilot Panel shows that recording is completed, press CONTINUE.
NOTE: If the on-screen process detects that your device uses a fixed code, it will automatically skip this step and proceed to the test in the next steps. - To train the receiver, press the LEARN button on the back of your receiver (removing the cover if needed), then press CONTINUE on the Pilot Panel.
NOTE: Because pressing the LEARN button is time-sensitive, a second person can assist with this step.
NOTE: If your receiver is QuickTrain compatible, you can press CONTINUE.
NOTE: After pressing the ‘LEARN’ or sync button, you will have 30 seconds to test HomeLink. If a signal is not detected within the timeout period, an error message will be displayed with the option to try again. - To test, press the TEST HOMELINK button. You will need to press this three times in total. Wait until you see a check mark before pressing the button a second and third time.
- During each brief test, the TEST HOMELINK button will be temporarily unavailable, while the current test number animates to indicate it is in progress.
NOTE: The device you are programming may respond during any of these three tests. Continue with all three tests. - After a test completes, a check replaces the number and the TEST HOMELINK button becomes available. Continue through all three tests.
- After all three tests have completed, the screen will prompt you to confirm whether the device responded. Press YES or NO.
NOTE: Pressing NO will give you the option to restart the test and contact information for HomeLink Help. - If you pressed YES, you will be brought back to the Connectivity screen. Your new HomeLink device will be listed under CONNECTED DEVICES.
Reprogramming a device
- On the Pilot Panel, select
- On the device details screen, press PROGRAM.
- Follow the steps for programming a device. See Programming Homelink.
Using HomeLink®
Once devices have been programmed to your vehicle, they can be accessed using the HomeLink menu on the right Cockpit Panel.
The HomeLink menu will open automatically when the vehicle is detected within 82 ft (25 m) of a programmed garage door or gate. To access it manually:
- Press the status bar to expand.
- Press to open HomeLink.
From this menu, you can:
- Press+ ADD NEW HOMELINK to add a new device. See Programming HomeLink.
- Press HOMELINK SETTINGS to edit or remove existing devices. See Renaming or Deleting.a Device.
- Press a device name to activate it.
The icon next to a device indicates that a signal has been sent to the door or gate. The menu automatically collapses 3 seconds after a signal is sent.
Renaming or Deleting a Program
NOTE: For your security, it is recommended to delete all programmed devices upon the sale or lease termination of your vehicle.
Renaming a program
- On the Pilot Panel, select
- On the device details screen, press the
- Use the on-screen keyboard to edit the device name, then press SAVE to confirm, or CANCEL to return to the previous screen.
Deleting a program
- On the Pilot Panel, select
- On the device details screen, press DELETE.
- The screen will prompt to confirm whether you wish to delete the selected device. Press DELETE ALL to confirm, or CANCEL to return to the previous screen.
Deleting all programs
- On the Pilot Panel, select
- If two or more devices are connected to your vehicle, the option to DELETE ALL will be available. Press it to continue.
- The screen will prompt to confirm whether you wish to delete all connected HomelLink® devices. Press DELETE ALL to confirm, or CANCEL to return to the previous screen.
Recent Posts
VW Jetta Engine Fuse Box Diagram
Access the comprehensive 2010-2018 VW Jetta Passenger Fuse Box Diagram to troubleshoot electrical issues effectively.…
VW Jetta Passenger Fuse Box Diagram
Explore the comprehensive VW Jetta Passenger Fuse Box Diagram to troubleshoot electrical issues effectively. Understand…
2023 Ford F-150 Lightning Fuse Box Diagram
Under Hood Fuse Box Location Remove the front luggage compartment cover. Under Hood Fuse Box…
2022 Kawasaki NINJA H2 SX SE Brake Lever Adjuster Owner’s Manual
2022 Kawasaki NINJA H2 SX SE Brake Lever Adjuster Owner's Manual NOTICE Only adjust the front…
2023 Land Rover Range Rover Evoque Exiting The Vehicle Owners Manual
2023 Land Rover Range Rover Evoque Exiting The Vehicle SINGLE LOCKING WARNING Before exiting the…
2023 Land Rover Range Rover Evoque Front Seats Owners Manual
2023 Land Rover Range Rover Evoque Front Seats FRONT SEAT SAFETY Make sure to read…
