2022 Land Rover Range Rover Fuses Owners Manual


2022 Land Rover Range Rover Fuses


FUSE BOX LOCATIONS


When a fuse box is exposed, take care to protect the box from moisture. Refit the access panel at the earliest opportunity.
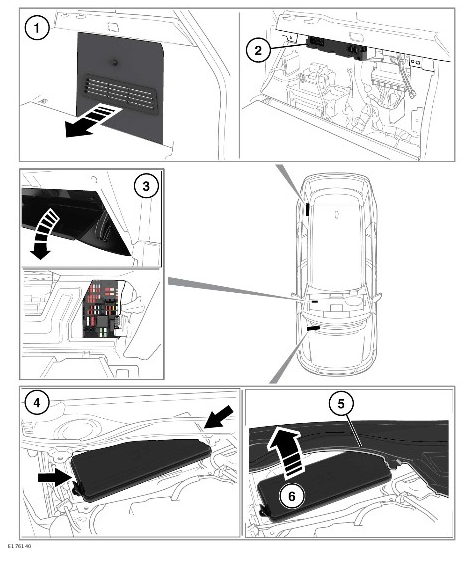
- To access the loadspace fuse box, open the tailgate. Remove the right-side access panel, by grasping the top of the panel and pulling sharply. NOTES
Hybrid vehicles feature an additional fuse box, located adjacent to the loadspace fuse box. The fuses contained within this fuse box should only be examined or replaced by an authorized retailer/repairer.
When refitting the access panel, make sure that the three securing pegs are aligned with their respective holes, before pushing the panel fully home.
- Loadspace fuse box. A label, located in a slot under the fuse box, shows the circuits protected and the fuse locations.
- To access the passenger compartment fuse box, open the glovebox. Press the top of the support stay at each end, and lower the glovebox into the footwell. A label on the front of the fuse access panel shows the circuits protected and the fuse locations. Remove the panel to gain access to the fuses. See STORAGE COMPARTMENTS.
- To access the engine compartment fuse box, remove the under-hood cover. See UNDER-HOOD COVERS REMOVAL.
- Lift up the edge of the leaf screen panel, just enough to allow the removal of the fuse box cover.
- Remove the fuse box cover, by releasing the clips on each end. A label on the inside of the cover shows the circuits protected and the fuse locations.
To access the loadspace fuse box, carry out the following procedure.
Raise the deployable loadspace floor to the open position. See DEPLOYABLE LOADSPACE FLOOR.
Turn the two fixings on the right-side floor rail through 90°, to release them from the spring clip. When released, turn through 90° again, back to the horizontal position, and remove from the rail. Keep the fixings in a safe place.
Lift the removable rail section and carefully remove the rail from the vehicle.
Lower the deployable loadspace floor.
Move the deployable loadspace floor fully backward. See DEPLOYABLE LOADSPACE FLOOR.
Refer to the fuse box location section of the Owner’s Handbook for the procedure for removing the side trim panel.
When removing or replacing the side trim panel, take care to avoid damaging the panel on the floor rail.
To fit the rail, reverse the removal procedure.
Hold the fixings in the horizontal position and firmly push them into the rail section. A click is heard as the spring clip engages.
REPLACING A FUSE
Hybrid vehicles only: The high voltage system has no serviceable parts. Never disassemble, remove or replace high-voltage components, cables, or connectors. Tampering with the high voltage system can cause severe burns or electric shock, which may result in serious injury or death. High voltage cables and connectors are colored oranges for identification purposes. If maintenance or repair is required, always consult a retailer/authorized repairer.
Always switch off the ignition system and the affected electrical circuit before replacing a fuse. Failure to do so could cause damage to the vehicle.
Fit-approved replacement fuses of the same rating and type, or fuses of a matching specification. Using an incorrect fuse may result in damage to the vehicle’s electrical system and can result in a fire.
If the replacement fuse blows after fitment, the system should be checked by a retailer/authorized repairer. Further damage could be caused to the vehicle if ignored.
Relays and fuses not detailed in this Owner’s Handbook should only be replaced by qualified persons.
If an electrical system has stopped operating, the cause may be a blown fuse. The easiest way to check if a fuse has blown is to first remove it.
To check for a blown fuse:
- Check the fuse box tables in the Fuses section of the Owner’s Handbook to identify the correct fuse.
- Gain access to the appropriate fuse box. See FUSE BOX LOCATIONS.
- Check the fuse box label to locate the correct fuse. Depending on the fuse box, the label is located on the underside of the lid, or on the back of the trim panel.
- Remove the fuse by pulling it straight out using the removal tool. See FUSE BOX LOCATIONS.
- Check for a break in the wire within the fuse. If the wire within the fuse is broken, the fuse has blown and needs replacing. If the wire is still intact, consult a retailer/authorized repairer.
- Refit or replace the fuse, as appropriate. Make sure the fuse is pushed fully into its correct position.
ENGINE COMPARTMENT FUSE BOX
| Fuse number | Rating (Amps) | Fuse color | Circuits protected |
|---|---|---|---|
| 1 | 10 | Red. | Auto stop/start (hybrid vehicles only). |
| 2 | – | – | – |
| 3 | – | – | – |
| 4 | 15 | Blue. | Hybrid vehicle powertrain. |
| 5 | 15 | Blue. | Hybrid vehicle powertrain. |
| 6 | 10 | Red. | Hybrid vehicle powertrain. |
| 7 | – | – | – |
| 8 | – | – | – |
| 9 | 25 | Clear. | Rear screen washer. |
| 10 | 15 | Blue. | Front fog lights. |
| 11 | 15 | Blue. | Horn. |
| 12 | 30 | Green. | Right-side headlight washer pump. |
| 13 | 30 | Green. | Left-side headlight washer pump. |
| 14 | 15 | Blue. | Auto stop/start. |
| 15 | 15 | Blue. | Supercharger cooling. |
| 16 | 25 | Clear. | Windshield washer jets. |
| 17 | 10 | Red. | Engine management system. |
| 18 | 20 | Yellow. | Engine management system (gasoline only). |
| 19 | 15 | Blue. | Engine management system. |
| 20 | 25 | Clear. | Engine management system. |
| 21 | 20 | Yellow. | Engine management system. |
| 22 | 10 | Red. | Engine management system (diesel only). Engine cooling fan (gasoline only). |
| 23 | 10 | Red. | Engine management system. |
| 24 | 15 | Blue. | Engine management system. |
| 25 | 10 | Red. | Engine management system (diesel only). |
| 26 | – | – | – |
| 27 | – | – | – |
| 28 | – | – | – |
| 29 | 5 | Tan. | Engine management system. Starter motor. Electrical power management. |
| 30 | 10 | Red. | Heated wiper park. |
| 31 | – | – | – |
| 32 | 10 | Red. | Steering wheel. |
| 33 | 5 | Tan. | Transfer box. |
| 34 | 5 | Tan. | 48v system. |
| 35 | 5 | Tan. | Headlight levelling. |
| 36 | – | – | – |
| 37 | – | – | – |
| 38 | – | – | – |
| 39 | 5 | Tan. | Hybrid vehicle powertrain. |
| 40 | 15 | Blue. | Transmission. Terrain response switch. Gear selector. |
| 41 | – | – | – |
| 42 | 25 | Clear. | Left-side headlight. |
| 43 | 5 | Tan. | Hybrid vehicle powertrain. |
| 44 | 25 | Clear. | Right-side headlight. |
| 45 | – | – | – |
| 46 | – | – | – |
| 47 | – | – | – |
| 48 | – | – | – |
| 49 | 5 | Tan. | Engine management system. |
| 50 | – | – | – |
| 51 | 10 | Red. | Engine management system. |
| 52 | – | – | – |
| 53 | – | – | – |
| 54 | – | – | – |
| 55 | – | – | – |
| 56 | – | – | – |
| 57 | – | – | – |
| 58 | – | – | – |
| 59 | – | – | – |
| 60 | 5 | Tan. | Heated wiper park. |
PASSENGER COMPARTMENT FUSE BOX
| Fuse number | Rating (Amps) | Fuse color | Circuits protected |
|---|---|---|---|
| 1 | 20 | Yellow. | Front cigar lighter. |
| 2 | 20 | Yellow. | Front accessory socket. Rear accessory socket. |
| 3 | 20 | Yellow. | Rear accessory socket. |
| 4 | 20 | Yellow. | Cubby box USB. |
| 5 | – | – | – |
| 6 | 10 | Red. | Climate control (hybrid vehicles only). |
| 7 | 5 | Tan. | Battery back-up sounder. |
| 8 | 15 | Blue. | Auxiliary heater (hybrid vehicles only). |
| 9 | – | – | – |
| 10 | 20 | Yellow. | Accessory sockets.. |
| 11 | 30 | Green. | Right-side rear seats. |
| 12 | 20 | Yellow. | Panoramic roof. |
| 13 | 20 | Yellow. | Panoramic roof. |
| 14 | 5 | Tan. | All Terrain Progress Control (ATPC). |
| 15 | – | – | – |
| 16 | – | – | – |
| 17 | – | – | – |
| 18 | 30 | Green. | Passenger seat. Left-side rear seat. |
| 19 | – | – | – |
| 20 | 25 | Clear. | Left-side rear door. |
| 21 | 10 | Red. | Cool box. 240v plug socket. |
| 22 | 5 | Tan. | 48v cooling fan. |
| 23 | 20 | Yellow. | Front passenger’s seat. Left-side rear seat. |
| 24 | 25 | Clear. | Driver’s door switches. Driver’s door soft-close. Driver’s door power-close. |
| 25 | 15 | Blue. | Dynamic Stability Control (DSC). |
| 26 | 10 | Red. | Passenger’s seat switches. |
| 27 | 5 | Tan. | Tire Pressure Monitoring System (TPMS). Front overhead console. |
| 28 | 20 | Yellow. | Driver’s seat. |
| 29 | 25 | Clear. | Right-side rear door switches. |
| 30 | – | – | – |
| 31 | – | – | – |
| 32 | 10 | Red. | Hybrid vehicle charging port flap. |
| 33 | 20 | Yellow. | Driver’s seat. |
| 34 | 25 | Clear. | Passenger’s door switches. Passenger’s door soft-close. Passenger’s door power-close. |
| 35 | 5 | Tan. | Brake pedal switch. |
| 36 | – | – | – |
| 37 | – | – | – |
| 38 | – | – | – |
| 39 | – | – | – |
| 40 | – | – | – |
| 41 | 5 | Tan. | Telematics. |
| 42 | – | – | – |
| 43 | 10 | Red. | Heated steering wheel. |
| 44 | 10 | Red. | Steering wheel. |
| 45 | 5 | Tan. | Touchscreen buttons. Rear climate control. |
| 46 | 15 | Blue. | Climate control. |
| 47 | – | – | – |
| 48 | – | – | – |
| 49 | 5 | Tan. | Vehicle immobilizer. |
| 50 | – | – | – |
| 51 | – | – | – |
| 52 | 5 | Tan. | Air ionizer. |
| 53 | – | – | – |
| 54 | 5 | Tan. | Diagnostic socket. |
| 55 | – | – | – |
| 56 | 10 | Red. | Climate control. |
LOADSPACE FUSE BOX
| Fuse number | Rating (Amps) | Fuse color | Circuits protected |
|---|---|---|---|
| 1 | 15 | Blue. | Hybrid vehicle powertrain/cooling fan (vehicles with a 48v system). |
| 2 | – | – | – |
| 3 | – | – | – |
| 4 | 10 | Red. | Left-side rear seat armrest. Calf rest heater. |
| 5 | 10 | Red. | Right-side rear seat armrest. Calf rest heater. |
| 6 | – | – | – |
| 7 | 5 | Tan. | Blind spot monitoring. |
| 8 | 20 | Yellow. | Driver’s heated seat. |
| 9 | 15 | Blue. | Driver’s seat switches. Front passenger’s seat switches. |
| 10 | 20 | Yellow. | Front passenger’s heated seat. |
| 11 | 20 | Yellow. | Right-side rear heated seat. |
| 12 | 15 | Blue. | Flashlight. Rear seat switches. |
| 13 | 20 | Yellow | Left-side rear heated seat. |
| 14 | – | – | – |
| 15 | 30 | Green. | Fuel system. |
| 16 | 15 | Blue. | Trailer socket. |
| 17 | 10 | Red. | Diesel Exhaust Fluid (DEF). |
| 18 | 20 | Yellow. | Loadspace accessory power socket. |
| 19 | 20 | Yellow. | Rear accessory socket and USB. |
| 20 | 20 | Yellow. | Cubby box accessory socket. |
| 21 | 20 | Yellow. | Loadspace accessory socket. |
| 22 | 20 | Yellow. | Accessory socket (long wheelbase vehicles only). |
| 23 | 10 | Red. | Lower touchscreen. |
| 24 | 10 | Red. | Instrument panel. |
| 25 | 5 | Tan. | Air suspension. |
| 26 | 2 | Gray. | Electronic toll collection. |
| 27 | 10 | Red. | Parking aid. Rear-view mirror. Cameras. Blind spot assist. |
| 28 | 10 | Red. | Head-Up Display (HUD). |
| 29 | 5 | Tan. | Adaptive cruise control. |
| 30 | 30 | Green. | Heated rear screen. Radio frequency filter. |
| 31 | – | – | – |
| 32 | – | – | – |
| 33 | 15 | Blue. | Rear wiper. |
| 34 | 5 | Tan. | 48v battery. |
| 35 | 15 | Blue. | Rear console. |
| 36 | 15 | Blue. | Rear console. |
| 37 | 30 | Green. | Driver’s seat. |
| 38 | – | – | – |
| 39 | 30 | Green. | Deployable side steps. |
| 40 | 10 | Red. | External sound generator (hybrid vehicles only). |
| 41 | 5 | Tan. | Rear console. Clock. |
| 42 | 20 | Yellow. | Right-side rear seat. |
| 43 | 20 | Yellow. | Keyless locking. |
| 44 | 15 | Blue. | Trailer socket. |
| 45 | 15 | Blue. | Engine management system. Fuel system. |
| 46 | 15 | Blue. | Fuel system. |
| 47 | – | – | – |
| 48 | 10 | Red. | Touchscreen. |
| 49 | 10 | Red. | Gesture tailgate. |
| 50 | 15 | Blue. | Entertainment and information systems. |
| 51 | 15 | Blue. | Entertainment and information systems. |
| 52 | 10 | Red. | Portable media. |
| 53 | 10 | Red. | Portable media. |
| 54 | 5 | Tan. | Occupant sensor. |
| 55 | 15 | Blue. | Air suspension. |
| 56 | 10 | Red. | Air suspension. Continuous variable dampers. |
| 57 | 5 | Tan. | Keyless locking. |
| 58 | 30 | Green. | Front passenger’s seat. Left-side rear seat. |
| 59 | 5 | Tan. | Rear-view camera. |
| 60 | – | – | – |
Recent Posts
VW Jetta Engine Fuse Box Diagram
Access the comprehensive 2010-2018 VW Jetta Passenger Fuse Box Diagram to troubleshoot electrical issues effectively.…
VW Jetta Passenger Fuse Box Diagram
Explore the comprehensive VW Jetta Passenger Fuse Box Diagram to troubleshoot electrical issues effectively. Understand…
2023 Ford F-150 Lightning Fuse Box Diagram
Under Hood Fuse Box Location Remove the front luggage compartment cover. Under Hood Fuse Box…
2022 Kawasaki NINJA H2 SX SE Brake Lever Adjuster Owner’s Manual
2022 Kawasaki NINJA H2 SX SE Brake Lever Adjuster Owner's Manual NOTICE Only adjust the front…
2023 Land Rover Range Rover Evoque Exiting The Vehicle Owners Manual
2023 Land Rover Range Rover Evoque Exiting The Vehicle SINGLE LOCKING WARNING Before exiting the…
2023 Land Rover Range Rover Evoque Front Seats Owners Manual
2023 Land Rover Range Rover Evoque Front Seats FRONT SEAT SAFETY Make sure to read…
