2023 Land Rover RANGE ROVER VELAR LOAD CARRYING
LOAD CARRYING
WARNING
Never allow passengers to travel in the loadspace under any circumstances. All vehicle occupants should be seated correctly and should wear a seat belt at all times when the vehicle is in motion. Failure to do so can lead to serious injury or death in the event of an accident.
Never allow passengers to travel in the loadspace under any circumstances. All vehicle occupants should be seated correctly and should wear a seat belt at all times when the vehicle is in motion. Failure to do so can lead to serious injury or death in the event of an accident.
WARNING
All items carried in the vehicle should be properly secured. If the vehicle is involved in an accident or subject to sudden braking or a change of direction, loose items can cause serious injury.
All items carried in the vehicle should be properly secured. If the vehicle is involved in an accident or subject to sudden braking or a change of direction, loose items can cause serious injury.
LOADSPACE COVER
WARNING
Do not store the loadspace cover lose in the vehicle. During an accident or sudden maneuver, the loadspace cover could cause serious injury or death.
Do not store the loadspace cover lose in the vehicle. During an accident or sudden maneuver, the loadspace cover could cause serious injury or death.
WARNING
Never place objects on top of the loadspace cover. During an accident or sudden maneuver, loose objects can cause serious injury or death.
Never place objects on top of the loadspace cover. During an accident or sudden maneuver, loose objects can cause serious injury or death.
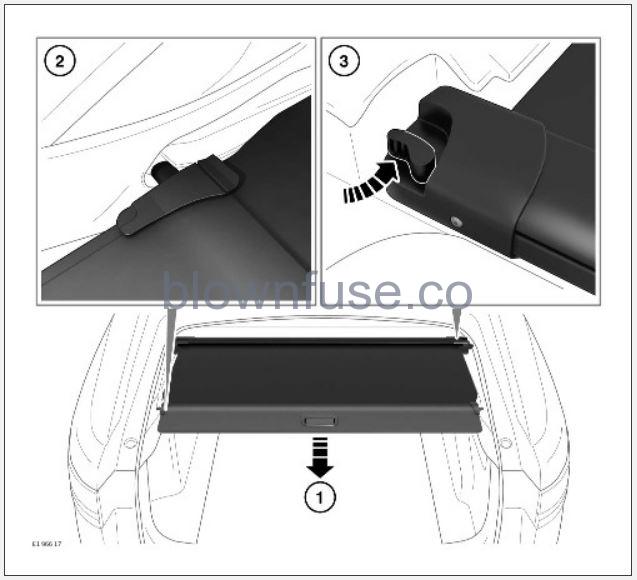
- Pull the rigid portion of the cover to unroll.
- Engage the end pieces into the recessed areas molded into the loadspace sides. To retract the loadspace cover, disengage the ends from the recessed areas and allow the soft portion of the cover to retract into its housing.
- To remove the cover, turn the release lever to unlock the assembly and disengage the pins from the sockets.
To refit the cover, engage the left side of the assembly into the recessed area. Engage the right side, and push down into place until an audible click is heard.
TAILGATE BLIND:
CAUTION
If items carried in the loadspace are higher than the loadspace cover, remove the tailgate blind to prevent damage to the blind and/or the items.
If items carried in the loadspace are higher than the loadspace cover, remove the tailgate blind to prevent damage to the blind and/or the items.
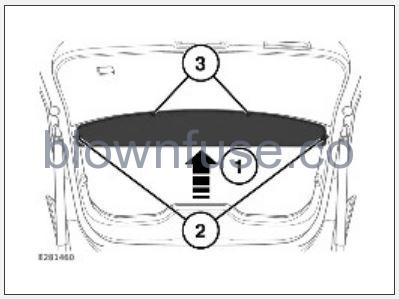
To remove the tailgate blind:
- With the tailgate open, push the tailgate blind in the middle towards the glass in order to flex it slightly.
- Pull one of the side pins to disengage.
- Pull the two center pins to disengage, then pull the remaining side pinout.
WARNING
Do not store the tailgate blind loose in the vehicle. During an accident or sudden maneuver, the tailgate blind could cause serious injury or death. To refit the tailgate blind: Reverse the above procedure to reattach the tailgate blind to the tailgate.
Do not store the tailgate blind loose in the vehicle. During an accident or sudden maneuver, the tailgate blind could cause serious injury or death. To refit the tailgate blind: Reverse the above procedure to reattach the tailgate blind to the tailgate.
LOADSPACE PARTITION
CAUTION
Make sure the soft cargo barrier and all fasteners are safely and correctly fitted. The straps should be tight and straight. During an accident or sudden maneuver, loose objects can cause serious injury or death.
Make sure the soft cargo barrier and all fasteners are safely and correctly fitted. The straps should be tight and straight. During an accident or sudden maneuver, loose objects can cause serious injury or death.
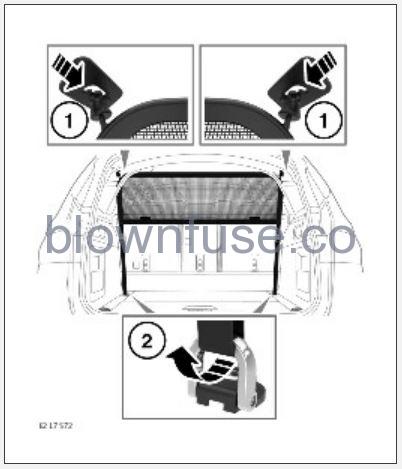
There is a cargo barrier net bracket on each side of the roof.
NOTES
Before fitting the cargo barrier net, check the orientation of the net. The logo on the cargo barrier net must be visible when standing at the rear of the vehicle and looking into the loadspace.
Before fitting the cargo barrier net, check the orientation of the net. The logo on the cargo barrier net must be visible when standing at the rear of the vehicle and looking into the loadspace.
To fit the cargo barrier net:
- Engage the end pieces into the recessed areas molded into the sides of the roof.
- Lace the straps through the lashing eye loops.
NOTES
Removal of the partition net is the reverse of the fitment procedure.
Removal of the partition net is the reverse of the fitment procedure.
LUGGAGE ANCHOR POINTS
WARNING
All items carried in the loadspace area should be properly secured. If the vehicle is involved in an accident or subject to sudden braking or a change of direction, loose items can cause serious injury.
All items carried in the loadspace area should be properly secured. If the vehicle is involved in an accident or subject to sudden braking or a change of direction, loose items can cause serious injury.
NOTES
A range of approved luggage retention accessories is available from a retailer/authorized repairer.
A range of approved luggage retention accessories is available from a retailer/authorized repairer.
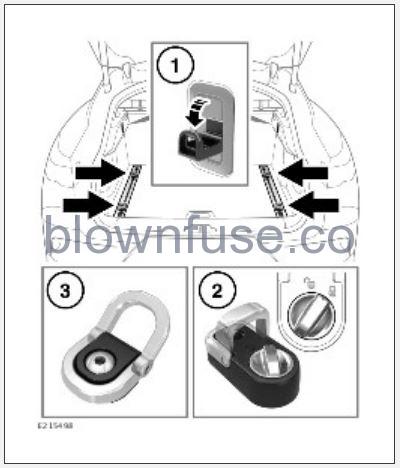
- Bag hooks: The bag hooks should only be used for lightweight items.
- If adjustable anchor points are fitted, first turn the locking mechanism counter-clockwise to unlock. Press the mechanism and slide the anchor point to the required position in the luggage rail. Release the mechanism to latch into position. Move the anchor point slightly until a click is heard. The anchor point is now secured. Turn the mechanism clockwise to lock.
- To assist in safely securing large items of luggage, four anchor points are located in the loadspace floor.
LUGGAGE DIVIDER
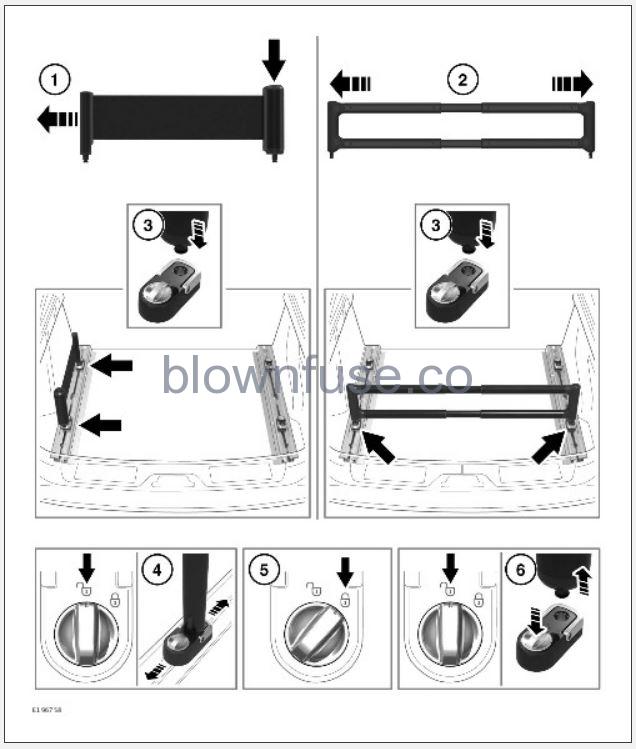
A luggage divider kit is provided to assist with safely securing items of luggage to the loadspace floor.
Floor-mounted luggage rails provide a full-width mounting channel that accommodates a flexible retracting band or a solid telescopic divider to secure soft and hard luggage of all shapes and sizes.
- Press and then pull the retracting band until the required length is reached.
NOTES
The retracting band should only be used along the side of the loadspace floor, as illustrated. - Adjust the divider to the required length.
- Unlock the appropriate anchor point. Attach the retracting band and divider.
- With the anchor point in the unlocked position, press the mechanism and slide to the required position in the luggage rail.
- Lock the anchor point in the required position.
- To remove the retracting band and divider from the anchor point, unlock the anchor point and press the lock or unlock button to release.


