
2023 Land Rover NEW RANGE ROVER TIRES

TIRE MARKINGS

Make sure the relevant safety warnings have been read and understood before replacing a tire. See REPLACEMENT TIRES.
All replacement tires must be the same specification as the original equipment tires, except for approved winter tires, off-road tires, and Professional Off-Road (POR) tires. If in doubt, consult a retailer/authorized repairer. Failing to comply with these rules can lead to accidents, potentially causing serious injury or death.
- P indicates that the tire is for passenger vehicle use. The index is not always shown.
NOTES
Some vehicles might be equipped with high load (HL) tires. High load capacity is marked with HL at location 1, before the tire size. HL tires have higher load capacity than extra load (XL) tires. - The width of the tire from sidewall edge to sidewall edge, given in mm.
- The aspect ratio, also known as the profile, gives the sidewall height as a percentage of the tread width. For example, if the tread width is 205 mm and the aspect ratio is 50, the sidewall height will be 102 mm.
- R indicates that the tire is of radial ply construction.
- The diameter of the wheel rim, given in inches.
- The load index for the tire. The load index specifies the maximum load the tire can carry at the speed indicated by the tire’s speed rating. The index is not always shown.
- The speed rating denotes the maximum speed at which the tire should be used for extended periods. See SPEED RATINGS.
- U.S. DOT Tire Identification Number (TIN): The TIN begins with the letters DOT and indicates that the tire meets all federal standards. The next two numbers or letters are the plant code where the tire was manufactured. The last four numbers are the date of manufacture. For example, if the number is 3119, the tire was made in the 31st week of 2019. The other numbers are marketing codes used at the manufacturer’s discretion. The information can be used to contact consumers if a tire defect requires a recall.
- M+S or M/S indicates that the tire has been designed with some capability for mud and snow.
- The winter tires symbol identifies dedicated winter tires. See USING WINTER TIRES.
- The number of plies in both the tread area and the sidewall area. The number of plies indicates how many layers of rubber-coated material make up the structure of the tire. Information is also provided on the type of materials used.
- Wear rate indicator: E.g., a tire rated at 400 lasts longer than a tire rated at 200.
- The traction rating grades a tire’s performance when stopping on a wet road surface. The higher the grade, the better the braking performance. The grades, from highest to lowest, are: AA, A, B, and C.
- The maximum load which can be carried by the tire.
- Heat resistance grading: The tire’s resistance to heat is grade A, B, or C, with A indicating the greatest resistance to heat. The grading is provided for a correctly inflated tire which is being used within its speed and loading limits.
- The maximum inflation pressure for the tire. The maximum inflation pressure should not be used for normal driving. See AVOIDING FLAT SPOTS.
Approved tires are identified by the brand mark J, LR, or J LR. Brand markings are specifically excluded for winter and POR tires.
SPEED RATINGS
| Rating | Speed mph (km/h) |
|---|---|
| Q | 99 (160) |
| R | 106 (170) |
| S | 112 (180) |
| T | 118 (190) |
| U | 124 (200) |
| H | 130 (210) |
| V | 149 (240) |
| W | 168 (270) |
| Y | 186 (300) |
TIRE CARE
Make sure the following warnings have been read and fully understood before driving the vehicle. Failure to do so may result in an accident, potentially leading to serious injury or death.
- Do not drive the vehicle if a tire is damaged, excessively worn, or incorrectly inflated. A tire in such a condition may catastrophically fail.
- Avoid contaminating the tires with vehicle fluids. Vehicle fluids may cause damage to the tire and cause tire failure.
- Avoid spinning the wheels. The forces released can damage the structure of the tire and cause tire failure.
- If wheel spin is unavoidable due to a loss of traction, e.g., in deep snow, do not exceed the 30 mph (50 km/h) point on the speedometer. Do not allow anyone to stand near or directly behind a tire that might spin.
- Do not exceed the maximum pressure stated on the sidewall of the tire.
Tire condition should be checked after the vehicle has been used off-road. As soon as the vehicle returns to a normal, hard road surface, stop and check for damage to the tires.
Check all the vehicle’s tires, including the spare, regularly for damage, wear, and distortion. If in any doubt about the condition of a tire, have it checked immediately by a tire repair center or a retailer/authorized repairer.
TIRE PRESSURE SAFETY
Make sure to read and fully understand the following warnings. Failure to comply with the safety instructions could result in an accident, leading to serious injury or death.
- heck the tires, including the spare, for condition and pressure on a weekly basis and before long journeys.
- All tire pressures, including the spare, should be checked. Failure to properly maintain the tire pressures could increase the risk of tire failure.
- The loading of the vehicle should always be considered when checking and adjusting the tire pressures. Failure to do so may lead to a loss of control, potentially causing serious injury or death. See TIRE PRESSURE LABEL.
- Always use a calibrated tire pressure gauge. Using an un-calibrated tire pressure gauge may result in tires with incorrect pressures. Incorrect tire pressure can lead to vehicle instability.
- Never drive the vehicle if the tire pressures are incorrect. Under-inflation causes excessive flexing and uneven tire wear, which can lead to sudden tire failure. Over-inflation causes harsh ride, uneven tire wear and poor handling.
- Under-inflation also reduces fuel efficiency and tire tread life and may affect the vehicle’s handling and stopping ability.
- If the tire pressures are checked while the vehicle is inside a protected, covered area, e.g., a garage, and subsequently driven in lower outdoor temperatures, tire under-inflation could occur.
- A slight pressure loss occurs naturally with time. If this exceeds 2 psi (0.14 bar, 14 kPa) per week, have the cause investigated and rectified by qualified personnel.
- Pressure checks should be carried out ideally when the tires are cold, and the vehicle has been stationary for more than 3 hours. A hot tire at, or below, the recommended cold inflation pressure, is dangerously under-inflated. Tires can be hot after driving, if the vehicle has been parked in strong sunlight, or used in high ambient temperatures. Do not reduce the tire pressures. Recheck the pressures when cold.
- If the tire pressures are checked when the tires are warm, expect the pressures to have increased by up to 4 to 6 psi (0.3 to 0.4 bar, 30 to 40 kPa). If Tire Pressure Monitoring System (TPMS) advised pressures are not available in the instrument panel, allow the tires to cool fully before adjusting the pressures.
For vehicles with TPMS, it is possible to adjust the pressure of a warm tire, providing the advised pressures are used. See TIRE PRESSURE CHECK.
TIRE PRESSURES
Make sure the relevant safety warnings have been read and understood before checking and adjusting the tire pressures. See TIRE PRESSURE SAFETY.
For vehicles with Tire Pressure Monitoring System (TPMS), inflate the tires to the advised pressures displayed in the instrument panel. The advised tire pressures are displayed in brackets in the instrument panel. See TIRE PRESSURE CHECK.
Confirm that the TPMS loading setting is correct. See VEHICLE LOADING.
When the tires are cold, inflate to the recommended cold tire pressures if either of the following conditions apply:
- TPMS is not fitted to the vehicle.
- The advised tire pressures are not displayed in the instrument panel.
See TIRE PRESSURE LABEL or refer to the table below.
To avoid damaging the valves, do not apply excessive force or sideways pressure on the gauge and/or inflator.
To avoid damage to the TPMS valves, it is recommended not to use rigid tire inflation wands. Rigid tire inflation wands increase the risk of excess leverage and sideways pressure on the valve.
The following procedure should be used to adjust the tire pressures:
- Remove the tire valve cap.
- Firmly attach a tire pressure gauge and/or inflator to the valve.
- Read the tire pressure from the gauge and add air, if required.
- If air is added to the tire via a manual gauge, remove the gauge and re-attach it before reading the pressure. Failure to do so may result in an inaccurate reading.
NOTES
If the tire pressure is too high, remove the gauge and press the center of the valve to allow air out of the tire. Refit the gauge to the valve and check the pressure. - Refit the valve cap.
| Tire size | Light load | Normal load | ||
|---|---|---|---|---|
| Front psi (bar, kPa) | Rear psi (bar, kPa) | Front psi (bar, kPa) | Rear psi (bar, kPa) | |
| 255/60R20 113Y | 34 (2.3, 230) | 37 (2.5, 250) | 44 (3.0, 300) | 50 (3.4, 340) |
| 275/55R20 117W | 34 (2.3, 230) | 37 (2.5, 250) | 44 (3.0, 300) | 50 (3.4, 340) |
| 275/55R20 117Y | 34 (2.3, 230) | 37 (2.5, 250) | 44 (3.0, 300) | 50 (3.4, 340) |
| 275/50R21 113Y | 34 (2.3, 230) | 37 (2.5, 250) | 44 (3.0, 300) | 50 (3.4, 340) |
| 285/45R22 114Y | 34 (2.3, 230) | 37 (2.5, 250) | 44 (3.0, 300) | 50 (3.4, 340) |
| 285/40R23 111Y | 34 (2.3, 230) | 37 (2.5, 250) | 44 (3.0, 300) | 50 (3.4, 340) |
| T195/75R20 116M | 60 (4.2, 420) | 60 (4.2, 420) | 60 (4.2, 420) | 60 (4.2, 420) |
For the latest available information on the tire pressures visit: www.ownerinfo.landrover.com.
TIRE PRESSURE LABEL
The recommended tire pressures are listed on a label located in the driver’s door opening.
The recommended tire pressures provide optimum ride and handling characteristics for all normal operating conditions.
The label contains the following information:
- The maximum number of occupants, divided between the front and rear of the vehicle.
- The vehicle’s capacity weight, which includes the weight of the driver, passengers, and cargo.
- Cold inflation pressures for the front, rear, and spare tires.
- The size of the tires with which the vehicle was originally equipped.
The labels must not be changed, even if different wheels and tires are fitted at a later stage.
TIRE VALVES
Do not twist or bend the tire valves when attaching a pressure hose or gauge. Doing so may cause damage, leading to tire failure. Death or serious injury may result.
Keep the tire valve caps screwed down firmly to prevent water or dirt from entering the valve. Check the valves for leaks when checking the tire pressures.
Do not use metal valve caps, as these can corrode onto the valve threads and be difficult or impossible to remove.
REPLACEMENT TIRES
Make sure the following warnings and notices have been read and fully understood. Failure to comply with the safety instructions could result in damage to the vehicle, or an accident, leading to serious injury or death.
- Always fit replacement tires of the same type and, wherever possible, of the same make and tread pattern as the original. Failure to comply may reduce vehicle stability, efficiency, and range.
- The load index and speed ratings on all replacement tires must be at least the same specification as the vehicle’s original equipment. If in doubt, consult a retailer/authorized repairer.
- If the use of tires not recommended by the vehicle manufacturer is unavoidable make sure to read and fully comply with, the tire manufacturer’s instructions. Failure to do so may lead to tire failure due to incorrect fitting or use.
- Drive within the speed limitations of the tires, especially if lower speed-rated tires are fitted, e.g., winter tires, off-road, or Professional Off-Road (POR) tires. In markets that require a tire’s maximum speed label to be fitted, the label should be placed within the driver’s field of vision. Tire maximum speed labels can be obtained from the tire retailer. Consult a retailer/authorized repairer for further information.
- Tire removal and fitting should only be carried out by a retailer/authorized repairer.
Make sure that the Tire Pressure Monitoring System (TPMS) sensor is not damaged during a tire change.
When the tread has worn down to approximately 0.07 in (2 mm), wear indicators start to appear at the surface of the tread pattern. Wear indicators produce a continuous band of rubber across the tread, as a visual reminder.
It is recommended that tires should be replaced in sets of four. If this is not possible, replace the tires in pairs, both front or both rear. When tires are replaced, the wheels should always be re-balanced and the alignment checked.
Use the correct tire specification and pressures. Alternatively, contact a retailer/authorized repairer for advice. See TIRE PRESSURES or TIRE PRESSURE LABEL.
PRESSURE COMPENSATION FOR AMBIENT TEMPERATURE CHANGES
Daily ambient temperature variations may cause intermittent, minor tire pressure changes, which is normal and should not indicate a tire failure.
To mitigate this condition, check and adjust the tire pressures to the recommended cold inflation pressures before vehicle use.
Make sure that the correct tire pressures are maintained when moving to areas of differing ambient temperature. See TIRE PRESSURES and TIRE PRESSURE LABEL.
AVOIDING FLAT SPOTS
In areas of extended high ambient temperature, vehicle tires can be affected by a softening of the tire’s sidewall. If the vehicle is stationary for long periods, the tire deforms at the point where the standing surface meets the tire.
The tire deformation described is known as a flat spot and is normal tire behavior.
When the vehicle is subsequently driven, a vibration may be experienced from the flat spot. The condition steadily improves with extra mileage.
In order to minimize flat spotting, increase the tire pressures to the maximum, as stated on the tire’s sidewall. The tires must be returned to the specified running pressures before driving. See TIRE PRESSURES and TIRE MARKINGS.
TIRE DEGRADATION
Tires degrade over time, due to the effects of ultraviolet light, extreme temperatures, high loads, and environmental conditions. It is recommended that all tires, including the spare, are replaced at least every 6 years from the date of manufacture. However, the tires may require replacement more frequently.
USING WINTER TIRES
A dedicated winter tire often has a lower speed rating than the original equipment tire. Consequently, the vehicle must be driven within the speed limitation of the winter tire. Consult a retailer/authorized repairer for further information. In markets that require a tire’s maximum speed label to be fitted, make sure to place the label within the driver’s field of vision. Maximum speed labels can be obtained from the tire retailer. Failure to adhere to the winter tire’s speed limit may result in an accident, leading to serious injury or death.
M+S tires have a recognized level of winter performance. However, the M+S marking on the sidewall of the tire does not necessarily indicate that the tire is a dedicated winter tire. The M+S marking on an all-season tire indicates that it is designed for use all year round, including in cold temperatures, snow, and ice. The performance of all-season tires is generally inferior to a dedicated winter tire in conditions specific to winter.
In many countries, legislation exists that requires the use of winter tires during specified periods of the year.

The winter tires symbol identifies dedicated winter tires. Dedicated winter tires are recommended if optimum winter traction is required or if the vehicle is to be used in more extreme winter conditions.
The tire pressures indicated on the tire information label are for use in all conditions for the original equipment tires. If a reduced speed-rating tire is fitted, the recommended pressures are only suitable up to the tire’s maximum speed, with a light vehicle load. Vehicle speed should be restricted to below 100 mph (160 km/h) when normally loaded.
Winter tires must be fitted to all four wheels.
For optimum traction, winter tires should be run in for at least 100 miles (160 km) on dry roads, before driving on snow or ice.
Use of dedicated winter tires may require a change of wheel size, depending on the original choice of wheel. All four wheels must be changed.
If fitted with standard rubber valves, the Tire Pressure Monitoring System (TPMS) warning lamp flashes for 75 seconds and then remains illuminated.
When the original wheels and tires are refitted, the vehicle needs to travel a short distance to reset the TPMS and extinguish the warning lamp.
| Recommended winter tires | ||||
|---|---|---|---|---|
| Tire size | Brand | Tread pattern | Rim width – Profile – Offset | Tire type |
| 275/55R20 117V XL | Pirelli | Scorpion Winter | 20×8.5J CH +43.5 | Alpine |
| 275/55R20 117T XL | Nokian | Hakkapeliitta 10 SUV | 20x8J CH +39.5 20×8.5J CH +43.5 | Nordic studded |
| 275/55R20 117T XL | Michelin | X-iceN4 SUV | Nordic studded | |
| 275/55R20 117H XL | Pirelli | Scorpion Ice Zero 2 | Nordic studded | |
| 275/55R20 117R XL | Nokian | Hakkapeliitta R5 SUV | Nordic studless | |
| 275/55R20 117T XL | Michelin | X-Ice Snow 5 SUV | Nordic studless | |
| 275/50R21 113V XL | Michelin | Pilot Sport Alpin 5 SUV | 21×8.5J CH +43.5 | Alpine |
| 275/50R21 113V XL | Pirelli | Scorpion Winter | Alpine | |
| 275/50R21 113T XL | Michelin | XiceN4 SUV | Nordic studded | |
| 275/50R21 113R XL | Nokian | Hakkapeliitta R5 SUV | Nordic studless | |
| 285/45R22 114V XL | Pirelli | Scorpion Winter | 22×9.5J CH +42.5 | Alpine |
| 285/45R22 114T XL | Michelin | XiceN4 SUV | Nordic studded | |
| 285/45R22 114T XL | Nokian | Hakkapeliitta 10 SUV | Nordic studded | |
| 285/45R22 114H XL | Pirelli | Scorpion Ice Zero 2 | Nordic studded | |
| 285/45R22 114T XL | Michelin | X-Ice Snow 5 SUV | Nordic studless | |
| 285/45R22 114T XL | Nokian | Hakkapeliitta R5 SUV | Nordic studless | |
Studded tires are market dependent. If in doubt, or for further information, contact a retailer/authorized repairer. Alternatively, visit: www.ownerinfo.landrover.com.
For information about the latest recommended winter tires, contact a retailer/authorized repairer. Alternatively, visit: www.ownerinfo.landrover.com.
PROFESSIONAL OFF-ROAD (POR) TIRES
| Recommended Professional Off-Road (POR) tires | |||||
|---|---|---|---|---|---|
| Wheel size | Tire size | Brand | Pattern | Rim Width / Profile / Offset | Type |
| 20 in | 255/60R20 113S XL | Goodyear | Wrangler DuraTrac | 20x8J CH +39.5 20×8.5J CH +43.5 | POR |
For information about the latest recommended POR tires, contact a retailer/authorized repairer. Alternatively, visit: www.ownerinfo.landrover.com.
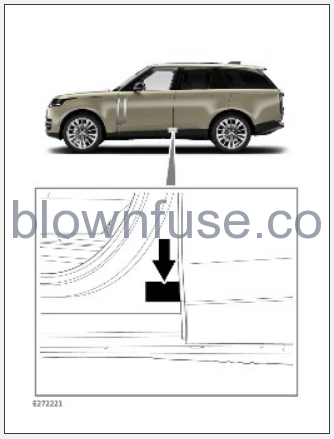
SELF-SEALING TIRES
Make sure to read and fully understand the following warnings and cautions. Failure to comply could result in serious injury, death, or vehicle damage.
- Regularly check the condition of the tires, especially if the vehicle is driven off-road. If a foreign object is identified, seek qualified assistance.
- Self-sealing tires reduce the impact of tread penetrations. Do not drive the vehicle with a tire that has damage to the sidewall.
- Do not attempt to repair a self-sealing tire with a tire repair system.
- If the Tire Pressure Monitoring System (TPMS) warning lamp illuminates, stop the vehicle in a safe place and inspect the tires. If in doubt, seek qualified assistance. See TIRE PRESSURE MONITORING SYSTEM (TPMS) (YELLOW).
Any repair performed on the tread area of a self-sealing tire may reduce the self-sealing ability, or damage the tire beyond repair.
Self-sealing tires are identified by one of the symbols shown below on the tire’s sidewall.
Continental.
Goodyear.
Michelin.
Pirelli.
A self-sealing tire can seal punctures in the tread area up to a maximum of 0.2 in (5 mm). In the event of a tire self-sealing, and no tire pressure loss, it is not necessary to stop immediately for a tire change and the journey may continue. When a puncture is observed, have it checked at the earliest opportunity by a tire repair center or a retailer/authorized repairer.
It is recommended that self-sealing tires are replaced with the same make and type. Fitting a tire that is not self-sealing may result in the vehicle being immobilized in the event of a puncture on the replacement tire. See REPLACEMENT TIRES.
USING SNOW CHAINS
Make sure the following warnings have been read and fully understood before using snow chains. Failure to use the snow chains safely could result in an accident, leading to serious injury or death.
- Only use traction devices in heavy snow conditions, on compacted snow.
- Dynamic Stability Control (DSC) must be switched off when using traction devices.
- Never exceed 30 mph (50 km/h) when traction devices are fitted.
- Never fit traction devices to a temporary-use spare wheel.
Traction devices approved by the vehicle manufacturer may be used to improve traction in heavy snow conditions, on compacted snow.
Traction devices should not be used in off-road conditions where there is no compacted snow.
If it becomes necessary to fit traction devices, the following points must be observed:
- Only use vehicle manufacturer-approved traction devices on the vehicle. Only vehicle manufacturer-approved traction devices have been tested to make sure that the devices do not cause damage to the vehicle. Contact a retailer/authorized repairer for information.
- The wheels and tires fitted to the vehicle must conform to the specifications of the vehicle manufacturer’s original equipment. Doing so helps to enhance the performance of the traction devices. See TIRE MARKINGS.
- Half-chain traction devices can be fitted to the rear wheels of vehicles with the following tire sizes:
255/60R20.
275/55R20.
275/50R21.
285/45R22.
285/40R23.
- Do not fit a traction device to a temporary-use spare wheel.
- Always read, understand, and follow the traction device manufacturer’s instructions. Pay particular attention to the maximum speed and fitting instructions.
- Fit traction devices in pairs on the same axle.
- Remove the traction devices, as soon as the conditions allow, to avoid tire and/or vehicle damage.
Contact a retailer/authorized repairer for details and availability of approved snow chains.
When using snow chains, select the grass gravel snow driving mode. See GRASS GRAVEL SNOW.
UNITED STATES DEPARTMENT OF TRANSPORTATION
The following information relates to the tire grading system developed by the National Highway Traffic Safety Administration (NHTSA) which grades tires by treadwear, traction, and temperature performance.
Tires that have deep tread, and winter tires, are exempt from these marking requirements.
UNIFORM TIRE QUALITY GRADING
Quality grades can be found where applicable on the tire sidewall between tread shoulder and maximum section width. For example:
Treadwear 200 Traction AA Temperature A
In addition to the marking requirements, passenger car tires must conform to Federal Safety Requirements.
TREADWEAR
The treadwear grade is a comparative rating based on the wear rate of the tire when tested under controlled conditions on a specified government test course. For example, a tire graded 150 would wear one and one-half (1½) times as well on the government course as a tire graded 100.
The relative performance of tires depends upon the actual conditions of their use, however, and may depart significantly from the norm due to variations in driving habits, service practices and differences in road characteristics and climate.
The vehicle should be checked by a retailer/authorized repairer as soon as possible if treadwear is uneven across the tire, or a tire wears excessively.
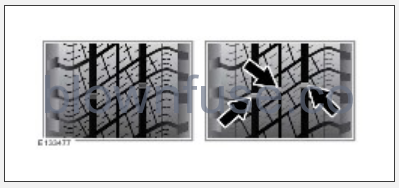
When the tread has worn down to approximately 0.07 in (2 mm), wear indicators start to appear at the surface of the tread pattern. Wear indicators produce a continuous band of rubber across the tread, as a visual indicator.
Wear indicators show the minimum tread depth recommended by the manufacturers. Tires which have worn to this point will have reduced grip and poor water displacement characteristics. Worn tires can lead to accidents, with the potential to cause serious injury or death.
Local legislation may determine a greater minimum tread depth to that shown by the tire wear indicators. Making sure that the tread depth meets the local legal requirements remains the responsibility of the driver. Do not rely on the tread depth indicators alone.
TRACTION
The traction grades, from highest to lowest, are AA, A, B, and C. The grades represent the tire’s ability to stop on wet pavement as measured under controlled conditions on specified government test surfaces of asphalt and concrete. A tire marked C may have poor traction performance.
Warning: The traction grade assigned to this tire is based on straight-ahead braking traction tests and does not include acceleration, cornering, hydroplaning, or peak traction characteristics.
TEMPERATURE
The temperature grades are A (the highest), B, and C, representing the tire’s resistance to the generation of heat and its ability to dissipate heat when tested under controlled conditions on a specified indoor laboratory test wheel.
Sustained high temperature can cause the material of the tire to degenerate and reduce tire life, and excessive temperature can lead to sudden tire failure.
The grade C corresponds to a level of performance which all passenger car tires must meet under the Federal Motor Safety Standard No. 109.
Grades B and A represent higher levels of performance on the laboratory test wheel than the minimum required by law.
Warning: The temperature grade for this tire is established for a tire that is properly inflated and not overloaded. Excessive speed, underinflation, or excessive loading, either separately or in combination, can cause heat buildup and possible tire failure.
TIRE GLOSSARY
lbf/in² or psi: Pounds per square inch, an imperial unit of measure for pressure.
kPa: Kilopascal, a metric unit of measure for pressure.
Cold tire pressure: The air pressure in a tire which has been standing in excess of 3 hours, or driven for less than 1 mile.
Recommended tire pressures: The pressure to which the tires should be inflated, dependent on vehicle load and tire temperature.
- Cold tires – the cold tire pressures are located on the driver’s door opening and in the Owner’s Handbook.
- Warm tires – the advised tire pressures for warm tires are displayed in the instrument panel.
Maximum permissible inflation pressure: The maximum pressure to which the tire should be inflated. The pressure is given on the tire’s sidewall in lbf/in² (psi) and kPa.
The pressure is the maximum allowed by the tire manufacturer, not the pressure recommended for use.
Curb weight: The weight of a standard vehicle, including:
- A full tank of fuel, if applicable.
- Any optional equipment fitted.
- The correct level of coolant and oils.
Accessory weight: The combined weight, in excess of those items replaced, of items available as factory fitted equipment.
Production options weight: The combined weight of options fitted which weigh in excess of 5 lbs (2.3 kg) more than the standard items that they replaced.
Not to include items already considered in curb or accessory weights. Such items include: heavy duty brakes, high capacity battery, special trim, etc.
Vehicle capacity weight: The number of seats multiplied by 150 lbs (68 kg), plus the rated amount of load and luggage.
Maximum loaded vehicle weight: The sum of the curb weight, accessory weight, vehicle capacity weight, plus any production option weights.
Rim: The metal support for a tire, or tire and tube, upon which the tire beads are seated.
Bead: The inner edge of a tire that is shaped to fit to the rim and form an airtight seal. The bead is constructed of steel wires which are wrapped, or reinforced, by the ply cords.
Gross Vehicle Weight (GVW): The maximum permissible weight of a vehicle with driver, passengers, load, luggage, and equipment.
STEPS FOR DETERMINING CORRECT LOAD LIMIT
Make sure the warnings in this topic have been read and fully understood before driving the vehicle. Exceeding the specified load limits could result in an accident, leading to serious injury or death.
- Locate the statement “The combined weight of occupants and cargo should never exceed XXX kg or XXX lbs” on your vehicle’s placard.
- Determine the combined weight of the driver and passengers that will be riding in your vehicle.
- Subtract the combined weight of the driver and passengers from XXX kg or XXX lbs.
- The resulting figure equals the available amount of cargo and luggage load capacity. For example, if the “XXX” amount equals 1400 lbs. and there will be five 150 lb. passengers in your vehicle, the amount of available cargo and luggage load capacity is 650 lbs. (1400 − 750 (5 x 150) = 650 lbs.)
- Determine the combined weight of luggage and cargo being loaded on the vehicle. That weight may not safely exceed the available cargo and luggage load capacity calculated in Step 4.
- If your vehicle will be towing a trailer, load from your trailer will be transferred to your vehicle. Consult this manual to determine how this reduces the available cargo and luggage load capacity of your vehicle.
The number and weight of passengers affect the cargo and luggage capacity. In the example above, the cargo and luggage load capacity is 650 lb. However, if fewer passengers ride in the vehicle, the luggage load capacity increases. If this vehicle carries three 150 lb passengers, the cargo and luggage load capacity increases to 950 lb:
(3 x 150 = 450 lb, and 1400 – 450 = 950 lb).
If the passengers weigh more, the cargo and luggage load capacity decreases.
Do not exceed the vehicle capacity weight (the total weight of driver, passengers, and cargo) given on the tire information label.
The weight of accessories must also be subtracted from the cargo and luggage load capacity. If unsure of the weight of any accessories fitted to the vehicle, contact a retailer/authorized repairer.
Overloading the vehicle will have an adverse effect on braking and handling characteristics, which could compromise safety. Overloading a vehicle may also cause tire damage or failure. Never overload the vehicle.