2022 Land Rover Discovery Sport Load Carrying

LOAD CARRYING
Never allow passengers to travel in the loadspace under any circumstances. All vehicle occupants should be seated correctly and should wear a seat belt at all times when the vehicle is in motion. Failure to do so can lead to serious injury or death in the event of an accident.
All items carried in the vehicle should be properly secured. If the vehicle is involved in an accident or subject to sudden braking or a change of direction, loose items can cause serious injury.
LOADSPACE COVER
Never place objects on top of the loadspace cover. During an accident or sudden maneuver, loose objects can cause serious injury or death.
Do not store the loadspace cover lose in the vehicle. During an accident or sudden maneuver, the loadspace cover could cause serious injury or death.
Never place the loadspace cover behind the second row of seats, if the third row is to be occupied. During an accident or sudden maneuver, the loadspace cover could cause serious injury to a third-row seat occupant.
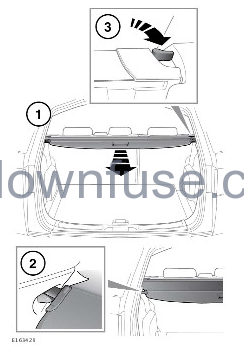
Using and removing the loadspace cover:
- Using the handle, pull the cover to unroll.
- Engage the end pieces into the recessed areas, molded into the loadspace sides. To retract the loadspace cover, disengage the ends from the recessed areas and allow the cover to retract into its housing.
- To remove the cover, turn the release lever to unlock the assembly and disengage the pins from the sockets.
NOTES
Turn the release lever until resistance is felt and pull further to release.
WARNINGTo avoid injury, the loadspace cover must NOT be left in the fitted position when the third-row seats are occupied.
CAUTIONDo not attempt to raise the second-row seats into the upright position, or tip them forward for third-row access, while the loadspace cover is stored behind the second-row seats, as damage will result.
- To refit the cover assembly, engage the left side into the recessed area. Then engage the right side. Push down into place until an audible click is heard.
LOADSPACE PARTITION
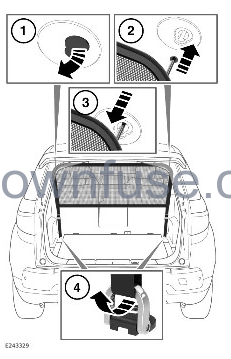
Make sure the cargo barrier net, all fasteners, and the straps are tight and straight.
To fit the cargo barrier net:
- Open the bracket’s lid using a suitable tool.
- Engage the cargo barrier net’s end pieces into the recessed areas molded into the sides of the roof.
- Push down the end pieces to secure the cargo barrier net.
- Fit and secure the straps to the lashing eye loops.
Removal of the partition net is the reverse of the fitment procedure.
ROOF RACKS AND LOAD CARRIERS
A loaded roof rack can reduce the stability of the vehicle, particularly when cornering and during crosswinds.
Driving off-road with a loaded roof rack is not recommended. Fit only a roof rack system that is designed for use with the vehicle. For further information, consult a retailer/authorized repairer. The maximum load for an approved roof rack system is 165 lb (75 kg) while driving on-road. Off-road driving reduces the limit to 110 lb (50 kg). The weight of the approved roof rack system is not calculated as part of the load. If an alternative roof rack system is used, the weight of that system must be included as part of the load weight. Loads must be evenly distributed without overhanging the rack. After traveling 30 miles (50 km), check the security of the roof rack and any load.
REMOVABLE LOADSPACE HOOKS
There are four loadspace hooks located underneath the loadspace floor, in dedicated storage pockets.
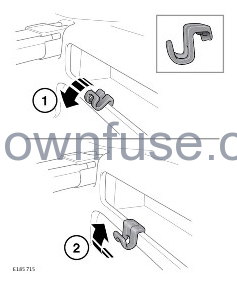
The hooks can be positioned anywhere along the storage area rail, on either side of the loadspace:
- Retract the loadspace cover to give better access to the loadspace.
- Position the hook on the storage area rail, at the angle shown (1).
- Push the hook downward towards the loadspace floor. Keep a finger on top of the hook to make sure it does not slip.
To remove a hook: Push the bottom of the hook upwards (2), and then lift it off the rail.
LUGGAGE ANCHOR POINTS
All items carried in the loadspace area should be properly secured. If the vehicle is involved in an accident, subject to sudden braking or a change of direction, loose items can cause serious injury.
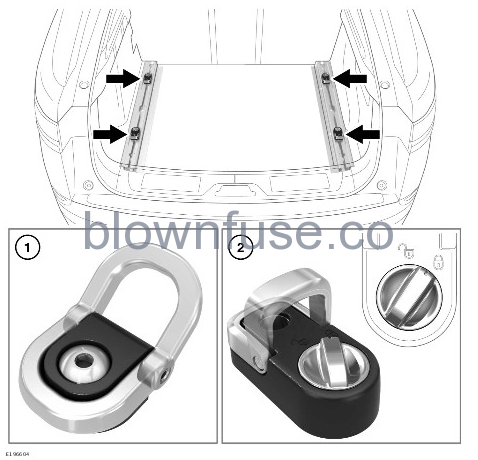
Using the fixed and adjustable lashing eyes:
- Fixed lashing eyes: Use to assist in safely securing large items.
- Adjustable lashing eyes: First turn the locking button counter-clockwise to unlock. Press the button and slide to the required position in the adjusting rail. Release the button to latch into position. Move the lashing eye slightly, until a click is heard. The lashing eye is now secured. Turn the button clockwise to lock.
In some markets, a range of approved luggage retention accessories is available from a retailer/authorized repairer.
