 2023 Land Rover Defender NAVIGATION (KOREA ONLY)
NAVIGATION SAFETY
Make sure the following warnings have been read and fully understood before using the navigation system.
Failure to use the navigation system safely could result in an accident, leading to serious injury or death.
The navigation system is not a substitute for driving safely with due care and attention. Road Traffic Regulations must always be observed. Drivers should not assume that a feature will correct errors in judgement when driving.
The driver is responsible for staying alert, driving safely, and for being in control of the vehicle at all times, relative to the prevailing conditions. The driver is responsible for determining the safety of the route suggested by the navigation system. The navigation system may not function properly in all circumstances.
Make sure the relevant safety warnings and cautions have been read and understood before operating the touchscreen. See TOUCHSCREEN SAFETY.
NOTES
During any map update, the vehicle’s electrical system must not be switched off, before the update is complete. Doing so cancels the map update and potentially leaves the system without any available map data. See MAP UPDATES.
The speed camera notifications can be enabled or disabled via the navigation settings menu. See NAVIGATION SETTINGS.
NAVIGATION OVERVIEW
The navigation system guides the driver to a selected destination using map and turn information displayed on the touchscreen, instrument panel, and in the Head-Up Display (HUD). Navigation instructions can also be complemented by voice guidance.
The touchscreen is used to control the navigation system via menus and map displays. See USING THE NAVIGATION SYSTEM.
The vehicle’s instrument panel can be set up to display navigation instructions and maps. See INSTRUMENT PANEL VIEW.
The HUD can also be set up to display turn instructions. See HEAD-UP DISPLAY (HUD).
The navigation system can also be controlled via voice commands. See USING VOICE CONTROL.
NAVIGATION PERFORMANCE LIMITATIONS
Under certain conditions, it is possible for the vehicle’s position displayed on the map screen to be incorrect. Incorrect vehicle positioning may happen when:
- Driving on a spiral ramp in a building.
- Driving on or beneath elevated roads.
- Driving between tall buildings.
- Two roads are close and parallel.
- The vehicle is transported to another location.
- The vehicle has been rotated on a turntable.
- The vehicle’s battery has been disconnected.
GPS signals may occasionally be interrupted due to physical barriers, such as roads under raised carriageways and tunnels.
NAVIGATION TILES
Make sure the relevant safety warnings have been read and understood before operating the navigation system. See NAVIGATION SAFETY.
The touchscreen home menu displays a navigation tile. See TOUCHSCREEN HOME MENU.
Depending if a route has been set or not, the navigation tile may display differently.
The following navigation tile displays when no route is set:
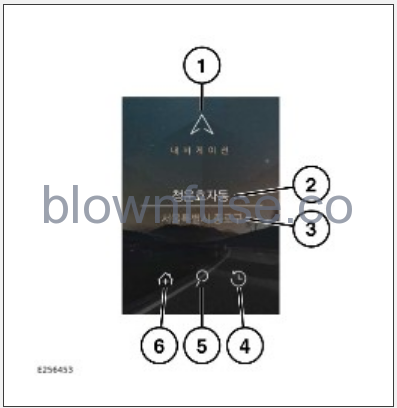
- Navigation icon: Touch to access the navigation map screen. See USING THE NAVIGATION SYSTEM.
- Displays the current location section name.
- Displays the nearest town or city, depending on the vehicle’s location.
- Recent destinations icon: Touch to view a list of recent destinations.
- Search icon: Touch to activate a navigation search. See SETTING A DESTINATION.
- Take me home icon: Touch to activate a stored home destination, or input the home destination details.
The following navigation tile displays when a route is set:
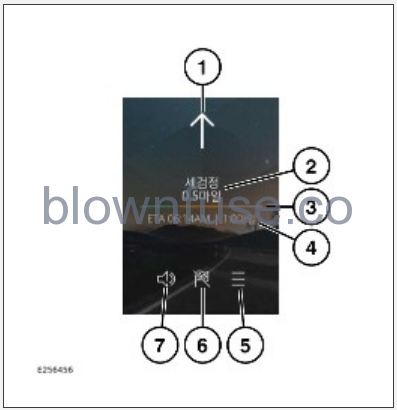
- Turn by turn icon: Displays the upcoming manoeuvre instruction.
- Displays the remaining distance to the turn by turn instruction and road name for the next manoeuvre.
- Progress bar: Displays a start to finish progress bar when a route has been set.
- Arrival information: Displays the Estimated Time of Arrival (ETA) and remaining distance.
- Guidance pop-up icon: Touch to display a pop-up tile displaying the following options to select:
Traffic: Displays traffic information when a route is set.
NOTES
Internet connection is required to receive traffic information. See CONNECTIVITY OVERVIEW.Rest areas: Displays a list of rest areas during the set route guidance, should the user choose to stop.
Fuel stations: Displays a list of fuel stations in order of distance during an active route guidance.
- Cancel guidance icon: Touch to cancel the current route guidance.
- Mute icon: Touch to mute or un-mute the navigation voice guidance.
USING THE NAVIGATION SYSTEM
Make sure the relevant safety warnings have been read and understood before operating the navigation system. See NAVIGATION SAFETY.
To access the navigation system, touch the navigation icon via the navigation tile on the home screen. See TOUCHSCREEN HOME MENU.
Alternatively, touch the navigation icon via the driver side bar. See DRIVER SIDE BAR ICONS.
The navigation tile displays various shortcuts depending if a route has been set or not. See NAVIGATION TILES.
A first time user should set up personal preferences in the navigation settings menu. Personal preferences may include settings for managing which selected routing mode and route preferences are applied. See NAVIGATION SETTINGS.
Touch the navigation icon to display a map view of the current vehicle position.

- Speed limit warning icon: Notifies the driver of the road speed limits.
- Information bar: Displays the road name or section name, dependant on the address format setting. See NAVIGATION SETTINGS.
- The current vehicle position and direction.
- Map mode toggle: Touch to select 2D, 3D, or north facing maps.
- Zoom icons: If displayed, touch to zoom in or out.
NOTES
Zoom icons only display after navigation map interaction.NOTES
The map zoom setting can be altered by using a pinch or push motion. The map view can be panned using a swipe motion. - Volume icon: Touch to mute the navigation system volume.
- Settings icon: Touch to display the navigation settings menu. See NAVIGATION SETTINGS.
- Menu soft key: Touch to display the navigation menu. See NAVIGATION MENU.
- Favorites soft key: Touch to add, remove, or edit a destination. See FAVOURITES.
- Search soft key: Touch to search for an address, place name, or category. See SETTING A DESTINATION
- Map soft key: Touch to display navigation map screen.
- Recent destinations icon: Touch to display all recent destinations. See NAVIGATION MENU.
NAVIGATION MENU
Make sure the relevant safety warnings have been read and understood before operating the navigation system. See NAVIGATION SAFETY.
To access the navigation menu, touch the Menu soft key on the navigation map screen. Alternatively, touch the navigation menu icon. See USING THE NAVIGATION SYSTEM.
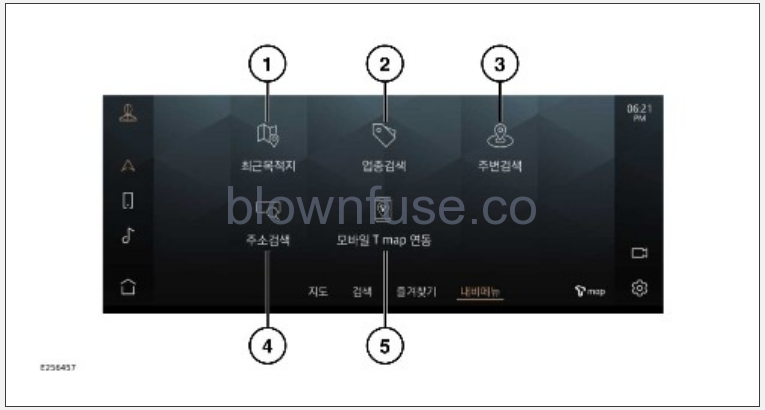
- Recent destinations: Touch to display the navigation system’s recent destination history.
- Category search: Touch to search for a destination based on a category.
- Nearby search: Touch to search for destinations that can be accessed based on the vehicle’s current location.
- Address search: Touch to search and set a new destination.
- Sync my mobile: Allows the user to sync the navigation system with the T map smartphone app.
SETTING A DESTINATION
To set a destination:
- Touch the search icon¹ located within the navigation tile on the touchscreen’s home menu. See TOUCHSCREEN HOME MENU and NAVIGATION TILES.
- Using the keyboard:
Input the required destination.
Select the required entry.
NOTES
If more than one result displays, the user is to select the required result from the list displayed. - The navigation system calculates and displays the following route options:
Recommended.
Fastest.
Avoid payment.
NOTES
If the vehicle is connected to the internet, the navigation system can calculate multiple routes for the user to select. - Select the required route option.
- Touch Start guidance to begin navigation.
To select a recently used destination:
- Touch the recent destinations icon² located within the navigation tile on the touchscreen’s home menu. See TOUCHSCREEN HOME MENU and NAVIGATION TILES.
- A list of recently navigated destinations is displayed.
- Select the required destination.
- Touch Start guidance to begin navigation.
Alternatively, for more detailed options when entering a destination:
- Touch the Menu soft key from the navigation map screen. Alternatively, touch the navigation menu icon. See USING THE NAVIGATION SYSTEM.
- The navigation menu displays the following options:
Recent destinations: Touch to display a list of recent destinations.
Category search: Touch to search for Places Of Interest (POIs).
Nearby search: Touch to search for POIs near to the vehicle’s location.
Address search: Touch to set a new destination or waypoint.
Sync my mobile: Allows the user to sync the navigation system with the T map smartphone app.
- Select the required option for a more detailed destination.
Touch the drop down icon³, suggestions icon⁴, or the OK soft key, to view the search results. Touch the text box to continue typing.
An address, place name, or category, can be added as a waypoint after a destination has been selected. See ADDING A WAYPOINT.

Search icon.¹

Recent destinations icon.²

Drop-down icon.³
Suggestions icon.⁴
MAP SPLIT SCREEN
Make sure the relevant safety warnings have been read and understood before operating the navigation system. See NAVIGATION SAFETY.
When a route has been selected, depending on the navigation settings, the touchscreen displays a turn by turn guidance map.
The information panel can be edited to display other options. See NAVIGATION SETTINGS.
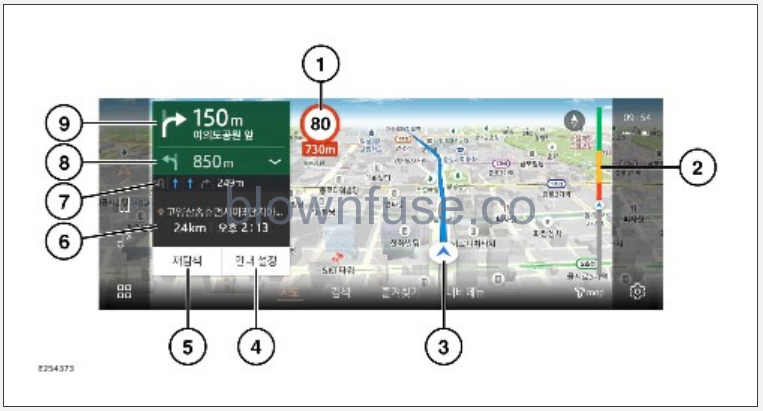
- Speed limit warning icon: Notifies the driver of the road speed limits.
NOTES
Speed limit warnings displayed on the navigation screen may be different to the traffic sign warning speed limits displayed on the instrument panel. - Traffic information bar: Displays traffic information during route guidance.
NOTES
The traffic information bar does not display on the map if the vehicle is not connected to the internet. - The current vehicle position and direction.
- Guidance settings soft key: Touch to edit the following route guidance settings:
Alternatives
Route summary
Turn By Turn settings
Cancel route.
- Recalculate soft key: Touch to recalculate route.
- Information bar: Displays information including the remaining route distance and the Expected Time of Arrival (ETA).
- Lane assistance.
- Manoeuvres overview: Touch to display a list of next manoeuvres for selected route guidance.
- Displays the upcoming manoeuvre instruction.
ADDING A WAYPOINT
Make sure the relevant safety warnings have been read and understood before operating the navigation system. See NAVIGATION SAFETY.
When a route is selected, the user has the option to add a waypoint.
To add a waypoint:
- Touch the Search soft key from the navigation map screen.
- Using the keyboard:
Input the required destination.
Select the required entry.
- Select the Details soft key.
- Touch the Add waypoint soft key.
- Alternatively, touch the waypoint icon¹ where displayed.
Waypoint icon.¹
NOTIFICATIONS
Make sure the relevant safety warnings, cautions, and notes have been read and understood before operating the navigation system. See NAVIGATION SAFETY.
A range of notifications can be displayed via the navigation map screen, for example, low fuel, safety cameras, traffic information, and manoeuvre details.
All navigation notifications can be edited via the navigation settings menu. See NAVIGATION SETTINGS.
FAVOURITES
Make sure the relevant safety warnings have been read and understood before operating the navigation system. See NAVIGATION SAFETY.
When detailed information is displayed about an address, place name, or category, touch the Add favorite soft key and the place is added to the list of saved favorites.
The list of favorites is located via the Favorite soft key, located on the navigation map screen. See USING THE NAVIGATION SYSTEM.
To remove or edit a saved favorite, touch the edit favorite soft key.
NAVIGATION SETTINGS
Make sure the relevant safety warnings have been read and understood before operating the navigation system. See NAVIGATION SAFETY.
Depending on the vehicle specification some setting may not be available.
To view the navigation settings menu:
- Select the settings icon from navigation map screen. See USING THE NAVIGATION SYSTEM.
- Select NAVIGATION from the settings pop-up menu.
The following options are available for the user to enable or disable:
Map and Guidance:
- Auto-Zoom: Touch toggle to switch on or off.
- Voice Guidance Announcements: Touch Off or On to select.
- Recent Destinations: Touch toggle to switch on or off.
NOTES
Displays your recent destinations on the map. - Traffic Display: Touch toggle to switch on or off.
- Hi-Pass Installed: Touch the check box if Hi-Pass is installed or not.
- Dynamic View: Touch the following options to change dynamic view format:
Further
Normal
Detail.
- Highway Mode: Touch toggle to switch on or off.
- Skybox: Touch toggle to switch on or off.
- Address Format: Touch Section Name or Road Name to select address format.
Alerts:
- Safety Camera Alerts: Touch toggle to switch on or off.
NOTES
When approaching a safety camera an audio or voice sounds to alert the driver. - Safety Zone Warnings: Touch toggle to switch on or off.
NOTES
Plays an announcement when approaching a safety zone. - Low Fuel Alert: Touch toggle to switch on or off.
- Speeding alert distance: Touch from the following to select the preferred speed alert distance:
1 Km (600 m on regular road)
600 m
300 m.
About:
- Product Name: Touch to display product information.
- App Version: Touch to display the app version information.
- Terms and Conditions: Touch to display the terms and conditions.
- Map Information: Displays the current map version information and if the map content is up to date.
- Clear User Preferences: Touch clear any saved user preferences.
MAP AUTO ZOOM
Make sure the relevant safety warnings have been read and understood before operating the navigation system. See NAVIGATION SAFETY.
When auto-zoom is enabled, the map automatically zooms in when the vehicle is travelling at slow speeds and zooms out when travelling at higher speeds.
Auto-zoom can be enabled and disabled via the navigation settings menu. See NAVIGATION SETTINGS.
NAVIGATION SYSTEM VOLUME
Make sure the relevant safety warnings have been read and understood before operating the navigation system. See NAVIGATION SAFETY.
To adjust the volume of the navigation voice guidance, rotate the media system’s volume control while spoken guidance is given. See MEDIA CONTROLS.
Alternatively, touch the volume icon on the navigation map screen. See USING THE NAVIGATION SYSTEM.
The volume for all safety camera notifications cannot be adjusted.
INSTRUMENT PANEL VIEW
Make sure the relevant safety warnings, cautions, and notes have been read and understood before operating the navigation system. See NAVIGATION SAFETY.
The availability and functionality of navigation maps displayed on the instrument panel depends on the specification of the vehicle.
The instrument panel can be set up to show a view of a full navigation map or a mini navigation map, depending on the instrument panel setup.
In this view, essential information, e.g., vehicle speed, fuel level, and range, is displayed as an information bar.
Navigation turn instructions are also available to the user and are displayed on the instrument panel and Head-Up Display (HUD).
Navigation turn instructions are only displayed if route guidance is active.
To display navigation map views in the instrument panel or HUD, please refer to the relevant section of the Owner’s Handbook. See CONFIGURING THE INTERACTIVE DRIVER DISPLAY and HEAD-UP DISPLAY (HUD).
MAP UPDATES
Make sure the relevant safety warnings have been read and understood before operating the navigation system. See NAVIGATION SAFETY.
For user safety, the vehicle must be stationary for an online or USB update process to avoid any distraction.
The map data in the navigation system can be updated via an online update when connected to the internet. See CONNECTIVITY OVERVIEW.
For further information on navigation online updates, please contact an authorised retailer/authorised repairer.
The map data in the navigation system can also be updated by downloading the updated map data to a USB memory device.
Due to the map data file size, it is recommended that a USB 3.0 memory device is used to update the map data.
To update the navigation system’s map data using a USB, please visit: www.tmap.co.kr/tmap_for_car/customer/pivi_pro.do and search for ‘Map Updates’.
To download to a USB memory device:
- Download the map data from the website to a USB memory device.
- Insert the USB drive into the vehicle’s USB socket. See AUXILIARY POWER SOCKETS.
- Follow the on-screen instructions to upload the map data to the navigation system.
Information on the installed maps is available in the navigation settings menu. See NAVIGATION SETTINGS.
For further information on the navigation system, please visit: www.tmap.co.kr/tmap_for_car/customer/pivi_pro.do.