2022 Land Rover DEFENDER WINDOWS
ELECTRIC WINDOWS
To prevent accidental operation, never leave the smart key inside the vehicle if children or animals are also left inside the vehicle. Removal of the smart key prevents unsupervised operation of the windows, and the panoramic or canvas roof, which may result in serious injury or death.
If children are carried in the rear seats, the isolator button should be used to prevent operation of the windows and doors. If the windows or doors are operated by children, there is a risk of serious injury or death.
Any ice must be removed from the windows before operating. Operating icy windows can cause damage to the windows’ operating system.
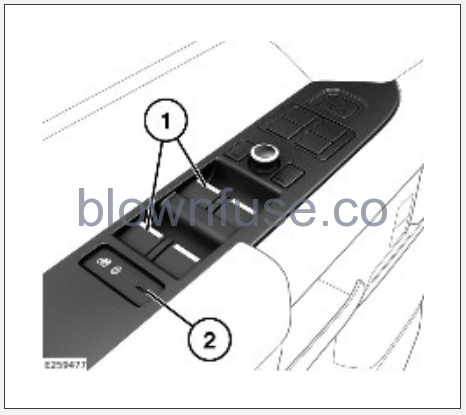
Each switch has a two-stage operation. Lightly press or pull and hold to manually operate to the required position. Alternatively, press or pull fully and release for one-touch operation. Press the switch again to halt the one-touch operation at any time.
To operate the windows:
- Window switches:
Briefly pull a switch fully up, and release to close a window.
Briefly press a switch fully down, and release to fully open a window.
Press or pull a switch again to stop movement of the window.
NOTES
The windows operate for 5 minutes after the engine is switched off, as long as none of the doors are opened.Rear windows have a short drop feature for passenger comfort. The first press of a switch lowers the window a short distance, to give a flow of air. A second press lowers the window to its full extent. If a resonance or booming sound occurs when a rear window is open, lowering an adjacent front window by approximately 1 inch (25 mm) eliminates the condition.
- Rear window isolator and child safety locks. See CHILD SAFETY LOCKS.
To prevent accidental damage, make sure any roof rack load does not interfere with the opening of the panoramic roof.
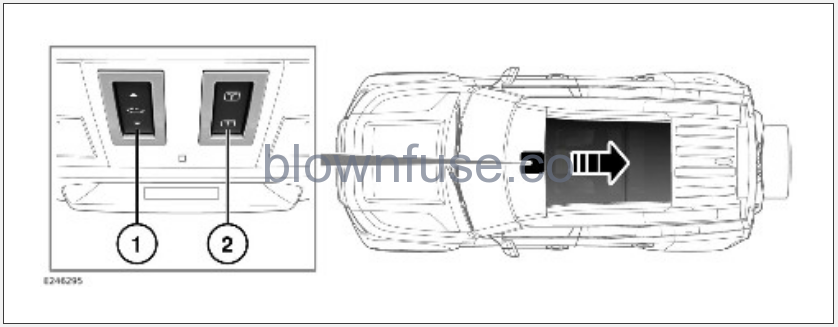
- Panoramic roof:
NOTES
The front and rear of the switch has a two-stage operation. Lightly press and hold to manually operate to the required position. Alternatively, press fully and release for one-touch operation. Press the switch again to halt the one-touch operation at any time.With the panoramic roof closed, press the rear of the switch to partially or fully raise the roof to the tilt position. Press the rear of the switch again to partially or fully open the roof.
NOTES
If the roof blind is closed, the panoramic roof switch also opens the roof blind while operating the panoramic roof. With the panoramic roof open, press the front of the switch to partially or fully close the panoramic roof. - Roof blind:The roof blind can be opened whenever required, but it can only be closed when the panoramic roof is closed. If the panoramic roof is partially closed, the roof blind only partially closes to the same position.
NOTES
The front and rear of the switch has a two-stage operation. Lightly press and hold to manually operate to the required position. Alternatively, press fully and release for one-touch operation. Press the switch again to halt the one-touch operation at any time.Press the rear of the switch to partially or fully open.
Press the front of the switch to partially or fully close.
The sliding canvas roof does not have an anti-trap facility. The canvas roof must be clear of obstruction to allow safe operation. If the canvas roof motion is blocked by body parts, there is a risk of serious injury or death.
The sliding canvas roof is not compatible with lateral cross-bars or roof rack equipment. Using unapproved roof-mounted equipment could result in damage to the sliding canvas roof.
Operation of the sliding canvas roof is not recommended in temperatures below 14˚F (-10˚C). Damage may occur if the canvas roof is operated below 14˚F (-10˚C).
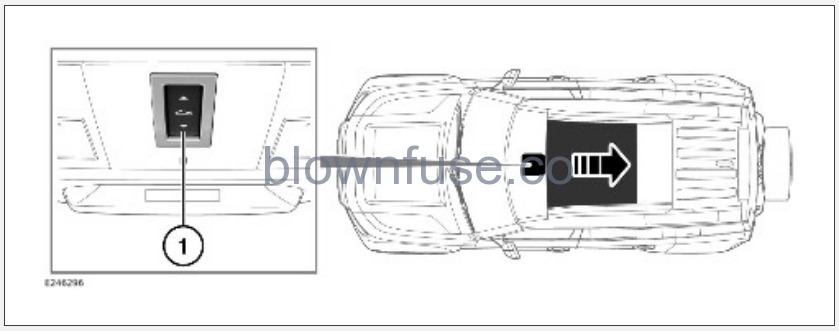
The front and rear of the switch has a two-stage operation. Lightly press and hold to manually operate to the required position. Alternatively, press fully and release for one-touch operation. Press the switch again to halt the one-touch operation at any time.
- With the sliding canvas roof closed, press the rear of the switch to partially or fully open the sliding canvas roof.
- With the sliding canvas roof open, press the front of the switch to partially close the sliding canvas roof.
- Press and hold the front of the switch to fully close the sliding canvas roof.
The one-touch operation does not fully close the sliding canvas roof.
Varying resonance noises can occur in the cabin when the sliding canvas roof is open, due to pressure fluctuation. To reduce or eliminate these noises, the sliding canvas roof can be closed slightly.
ANTI-TRAP PROTECTION
Before closing a window, make sure that no occupants have any body part in a position where it could be trapped. Even with an anti-trap system, death or serious injury could occur.
Closing a window onto any part of the body can result in serious injury.
If the power supply is lost, when a window is partially open or is failing to operate correctly, a window reset may be required. See WINDOW RESET.
Anti-trap protection is designed to stop window movement if an obstruction or resistance is detected. Check the window and its aperture, and remove any obstructions, e.g., ice.
If it is still necessary to raise the window, the override procedure is as follows:
- Attempt to close the window. Anti-trap prevents closure and lowers the window slightly.
- Within 10 seconds, attempt to raise the window again. Anti-trap prevents closure and lowers the window slightly.
- Attempt to close the window for the third time. Hold the switch in the close position. Hold until closed.
If this procedure fails to remove the blockage, the window operation may need to be reset. See WINDOW RESET.
Before closing the panoramic roof, make sure that no occupants have any body part in a position where it could be trapped. Even with an anti-trap system, death or serious injury could occur.
If the power supply is lost, when the panoramic roof is partially open or is failing to operate correctly, a panoramic roof reset may be required. See PANORAMIC ROOF BLIND RESET.
Before closing the roof blind, make sure that no occupants have any body part in a position where it could be trapped. Even with an anti-trap system, death or serious injury could occur.
Closing the roof blind onto any part of the body can result in serious injury. To prevent serious personal injury or damage to the vehicle, the roof blind has an anti-trap mechanism. If the roof blind encounters resistance when closing, it stops. Dependent on the roof blind’s current position, the roof blind partially or fully opens to allow the removal of any obstruction.
If the roof blind’s anti-trap mechanism has been activated, a manual reset of the roof blind needs to be performed. Press and hold the front of the switch until the roof blind is fully closed.
If the power supply is lost, when the roof blind is partially open or is failing to operate correctly, a roof blind reset may be required. See PANORAMIC ROOF BLIND RESET.
Vehicles with a sliding canvas roof do not have an anti-trap system. Make sure that no occupants have any body parts in a position where they could become trapped. Serious injury or death could occur.
ROOF BLIND
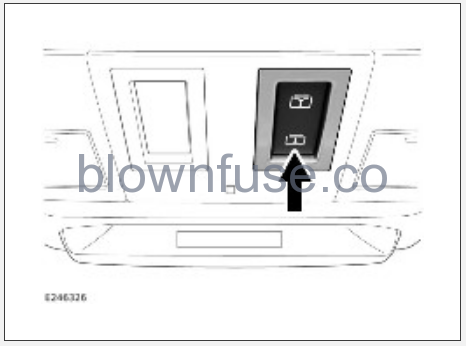
To operate the roof blind:
Press the rear of the roof blind switch to the second position and release. The blind fully opens. A further press stops movement of the blind.
Alternatively, press the rear of the roof blind switch to the first position and hold until the blind reaches the desired position. Release the switch.
Press the front of the roof blind switch to the second position and release. The blind fully closes. A further press stops movement of the blind.
Alternatively, press the front of the roof blind switch to the first position and hold until the blind reaches the desired position. Release the switch.
SOLAR ATTENUATING GLASS
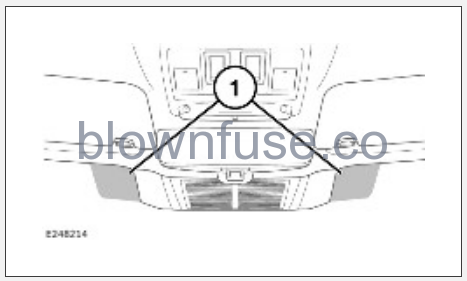
The solar attenuating glass windshield filters sunlight passing through a special laminated layer.
Electronic actuating cards, such as toll road payment cards or Radio Frequency (RF) ID tags, can be fixed at the dedicated locations. The locations are on the inside of the windshield. If the cards are located at any other part of a solar attenuating windshield, the electronic scanners may not recognise them.
The fixing location is at the top of the windshield, as shown at (1), close to the forward-facing camera cover.
Transponders, mounted on the front license plate plinth, can be used as an alternative, dependent on the market and availability.
