
 2023 Land Rover NEW RANGE ROVER HEADPHONES

PAIRING AND CONNECTING USING THE TOUCHSCREEN
To manually pair a new device, navigate to the Headphones settings menu. SeeREAR SEAT SCREEN SETTINGS
To pair a new device:
- Power on the headphones.
- Make sure the headphones are discoverable. For headphones supplied with the vehicle, refer to the pairing information. See HEADPHONE PAIRING AND RESET. For your own device, refer to manufacturers’ instructions.
- Select Pair New. The system enters pairing mode and searches for discoverable devices.
- Select the device you want to pair with the vehicle from the on-screen list.
- Select the screen you want to pair the headphones with.
NOTES
The screen currently paired with the device is displayed, either Left Screen or the Right Screen. By default, the headphones automatically pair to the screen in use. - A tone sounds once the pairing is complete.
In the event of a failed connection or a pairing time out, the device does not find tone sounds and the LED indicator flashes blue once every 2 seconds.
Navigate to the Headphones settings menu to disconnect or remove a device paired with the vehicle.
To disconnect or forget a device:
- Select the device from the paired list.
- Select either Disconnect or Remove headphones
NOTES
The disconnect option is only available if the headphones are currently connected. - The device is no longer visible in the paired list.
HEADPHONES OVERVIEW
Headphones may be supplied for vehicles fitted with rear seat screens.
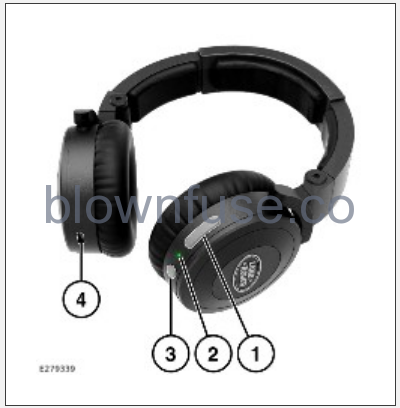
Operate the headphones as follows:
- Volume button:
When in audio mode, apply a short press to the + button to increase the volume. Alternatively, to skip to the next track apply a long press for approximately 1.5 seconds.
NOTES
When at maximum volume, the max volume tone will sound.When in audio mode, apply a short press to the – button to decrease the volume. Alternatively, to skip to the previous track apply a long press for approximately 1.5 seconds.
- LED indicator: Displays the status of the headphones. See HEADPHONE CHARGING AND STATUS
- Power button:
To power on the headphones, long press for approximately 2 seconds. A tone sounds accompanied by the LED status indicator. See HEADPHONE CHARGING AND STATUS.
To power off the headphones, long press for approximately 2 seconds. A tone sounds accompanied by the LED status indicator. See HEADPHONE CHARGING AND STATUS.
When in audio mode, a short press will enable you to play or pause the audio.
NOTES
Without a device connected, the headphones power off automatically after 5 minutes. - USB-C input: Used to charge the headphones. See HEADPHONE CHARGING AND STATUS
HEADPHONE PAIRING AND RESET
The headphones supplied with the vehicle can pair with up to eight devices. The first device paired with the headphones becomes the default and automatically connects when the headphones and device are powered on. Connecting to a device other than the default must be done via manual pairing.
To change the default device, perform a factory reset or clear the paired list on the device.
To manually pair the headphones supplied with the vehicle:
- Power on the headphones.
- Press and hold the power button for approximately 5 seconds, the headphones are now discoverable. A tone sounds accompanied by the LED status indicator. See HEADPHONE CHARGING AND STATUS
- Use the device’s Bluetooth connection to search for the headphones and follow the device instructions to pair. To pair with the vehicle, follow the instructions on pairing via the touchscreen. See PAIRING AND CONNECTING USING THE TOUCHSCREEN
- A tone sounds when pairing is complete.
NOTES
The device does not find tone sounds if pairing times out.
To reset the default device and check the status:
- Press the power button for 3 seconds, and release the button when the LED indicator flashes red.
- Check the status of the LED indicator:
If the LED flashes red and blue, a default device is not stored.
If the LED flashes blue, a default device is stored.
- To clear a stored device, press and hold the volume + and – buttons until the headphones power off.
HEADPHONE CHARGING AND STATUS
Charging
When the headphones have less than 20% power, the low battery tone sounds. The LED indicator also illuminates red for a duration of 1 second per minute.
To charge the headphones:
- Connect the supplied charging cable to the USB-C input on the headphones.
- Connect the other end of the USB-C charging cable to an appropriate power source. See AUXILIARY POWER SOCKETS.
- The LED indicator illuminates red to confirm charging is in progress.
- The LED indicator illuminates blue once charging is complete.
LED status and voice prompts
| LED status | Function |
|---|---|
| Red, on for 1 second. | Power on. |
| Red, on for 1 second. | Power off. |
| Red and blue, flash alternatively. | Bluetooth pairing mode. |
| Blue, flash once per 2 seconds. | No device connected. |
| Blue, flash twice per 4 seconds. | Device connected. |
| Red, on for 1 second per minute. | Low battery |
| Red, constant. | Charging. |
| Blue, constant. | Charging complete. |