2022 Kawasaki NINJA H2 R Meter Instruments Owners Manual



2022 Kawasaki NINJA H2 R Meter Instruments

Meter Instruments
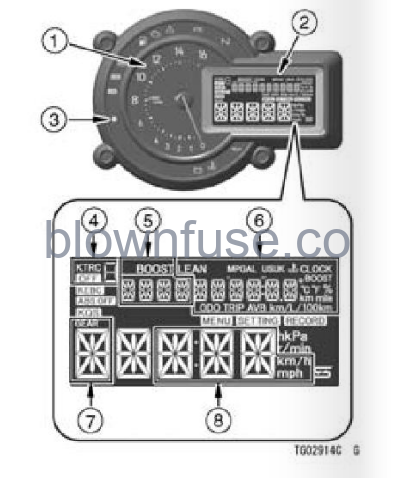


- Tachometer and Engine Speed Indicator with Shift-up Indicator
- Multifunction Meter
- Ambient Brightness Sensor
- KTRC Mode Indicator
- Boost Indicator
- Multifunction Display
- Odometer
- Trip Meter A/B
- Current Mileage/Average Mileage/Fuel
- Consumption
- Lean Angle Indicator
- Maximum Lean Angle (LIR)
- Coolant Temperature
- Boost Temperature
- Boost Pressure (%)
- Stop Watch
- Clock
- Gear Position Indicator
- Speedometer
When the ignition switch is turned on, all LCD functions are shown for a few seconds, then the multifunction meter turns to operational mode.
Indicators
- ESD Indicator (White)
- KIBS Indicator (White)
- ABS Indicator (Yellow)
- Fuel Level Warning Indicator (Amber)
- Engine Warning Indicator (Yellow)
- Warning Indicator (Yellow)
- KTRC Indicator (Yellow)
- Neutral Indicator (Green)
- IMUS Indicator
- Oil Pressure Warning Indicator (Red)
- Coolant Temperature Warning Indicator
- Battery Warning Indicator (Red)
- KEBC Indicator
- ABS OFF Indicator
- KQS Indicator
Inertial Measurement Unit
Indicator Initial Operation
When the ignition switch is turned on, all indicators go on/off as shown in the table. If any indicator does not operate as shown, have it checked by an authorized Kawasaki dealer.
- When ignition switch is turned on.
- After a few seconds
- When engine starts.
- Goes on.
- Goes off.
- goes off shorty after the motorcycle starts moving.
When Warning Indicators Appear or Blink
When warning indicators appear, there could be a problem with vehicle function. Follow actions in the table after stopping the vehicle in a safe place. The numbers in this column corresponds to reference numbers on page 29.
- After continuous riding on a rough road.
- When the engine is started with the stand raised and the transmission engaged, and the rear wheel turns.
- When accelerating so abruptly that the front wheel leaves the ground.
- When the ABS has been subjected to strong electrical interference.
- When tire pressure is abnormal. Adjust tire pressure.
- When a tire different in size from the standard size is being used. Replace with standard size.
- When the wheel is deformed. Replace the wheel.
Refer to the beginning of this section for indicator position. ESD (Electronic Steering Damper) indicator may blink and the warning indicator may appear when the ignition switch is turned on with the motorcycle moving. If this happens, first turn the ignition switch off, and then back on with the motorcycle completely stopped. The ESD and warning indicator should then go off. If they do not, have the ESD system checked by an authorized Kawasaki dealer.
Other Indicators
Speedometer/Tachometer
B. Tachometer
C. Red Zone
D. Engine Speed Indicator and Shift-up Indicator (Numeral Part)
Speedometer
The speedometer is digital and can be set for km/h or mph. The unit setting can be changed according to local regulations. Make sure the unit setting (km/h or mph) is correctly displayed before riding. Refer to the Unit Setting (UNIT) in the Setting Mode section.
Tachometer
The tachometer shows the engine speed in revolutions per minute (r/min, rpm).
NOTICE
Engine speed should not be allowed to enter the red zone; operation in the red zone will overstress the engine and may cause serious engine damage.
When the ignition switch is turned on, the tachometer needle momentarily sweeps from the minimum to the maximum reading, then back the mini- mum reading to check its operation. If the tachometer does not operate correctly, have it checked by an authorized Kawasaki dealer.
Engine Speed Indicator
The engine speed indicator (numeral part of the tachometer) appears according to the engine speed.
NOTE
The engine speed indicator appears earlier 500 r/min (rpm) than real engine speed. The engine speed indicator also serves as the shift-up indicator.
Shift-up Indicator
The shift-up indicator can be used to indicate the timing for next up shift to prevent engine damage by blinking the shift-up indicator once a pre-set engine speed is reached.
NOTE
The shift-up indicator blinks slowly from 500 r/min (rpm) before it reaches pre-set engine speed, and then it blinks fast after it reaches pre-set engine speed.
Shift-up Indicator Setting
This function can be selected from on or off. Refer to the Shift-up Indicator Setting (SHIFT LAMP) in the Setting Mode section.
Shift-up Engine Speed Setting
The shift-up indicator timing can be adjusted between 9 000 r/min (rpm) and 13 500 r/min (rpm). Refer to the Shift-up Engine Speed Setting (SHIFT REV) in the Setting Mode section.
Display Select
Upper and Lower Buttons and Mode Button
The upper and lower buttons on the left handlebar switches and mode button on the right handlebar switches are used to operate the various functions displayed in the multifunction meter.
B. Lower Button
C. Mode Button
With these buttons, you can select desired functions. Refer to each section for the procedure for selection.
Push and hold.
To select KTRC Mode:
Refer to the Kawasaki Traction Control (KTRC) section in the HOW TO RIDE THE MOTORCYCLE chapter.
To set KLCM
Refer to the Kawasaki Launch Control Mode (KLCM) section in the HOW TO RIDE THE MOTORCYCLE chapter.
To select Multifunction Display:
Push the upper button or lower button to select the display. The display items can be shifted in the following order.
Multifunction Display Items
- Odometer
- Trip Meter NB
- Current Mileage
- Average Mileage
- Fuel Consumption
- Lean Angle Indicator
- Maximum Lean Angle (Left/Right)
- Coolant Temperature
- Boost Temperature
- Boost Pressure (%)
- Stop Watch
- Clock
- Numerical Value Reset
- Service Time Warning Message*
- KLCM OFF Warning Message*
- Fuel Level Warning Message’
When occurred.
NOTE
The multifunction display is displayed in the unit depending on the unit setting.
B. Flow when pushing lower button
C. Warning Messages
To shift Setting Mode or Record Mode: The setting mode and record mode can be shifted from Menu Mode.
- Push and hold the mode button to shift to the menu mode.
- Push the upper button or lower button to select the setting mode or the record mode.
- Push the mode button to shift the mode.
NOTE
- To back to the menu mode from the setting mode and record mode, push and hold the mode button.
- When the vehicle speed exceeds 5 km/h (3.1 mph), the meter shifts to the ordinary display.
- The meter instrument cannot be shifted to the menu mode while the KLCM is activating.
B. Flow when pushing upper or lower button
C. Flow when pushing mode button
D. Ordinary Display
E. Menu Mode
F. Setting Mode
G. Record Mode
To select Setting Mode:
Push the upper button or lower button to select the item. The setting modes can be shifted in the following order.
Setting Mode Items
- Unit Setting
- Meter Illumination Brightness Setting
- ABS Setting
- Shift-up Indicator Setting
- Shift-up Engine Speed Setting
- KEBC Setting
- KQS Setting
- KLCM Mode Setting
- Clock Setting
- Setting Reset
NOTE
When the vehicle speed exceeds 5 km/h (3.1 mph), the meter shifts to the ordinary display.
B. Flow when pushing upper button
C. Flow when pushing lower button
D. Menu Mode
E. Setting Mode
To select Record Mode: Push the upper button or lower button to select the item. The record modes can be shifted in the following order.
Record Mode Items
- Service Time I
- Service Time 2
- Maximum Vehicle Speed
- Maximum Engine Speed
- Maximum Boost Pressure
- Record Reset
NOTE
When the vehicle speed exceeds 5 km/h (3.1 mph), the meter shifts to the ordinary display.
B. Flow when pushing upper button
C. Flow when pushing lower button
D. Menu Mode
E. Record Mode
Multifunction Display
Odometer
The odometer shows the total distance. This meter cannot be reset. Push the upper button or lower but- ton to display the odometer.
NOTE
When the figures come to 999999, the display is stopped and locked.
Trip Meter
Push the upper button or lower button to display the trip meter NB.
To reset the trip meter:
Push the lower button and hold it in until the display turns to 0.0.
NOTE
When the trip meter reaches 9999.9 while riding, the meter resets to 0.0 and continues counting.
Current Mileage
The current mileage display is renewed every 4 seconds. Push the upper button or lower button to display the current mileage.
NOTE
When the ignition switch is turned on, the numerical value shows “— —.” After a few seconds of riding the numerical value is displayed.
Average Mileage
This display shows the average fuel consumption from the reset. The average mileage display is renewed every 5 seconds. Push the upper button or lower button to display the average mileage.
To reset the average mileage: Push the lower button and hold it in until the average mileage values resets to “—
NOTE
- When the battery is disconnected, the average mileage resets to “— —.
- After resetting the average mileage, the numerical value is not displayed until the vehicle has traveled 100 m (328 f).
Fuel Consumption
This display shows the fuel consumption by numerical value counted from the start of measuring to the present time. The fuel consumption display is renewed every 4 seconds. Push the upper button or lower button to display the fuel consumption.
To reset the fuel consumption: Push the lower button and hold it in until the fuel consumption value resets to 0.0.
NOTE
When the battery is disconnected, the fuel consumption resets to 0.0.
Lean Angle Indicator
This display shows the lean angle of the vehicle. The bigger the angle, the more segments appear. Push the upper button or lower button to display the lean angle indicator.
NOTE
When the vehicle is standing upright (O ±50), the indicator shows “—
Maximum Lean Angle (Left/Right)
To reset the maximum lean angle (left/right): Push the lower button and hold it in until the maximum lean angle(left/right) values resets to 0.
Coolant Temperature
This display shows the temperature of the engine coolant. Push the upper button or lower button to display the coolant temperature.
If the coolant temperature is below 400C (104 F) 0 , ——” is displayed.
If the coolant temperature rises to above 1150C (2390F) and below 1200C (2480F), the numerical value of the current coolant temperature starts blinking, the coolant temperature warning indicator appears. This warns the operator that the coolant temperature is high. If the coolant temperature rises to1200C (2480F) or more, “HI” is dis- played and starts blinking, the coolant temperature warning indicator continues to appear.
NOTICE
Stop the engine if the coolant temperature shows “HI.” Prolonged engine operation will result in severe engine damage from overheating.
NOTE
The other displays shifts to the coolant temperature automatically if the coolant temperature rises to above 1150C (23906.
Boost Temperature
This display shows the boost temperature of the intake air chamber. Push the upper button or lower button to display the boost temperature.
This display shows the boost pressure of the intake air chamber by the percentage. Push the upper button or lower button to display the boost pressure.
The stopwatch is operated as follows: Push the upper button or lower button to display the stop watch.
- The stopwatch starts timing laps.
- After each lap, pull the lap button. The stopwatch starts timing the next lap and the previous lap time is dis- played for 10 seconds.
NOTE
The lap time can be stored for a maximum of 99 times.
B. Lap Number
C. Lap Time
- To stop the stop watch, push and hold the upper button.
- To display each measured lap time, push and hold the mode button while stopping the stop watch.
- The measured lap time is switched each time the upper button or lower button is pushed. When no lap number is displayed, the displayed time is the total time of all timed laps.
B. Lap Time
C. Total Lap Time
D. Flow when pushing upper button
E. Flow when pushing lower button
NOTE
- Push and hold the upper button during displaying the measured lap time, the stop watch starts timing laps.
- Even if the ignition switch is turned off, the measured lap time does not erase.
- When the battery is disconnected, the stop watch is reset and erase all lap numbers and times.
To reset the stop watch and erase all lap numbers and times:
Push the lower button and hold it un- til the stop watch values resets to “00’00″00.”.
Clock
To adjust the clock: Refer to the Clock Setting (CLOCK) in the Setting Mode section.
NOTE
When the battery is disconnected, the clock is reset to 1:00 (12h mode) or 13:00 (24h mode) and starts work- ing again when the battery is connected.
Numerical Value Reset
This display can be reset the follow- ing items at a time
- Trip Meter A/B
- Average Mileage
- Fuel Consumption
- Maximum Lean Angle (Left/Right)
To reset numerical value: Push the upper button or lower button to display “RESET ALL.”
NOTE
When turning off the ignition switch during resetting, the reset is not carried out.
Menu Mode
The menu mode is the mode to select the setting mode or the record mode. Refer to the Display Select section.
Setting Mode
Unit Setting (UNIT)
The unit set in the metering instrument can be changed according to local regulations. Make sure the unit setting is correctly displayed before riding.
NOTE
- Do not operate the motorcycle with the wrong unit (mph or km/h) of the speedometer.
- The unit setting can be selected from four unit types.
To select the setting:
- Push and hold the mode button to shift to the menu mode.
- Push the upper button or lower button to display the “SETTING.”
B. “SETTING”
- Push the mode button to shift to the setting mode.
- Push the upper button or lower button to display the “UNIT.”
B. “UNIT”
- Push the mode button.
- Push the upper button or lower button to select the type.
B. Flow when pushing lower button
Push the mode button.
Meter Illumination Brightness Setting (BRIGHTNESS)
The brightness of the multifunction meter and engine speed indicator are controlled automatically depending on the ambient brightness.
B. Multifunction Meter
C. Ambient Brightness Sensor
NOTE
Be careful not to cover the ambient brightness sensor on the meter instrument while riding the motorcycle. The brightness can be adjusted manually in three levels.
To select the setting:
- Push and hold the mode button to shift to the menu mode.
- Push the upper button or lower button to display the “SETTING.”
B. “SETTING”
- Push the mode button to shift to the setting mode.
- Push the upper button or lower button to display the “BRIGHTNESS.”
B. “BRIGHTNESS”
- Push the mode button. The LCD illumination and engine speed indicator appear.
- Push the upper button or lower button to select the mode.
B. Flow when pushing lower button
push the mode button.
ABS Setting (ABS)
The ABS can be selected from three modes.
NOTE
If the ABS has any problem, the setting cannot be changed.
To select the setting:
- Push and hold the mode button to shift to the menu mode.
- Push the upper button or lower button to display the “SETTING.”
B. “SETTING”
- Push the mode button to shift to the setting mode.
- Push the upper button or lower button to display the “ABS.”
B. “ABS”
- push the mode button.
- Push the upper button or lower button to select the mode.
B. Flow when pushing lower button
push the mode button.
Shift-up Indicator Setting (SHIFT LAMP)
The shift-up indicator can be selected on or off.
NOTE
The initial setting is “ON. ”
To select the setting:
- Push and hold the mode button to shift to the menu mode.
- Push the upper button or lower button to display the “SETTING.”
B. “SETTING”
- Push the mode button to shift to the setting mode.
- Push the upper button or lower button to display the “SHIFT LAMP.”
B. “SHIFT LAMP”
- Push the mode button. The shift-up indicator (engine speed indicator) appears or blinks with the current setting.
- Push the upper button or lower button to select the “ON” or “OFF.”
Push the mode button.
Shift-up Engine Speed Setting (SHIFT REV)
The shift-up indicator timing can be adjusted between 9 000 rimin (rpm) and 14 500 r/min (rpm).
NOTE
The initial setting is 9 000 r/min (rpm).
To adjust the setting:
- Push and hold the mode button to shift to the menu mode.
- Push the upper button or lower button to display the “SETTING.”
B. “SETTING”
- Push the mode button to shift to the setting mode.
- Push the upper button or lower button to display the “SHIFT REV.”
B. “SHIFT REV”
- push the mode button.
- Push the upper button or lower button to adjust the shift-up engine speed.
NOTE
- When pushing the upper button, the shift-up engine speed increases in 250 r/min (rpm) increments.
- When pushing the lower button, the shift-up engine speed decreases in 250 r/min (rpm) increments.
- lf the shift-up engine speed increases until the maximum value, it returns to the minimum value and begins increasing.
- lf the shift-up engine speed decreases until the minimum value, it returns to the maximum value and begins decreasing.
B. Flow when pushing lower button
Push the mode button.
WARNING
Failure to observe the road ahead increases the chance of an accident resulting in severe injury or death. Do not continually focus your vision on the shift-up indicator. When shifting down to a lower gear, do not shift at such a high speed that the engine rimin (rpm) jumps excessively. Not only can this cause engine damage, but the rear wheel may skid and cause an accident. Downshifting should be done below 5 000 r/min (rpm) for each gear.
NOTICE
Engine speed should not be allowed to enter the red zone; operation in the red zone will overstress the engine and may cause serious engine damage.
KEBC Setting (KEBC)
The KEBC system can be selected from two modes.
NOTE
If the KEBC system has any problem, the setting cannot be changed.
To select the setting:
- Push and hold the mode button to shift to the menu mode.
- Push the upper button or lower button to display the “SETTING.”
B. “SETTING”
- Push the mode button to shift to the setting mode.
- Push the upper button or lower button to display the “KEBC.”
B. “KEBC”
- Push the mode button.
- Push the upper button or lower button to select the “OFF” or “LIGHT.”
push the mode button.
KQS Setting (KQS)
The KQS system can be selected on or off.
NOTE
- The initial setting is “OFF.”
- If the KQS system has any problem, the setting cannot be changed.
To select the setting:
- Push and hold the mode button to shift to the menu mode.
- Push the upper button or lower button to display the “SETTING.”
B. “SETTING”
- push the mode button to shift to the setting mode.
- Push the upper button or lower button to display the “KQS.”
B. “KQS”
- Push the mode button.
- Push the upper button or lower button to select the “OFF” or “ON.”
push the mode button.
KLCM Mode Setting (KLCM)
The KLCM can be selected from three modes.
NOTE
If the KLCM system has any problem, the setting cannot be changed.
To select the setting:
- Push and hold the mode button to shift to the menu mode.
- Push the upper button or lower button to display the “SETTING.”
B. “SETTING”
- Push the mode button to shift to the setting mode.
- Push the upper button or lower button to display the “KLCM.”
B. “KLCM”
- Push the mode button.
- Push the upper button or lower button to select the mode.
B. Flow when pushing lower button
push the mode button.
Clock Setting (CLOCK)
The clock can be selected from the 12h mode and 24h mode.
NOTE
When the battery is disconnected, the clock is reset to 1:00 (12h mode) or 13:00 (24h mode) and starts working again when the battery is connected.
To adjust the clock:
- Push and hold the mode button to shift to the menu mode.
- Push the upper button or lower button to display the “SETTING.”
B. “SETTING”
- Push the mode button to shift to the setting mode.
- Push the upper button or lower button to display the “CLOCK.”
B. “CLOCK”
Push the mode button to select the hour or minute digits.
- Push the upper button or lower button to adjust the hour or minute dig-.
- To finish the adjustment, stop the blinking of digits by pushing the mode button.
To change the 12h/24h mode:
- During blinking the hour digits, push the mode button and hold it. The current mode (12h or 24h) appears.
- Push the upper button to select the mode.
- Push the mode button and return to the clock adjustment.
B. Flow when pushing an upper button
C. Flow when pushing the mode button
Setting Reset (RESET)
The following settings of the meter can be reset. Other settings are not reset.
Initial Setting
- Push and hold the mode button to shift to the menu mode.
- Push the upper button or lower button to display the “SETTING.”
B. “SETTING”
- • Push the mode button to shift to the setting mode.
- Push the upper button or lower button to display the “RESET.”
B. “RESET”
- push the mode button.
- Push the upper button or lower button to select the “NO” or “YES.”
- Push the mode button, When selecting “YES,” start the mode re-set.
NOTE
- When turning off the ignition switch during resetting, the mode reset is not carried out.
Record Mode
Service Time 1/2 (SERVICE1/2)
This mode shows the service time I or 2 indicating when the periodic maintenance must be done.
NOTE
- The service time decreases only when the engine speed is more than 8 000 r/min (rpm). When the service time reaches “O,” the “SERVICE? or “SERVICE2” message blinks on the multifunction display. If the “SERVICE-I” or “SER- VICE2” message blinks have the maintenance done by an authorized Kawasaki dealer. After the maintenance, reset the service time in the dealer.
Maximum Vehicle Speed (MAX SPEED)
The maximum vehicle speed is recorded since the last reset. The maximum vehicle speed can be reset in the record reset of the record mode.
NOTE
- The data cannot be recorded correctly when the battery cable is dis- connected without the ignition switch being turned off. Maximum Engine Speed (MAX REV) The maximum engine speed is recorded since the last reset. The maximum engine speed can be reset in the record reset of the record mode.
NOTE
- When the recorded maximum engine speed is less than 4 000 r/min (rpm), “0” is displayed.
Maximum Boost Pressure (MAX BOOST)
- The data cannot be recorded correctly when the battery cable is dis- connected without the ignition switch being turned off. The maximum boost pressure is recorded since the last reset. The maximum boost pressure can be reset in the record reset of the record mode.
NOTE
- The data cannot be recorded correctly when the battery cable is dis- connected without the ignition switch being turned off. Record Reset (RESET) The maximum vehicle speed, maximum engine speed, and maximum boost pressure can be reset.
To reset the record:
- Push and hold the mode button to shift to the menu mode.
- Push the upper button or lower button to display the “RECORD.”
B. “RECORD”
- Push the mode button to shift to the record mode.
- Push the upper button or lower but- tonto display the “RESET.”
B. “RESET”
- Push the mode button.
- Push the upper button or lower button to select the “NO” or “YES.”
- Push the mode button, When selecting “YES,” start the record reset.
NOTE
- When turning off the ignition switch during resetting, the record reset is not carried out.
Features
Gear Position Indicator
This indicator shows the current gear position (1st— 6th). When the transmission is in neutral, “N” is displayed, and the neutral indicator appears.
B. Neutral Indicator
NOTE
- If the gear position display in the malfunctioning meter blinks “—, ” the trans- the mission is not properly shifted to 1st. Be sure to shift the transmission. Boost Indicator This display shows the instantaneous boost pressure of the intake air chamber. The higher the pressure, the more segments appear.
B. Boost Pressure
KTRC Mode Indicator
This indicator shows the mode of the KTRC. current
Refer to the Kawasaki Traction Control (KTRC) section in the HOW TO RIDE THE MOTORCYCLE chapter.
Recent Posts
VW Jetta Engine Fuse Box Diagram
Access the comprehensive 2010-2018 VW Jetta Passenger Fuse Box Diagram to troubleshoot electrical issues effectively.…
VW Jetta Passenger Fuse Box Diagram
Explore the comprehensive VW Jetta Passenger Fuse Box Diagram to troubleshoot electrical issues effectively. Understand…
2023 Ford F-150 Lightning Fuse Box Diagram
Under Hood Fuse Box Location Remove the front luggage compartment cover. Under Hood Fuse Box…
2022 Kawasaki NINJA H2 SX SE Brake Lever Adjuster Owner’s Manual
2022 Kawasaki NINJA H2 SX SE Brake Lever Adjuster Owner's Manual NOTICE Only adjust the front…
2023 Land Rover Range Rover Evoque Exiting The Vehicle Owners Manual
2023 Land Rover Range Rover Evoque Exiting The Vehicle SINGLE LOCKING WARNING Before exiting the…
2023 Land Rover Range Rover Evoque Front Seats Owners Manual
2023 Land Rover Range Rover Evoque Front Seats FRONT SEAT SAFETY Make sure to read…
