2022 Kawasaki KX85 Drive Chain
Drive Chain
For safety and to prevent excessive wear, the drive chain must be checked, adjusted, and lubricated in accordance with the Periodic Maintenance Chart. If the chain becomes badly worn or maladjusted ei- ther too loose or too tight it could jump off the sprockets or break.
WARNING
A chain that breaks or jumps off the sprockets could snag on the engine sprocket or lock the rearwheel, severely damaging the motor cycle and causing it to go out of control. In- spect the chain for damage and proper ad- justment before each ride.
Drive Chain Slack Inspection
- With the motorcycle on its side stand, rotate the rear wheel to find the place where the chain is tightest (because it wears unevenly).
- Rotate the rear wheel to find the position where the chain is tightest.
- Push up the upper chain at the rear end of the chain slipper and measure the chain slack. The distance between the bottom of the chain and the end of the chain slipper should be within the standard value. \
Drive Chain Slack
Standard 54 64 mm (2.1 2.5 in.)
Adjust the drive chain if its slack is out of specification.
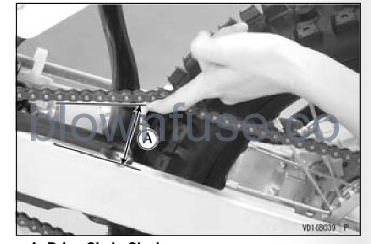
A. Drive Chain Slack
- In addition to checking the slack, rotate the rear wheel to inspect the drive chain for damaged rollers, loose pins, and links, and the sprockets for unevenly or excessively worn and damaged teeth.
- If there are any such defects, replace the drive chain and/or the sprockets.
Drive Chain Slack Adjustment
- Remove the cotter pin from the rear axle.
- Loosen the rear axle nut and both chain adjuster locknuts.
- Turn both chain adjusting bolts evenly until the drive chain slack (measured between the chain and the swingarm) is within the standard value. If the chain is too tight, back out the left and right
chain adjust bolts evenly, and push the wheel forward. If the chain is too loose, turn both chains adjusting bolts evenly until the drive chain has the correct amount of slack. To keep the chain and wheel properly aligned, the notch on the right chain adjuster should align with the same swingarm mark as the left chain adjuster notch aligned.
Drive Chain Slack
54-64 mm (2.1 2.5 in.)
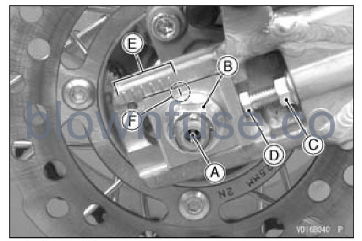
A. Cotter Pin
B. Rear Axle Nut
C. Chain Adjuster Locknut
D. Adjusting Bolt
E. Marks
F. Notch
NOTE
Wheel alignment can also be checked using the straightedge or string method.
WARNING
Misalignment of the wheel will result in abnormal wear, and may result in an unsafe riding condition. Align the rear wheel using the marks on the swingarm or measure the distance between the center of the axle and the swingarm pivot.
- Tighten both chain adjuster locknuts
- Tighten the rear axle nut to the specified torque.
Tightening Torque
Rear Axle Nut: 80 Nm (8.2 kgf m, 59 ftlb)
- Rotate the wheel, measure the chain slack again at the tightest position, and readjust it if necessary.
- Install a new cotter pin through the rear axle, and bend its ends.
A. Cotter Pin
WARNING
A loose axle nut can lead to an accident resulting in serious injury or death. Tighten the axle nut to the proper torque and install a new cotter pin. Check the rear brake effectiveness.
NOTE
When riding in wet and muddy conditions, mud sticks to the chain and sprockets, resulting in an overly tight chain, which can cause it to break.To prevent this, adjust the chain slack (measured between the chain and the swingarm) to 64 74 mm (2.52.9 in.).
Chain Wear Inspection
When the chain has reached its wear limit (i.e. when it has stretched by 1.7% of its original length), it is no longer safe for use and should be replaced. Since it is impractical to measure the entire length of the chain, determine the degree of wear by measuring a 20-link section of the chain.
- Tighten the chain either by using the chain adjusters or by hanging a 10 kg (22 lb) weight on the chain.
- Measure the 20-link length on a straight part of the chain from the center of the 1st pin to the center of the 21st pin. If the length exceeds the service limit, the chain should be replaced. Since over- worn sprockets will cause a new chain to wear faster, inspect both the engine and rear sprockets whenever the chain is replaced, and replace them if necessary.
A. Weight
B. Tape Measure
Drive Chain 20-link Length
NOTE
- The drive system was designed for use with a DAIDO DID 420DS3 chain (120-tinks). For maximum stretch resistance and safety, a genuine part must be used for replacement.
- To minimize any chance of the master link coming apart, the master link clip must be installed with the closed end of the U” pointing in the direction of chain rotation.
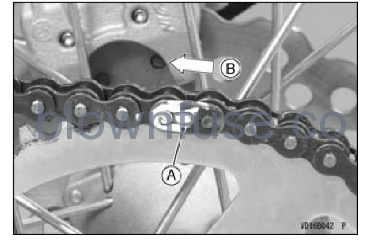
A. Master Link Clip
B. Direction of Chain Rotation
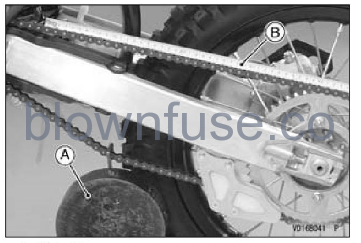
Chain Guide Wear Inspection
Visually inspect the drive chain guide and replace it if excessively worn or damaged.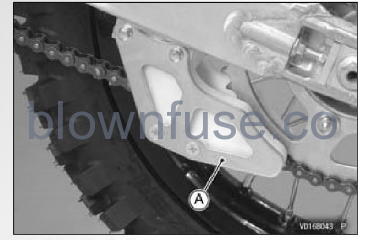
A. Drive Chain Guide
Chain Slipper Wear Inspection
Visually inspect the upper and lower of the chain slipper on the swingarm and replace them if worn or damaged.
A. Upper and Lower of the Chain Slipper
B. Swingarm
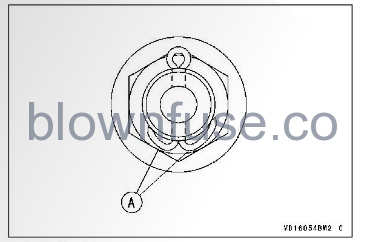
Sprocket Wear InspectionVisually inspect the sprocket teeth and replace the sprocket if its teeth are worn or damaged.
Sprocket Teeth Wear 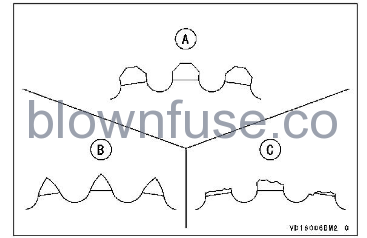
A. Good Teeth
B. Worn Teeth
C. Damaged Teeth
NOTE
Sprocket wear is exaggerated in the illustration.
Chain Lubrication
Lubrication is necessary after riding through rain or on wet roads, or any time that the chain appears dry. Use a lubricant for drive chains. If the chain is especially dirty, clean it using a cleaner for drive chains following the instructions supplied by the chain cleaner manufacturer.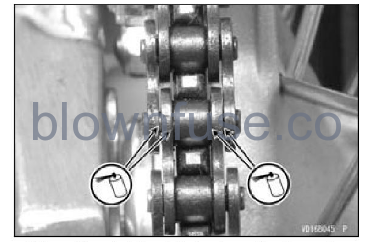
- Apply lubricant to the sides of the rollers so that it will penetrate to the rollers and bushings. Wipe off any excess lubricant.
- Wipe off any lubricant that gets on the tire surface