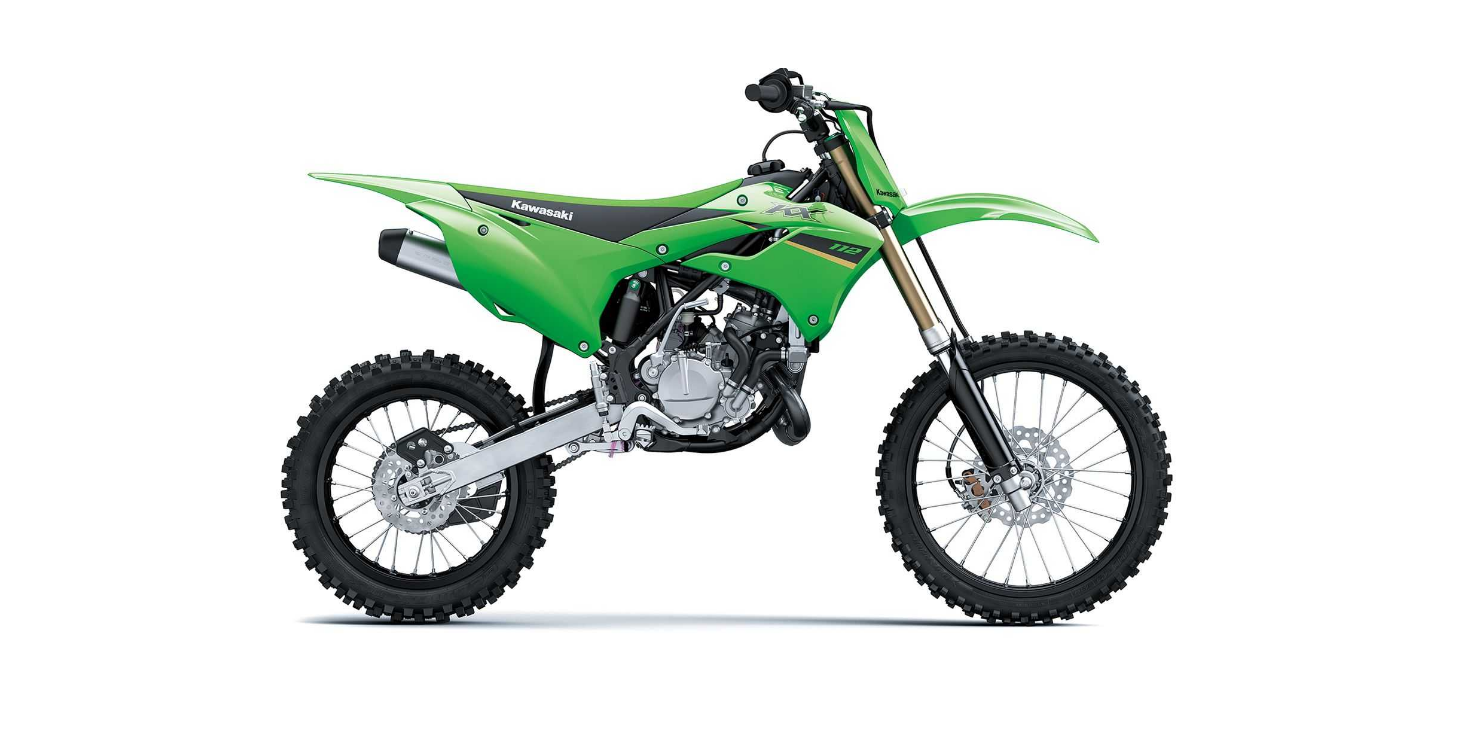
2022 Kawasaki KX112 Piston
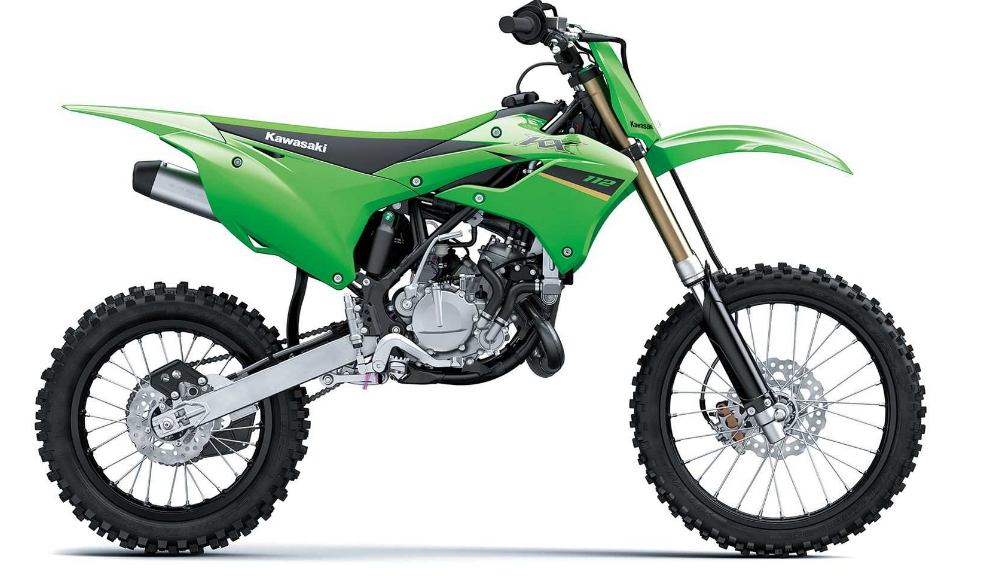
Piston
Piston Removal
- Turn the fuel tap lever to the “OFF” position (see Stopping the Engine section).
- Drain the coolant (see Cooling System section).
- Remove the fuel tank mounting bolt for easier removal of the cylinder.
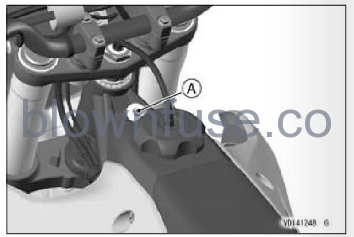
- A. Fuel Tank Mounting Bolt
- Remove the bolts and the shrouds on both sides.
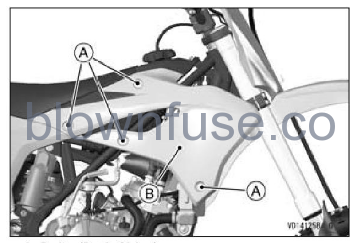
- A. Bolts (Both Sides)
- B. Shrouds (Both Sides)
- Remove the radiator screen bolt.
- Clear the hook and remove the radiator screen.
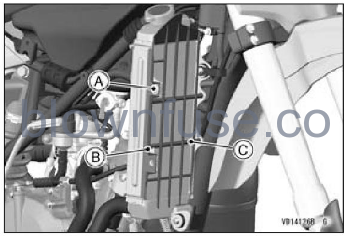
- A. Radiator Screen Bolt
- B. Hook
- C. Radiator Screen
- Disconnect the overflow hose.
- Loosen the water hose clamp screws, and disconnect the water hoses.
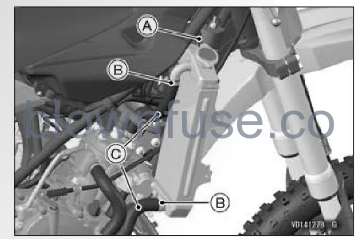
- A. Overflow Hose
- B. Water Hose Clamp Screws
- C. Water Hoses
- Remove the radiator mounting bolts, clamp, and radiator.
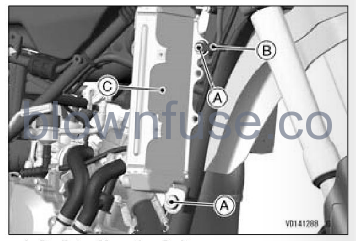
- A. Radiator Mounting Bolts
- B. Clamp
- C. Radiator
- Loosen the water hose clamp screws, and disconnect the water hoses.
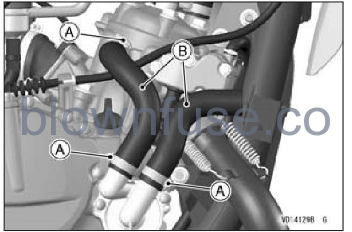
- A. Water Hose Clamp Screws
- B. Water Hoses
- Remove the spark plug cap (see Spark Plug section).
- Remove the muffler (see Exhaust System section).
- Remove the expansion chamber mounting springs.
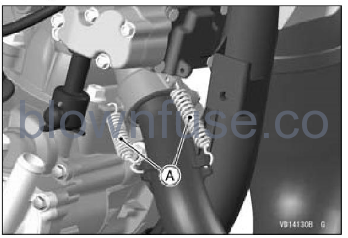
- A. Expansion Chamber Mounting Springs
- Remove the shroud screen bolt and shroud Screen.
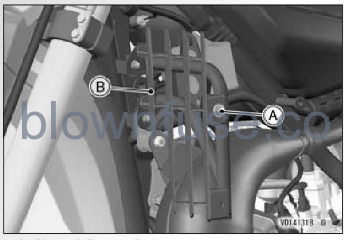
- A. Shroud Screen Bolt
- B. Shroud Screen
- Remove the expansion chamber mounting nut and take off the expansion chamber.
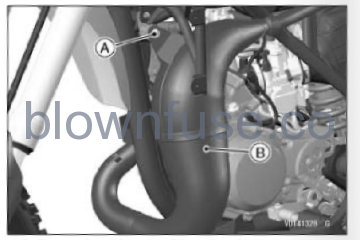
- A. Expansion Chamber Mounting Nut
- B. Expansion Chamber
- Remove the engine bracket mounting bolts, nuts, and engine brackets.
- Remove the cylinder head nuts, cylinder head, and gasket.
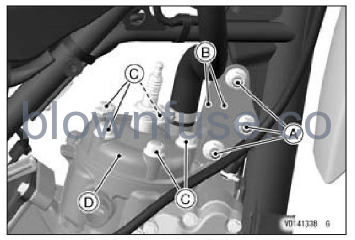
- A. Engine Bracket Mounting Bolts and Nuts
- B. Engine Brackets
- C. Cylinder Head Nuts
- D. Cylinder Head and Gasket
- Remove the carburetor from the cylinder intake joint (see Carburetor section).
- Remove the KIPS cover bolts and the KIPS cover.
- Remove the KIPS cover gasket.
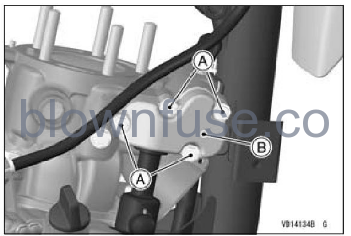
- A. KIPS Cover Bolts
- B. KIPS Cover and Gasket
- Remove the circlip.
- Push the shift lever, and disconnect the link lever from the operating rod.
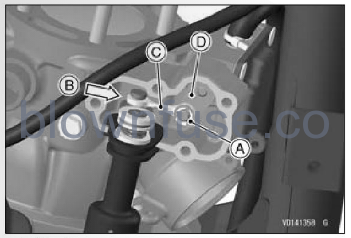
- A. Circlip
- B. Push the Shaft Lever
- C. Link Lever
- D. Operating Rod
- Push the boot down.
- Open the clamp to free the alternator lead.
- Cut the band and disconnect the hose.
- Remove the cylinder bolts and nuts.
- Remove the cylinder and the cylinder base gasket. If necessary, tap lightly around the base of the cylinder with a plastic mallet, taking care not to damage the cylinder.
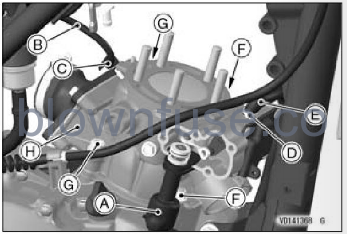
- A. Boot
- B. Alternator Lead
- C. Clamp
- D. Band
- E. Hose
- F. Cylinder Nuts
- G. Cylinder Bolts
- H. Cylinder and Cylinder Base Gasket
- Stuff a clean cloth into the crankcase opening around the connecting rod so that no parts will fall into the crankcase.
- Remove one of the piston pin snap rings with needle-nose pliers.
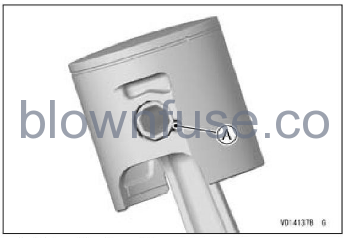
- A. Piston Pin Snap Ring
- Remove the piston by pushing the piston pin out the side from which the snap ring was removed. Use a piston pin puller assembly (special tool: 57001-910), if the pin is tight.
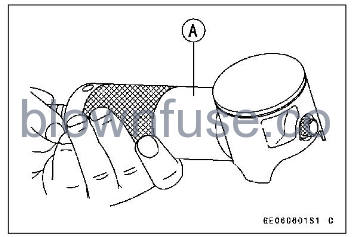
- A. Piston Pin Puller Assembly (Special Tool: 57001-910)
Piston Ring Removal
- .Carefully spread the ring-opening with your thumbs and then push up on the opposite side of the ring to remove it.
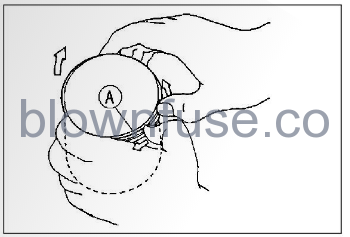
- A. Piston Ring
- Piston Ring/Ring Groove Clearance Inspection Visually inspect the piston ring and the piston ring groove.
- If the ring is worn unevenly or damaged, it must be replaced.
- If the piston ring groove is worn unevenly or damaged, the piston must be replaced and fitted with a new ring.
- Check for uneven piston ring groove wear by inspecting the ring seating.
- The ring should fit perfectly parallel to the groove surface. If not, replace the piston and the piston ring.
- With the piston ring in its groove, make several measurements with a thickness gauge to determine piston ring/ring groove clearance.
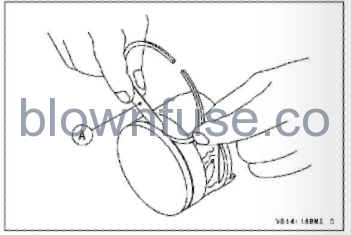
- A. Thickness Gauge
Piston Ring/Ring Groove Clearance
- If the piston ring/ring groove clearance is greater than the service limit, measure the ring thickness and groove width as follows to decide whether to replace the ring, the piston or both.
- If the piston ring has worn down to less than the service limit, replace the ring: if the piston ring groove width exceeds the service limit, replace the piston.
Piston Ring Thickness Inspection
- Measure the thickness at several points around the ring with a micrometer.
Piston Ring Thickness
If any of the measurements is less than the service limit, replace the ring.
NOTE
When using a new ring in a used piston, check for uneven groove wear. The ring should fit perfectly parallel to the groove side. If not, replace the piston.
Piston Ring Groove Width Inspection
- Measure the groove width at several points around the piston with a vernier caliper.
Piston Ring Groove Width
- Standard 1.03 1.05 mm (0.0406 0.0413 in.)
- Service Limit 1.13 mm (0.0445 in.)
If any of the groove widths exceeds the service limit, replace the piston.
Piston, Piston Pin, and Connecting Rod Wear Inspection
- Visually inspect the snap rings still fitted in place.
- If the snap ring shows weakness or deformation, replace the ring. Also if the piston pin hole groove shows excessive wear, replace the piston.
- Measure the diameter of the piston pin with a micrometer.
Piston Pin Diameter
- If the piston pin diameter is less than the service limit at any point, replace the piston pin.
- Using a cylinder gauge, measure the diameter of both of piston pin holes in the piston and the inside diameter of the connecting rod’s small end.
Piston Pin Hole Diameter
Connecting Rod Small End Inside Diameter
- If either piston pin hole diameter exceeds the service limit, replace the piston.
- If the inside diameter of the connecting rod small end exceeds the service limit, replace the crankshaft assembly.
- Check the needle bearing.
NOTE
- The rollers in a needle bearing normally wear very little, and wear is difficult to measure. Instead of measuring, inspect the bearing for abrasion, color change or other damage.
- If there is any doubt as to the condition of a needle bearing, replace the bearing and piston pin.
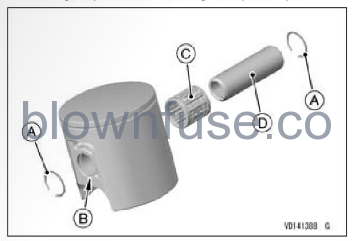
- A. Snap Rings
- B. Pin Hole
- C. Needle Bearing
- D. Piston Pin
Piston Installation
- Install all parts in the reverse order of removal.
- Stuff a clean cloth into the crankcase opening around the connecting rod so that no parts will fall into the crankcase.
- Scrape off any carbon off of the piston, then lightly polish the piston with fine emery cloth.
- Clean carbon and dirt out of the piston ring grooves using a suitable tool
NOTICE
- Carbon particles can be very abrasive to the piston rings. Do not allow such particles to fall onto the cylinder walls.
- First, fit one end of the piston ring against the pin in the ring groove, spread the ring-opening with the other hand, and then slip the ring into the groove.
NOTE
install the ring so that the marked side faces upward.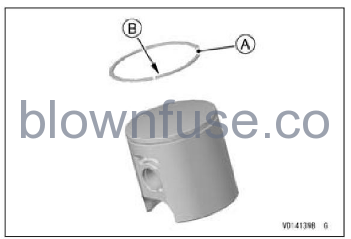
- A. Piston Ring
- B. Marked side
Install the piston ring so that the pin in the piston ring groove is between the ends of the piston ring.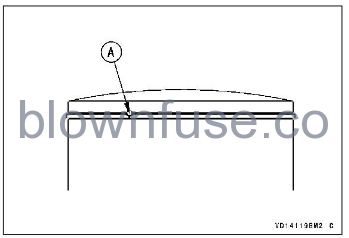
- A. Pin
Apply 2-stroke engine oil to the connecting rod needle bearing and the piston pin.
NOTE
- Install the piston with its mark facing forward.
- When installing a piston pin snap ring, compress it only enough to install it and no more.
NOTICE
- Do not reuse snap rings, as removal weakens and deforms them. They could fall out and score the cylinder wall.
- Fit a new piston pin snap ring into the side of the piston so that the snap ring opening does not coincide with the notch in the edge of the piston pin hole.
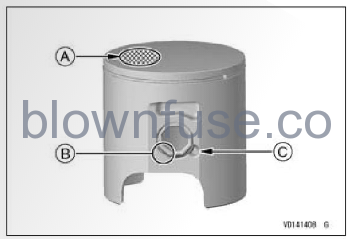
- A. Mark
- B. Snap Ring Ends
- C. Notch
Cylinder Installation
- Scrape any carbon out of the exhaust port.
- Check for mineral deposits and rust in the cylinder water jacket, and remove them if necessary.
- Replace the cylinder base gasket with a new one.
- Apply 2-stroke engine oil to the piston surface, piston ring, and cylinder bore.
- Check to see that the pin in the piston ring groove is between the ends of the piston ring, and fit the base of the cylinder over the ring, pressing in on opposite side of the piston ring as necessary. Be certain that the ring does not slip out of position.
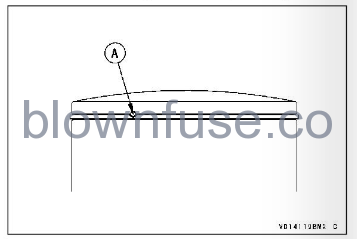
- A. Pin
- Tighten the cylinder bolts and nuts following the specified tightening sequence [1 4] temporarily.
- Tighten the cylinder bolts and nuts with the specified torque by a specified tightening sequence [5 8]
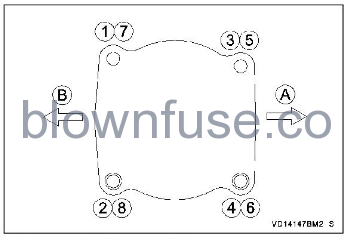
- A. Expansion Chamber Side
- B. Cylinder Intake Joint Side
Tightening Torque_
- Cylinder Bolts: 20 Nm (2.0 kgfm, 15 ft:lb)
- Cylinder Nuts: 25 25 Nm (2.5 kgfm, 18 ft-lb)
Replace the band with a new one. Connect the hose and install the band.
Cylinder Head Installation
- Replace the cylinder head gasket with a new one.
- Scrape out any carbon and clean the cylinder head with a high flash-point solvent.
- Check for mineral deposits and rust in the cylinder head water jacket, and remove them if necessary.
- Install the dowel pins.
- Install a new cylinder head gasket with the side marked UP facing up.
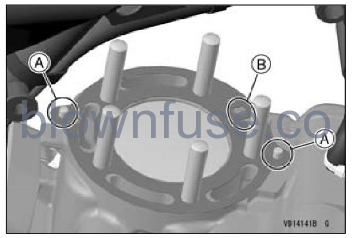
- A. Dowel Pins
- B. Mark
- Tighten the cylinder head nuts to the specified torque in a crisscross pattern.
- Tightening Torque
- Cylinder Head Nuts: 25 Nm (2.5 kgfm, 18 ft:1b)
- Connect the two water hoses
- Replace the engine bracket mounting nuts with new ones.
- Install the engine bracket and tighten the nuts to the specified torque.
- Tightening Torque
- Engine Bracket Mounting Nuts: 30 N m (3.1 kgf m, 22 ftlb)
- Link the link lever to the operating rod and insert the circlip.
- Tighten the KIPS cover bolts to the specified torque and follow the specified tightening sequence [1 5].
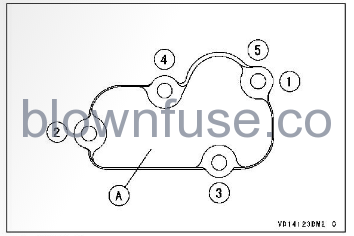
- A. KIPS Cover
- Tightening Torque
- KIPS Cover Bolts: 3.0 Nm (0.31 kgf m, 27 in lb)
- Replace the exhaust gasket with a new one.
- Replace the exhaust O-rings with new ones.
- Apply molybdenum disulfide grease around the exhaust 0-rings.
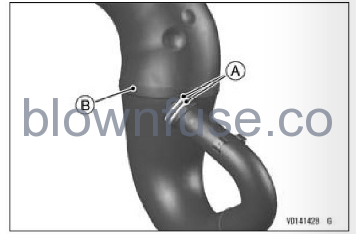
- A. Exhaust O-rings
- B. Expansion Chamber
- Install the expansion chamber.
- Install the expansion chamber mounting springs as shown.
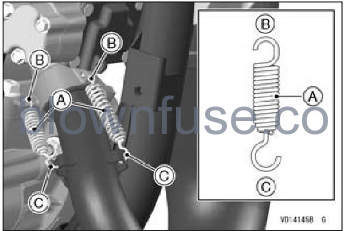
- A. Expansion Chamber Mounting Spring
- B. Cylinder Side
- C. Expansion Chamber Side
- NOTE
Do not hook the expansion chamber mounting springs to the exhaust valve cover hole.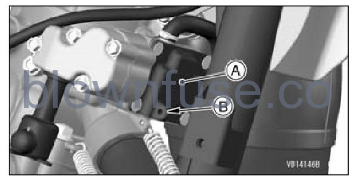
- A. Exhaust Valve Cover
- B. Hole (Do not hook the spring)
- Install the muffler (see Exhaust System section).
- Install the spark plug cap.
- Pull up the spark plug cap lightly to make sure of the installation of the spark plug cap.
- Install the radiator and clamp.
Run the overflow hose and water hoses correctly. - Tighten the water hose clamp screws to the specified torque.
- Tightening Torque
- Water Hose Clamp Screws: 3.0 N m (0.31 kgf m, 27 in b)
- Install the radiator screen so that the projections fit into the holes.
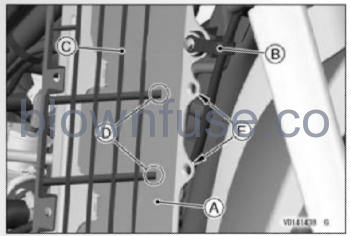
- A. Radiator
- B. Clamp
- C. Radiator Screen
- D. Projections
- E. Holes
- Install the shroud screen so that the projections fit into the holes.
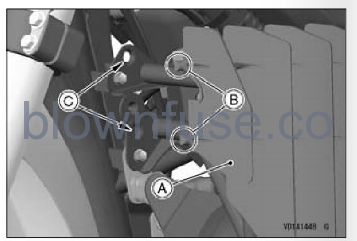
- A. Shroud Screen
- B. Projections
- C. Holes
- Install the removed parts.
- Fill the coolant and check the coolant level (see Cooling System section).
