2022 Kawasaki KX85 Clutch
Clutch
Clutch Lever Adjustment
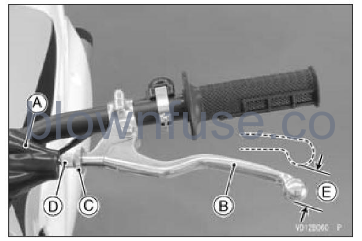
Proper clutch lever free play is 8 13 mm (0.3 0.5 in.). Lever play increases with cable stretch and friction plate wear, requiring periodic adjustment. When the clutch lever free play is out of specification, first try adjusting it at the clutch lever as follows.
- Slide the dust cover of the clutch lever.
- Loosen the locknut, turn the adjuster to obtain the proper amount of clutch lever play, then tighten the locknut.
A. Dust Cover
B. Clutch Lever
C. Locknut
D. Adjuster
E. 8 13 mm (0.3 0.5 in.)
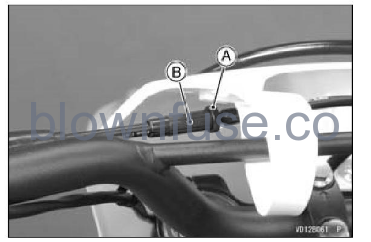
If the clutch lever free play cannot be adjusted at the clutch lever, make the adjustment further down the cable as follows
- Loosen the locknut at the clutch lever.
- Turn the adjuster in all the way, then tighten the locknut.
- Loosen the locknut in the middle of the clutch cable, and turn the adjusting nut so that the clutch lever play is 8 13 mm (0.3 0.5 in.).
A. Locknut
B. Adjusting Nut
- Tighten the locknut.
- Start the engine, check that the clutch does not slip and it releases properly.
- Slide the dust cover back into place.
WARNING
Excess clutch cable play could prevent clutch disengagement and cause a crash resulting in serious injury or death. When adjusting the clutch cable, be sure the upper end of the outer cable is fully seated in its fitting so that it doesn’t slip into place later and create excessive cable play.
NOTE
After the adjustment is made, start the engine and check that the clutch does not slip and that it releases properly
Friction and Steel Plates Removal
- Drain the transmission oil (see Transmission Oil section).
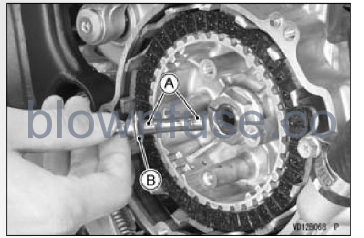
- Give plenty of play to the clutch cable by turning the adjuster.
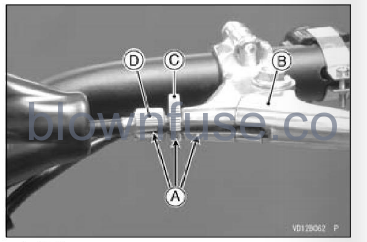
- Line up the slots in the clutch lever, locknut, and adjuster, and then free the cable from the clutch lever.
A. Slots
B. Clutch Lever
C. Locknut
D. Adjuster
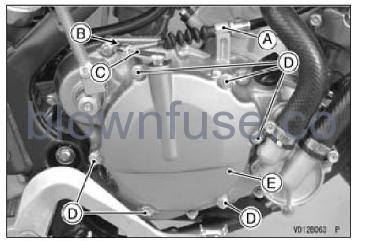
- Take the clutch cable off the cable holder.
- Take the lower end of the clutch cable off the clutch release lever.
- Remove the clutch cover bolts.
- Turn the clutch release lever toward the rear.
NOTICE
Do not remove the clutch release shaft unless it is absolutely necessary. If the clutch release shaft is removed, the oil seal must be replaced with a new one. Remove the clutch cover and the gasket.
A. Cable Holder
B. Lower End of the Clutch Cable
C. Clutch Release Lever
D. Clutch Cover Bolts
E. Clutch Cover and Gasket
- Take the clutch cable off the cable holder.
- Take the lower end of the clutch cable off the clutch release lever.
- Remove the clutch cover bolts.
- Turn the clutch release lever toward the rear
- Remove the magneto cover (see Ignition Timing section).
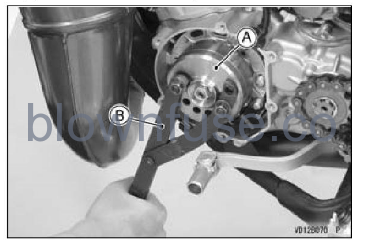
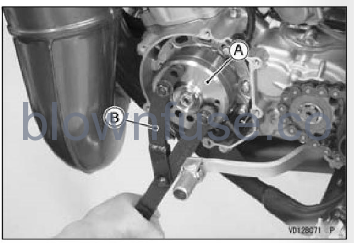
- Hold the flywheel with the flywheel & pulley holder (special tool: 57001-1605).
A. Flywheel
B. Flywheel & Pulley Holder (Special Tool: 57001-1605)
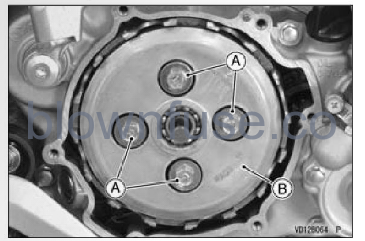
Remove the clutch spring bolts, springs and clutch pressure plate.
A. Clutch Spring Bolts and Springs
B. Clutch Pressure Plate
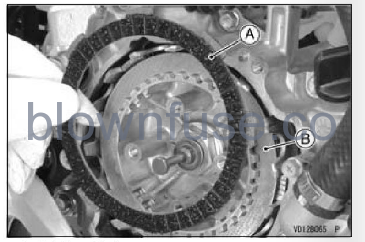
Remove the friction plates and steel plates.
A. Friction Plates
B. Steel Plates
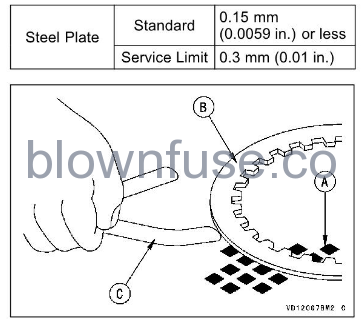
Frictionand Steel Plates Wear/Damage Inspection
- Visually inspect the friction and steel plates to see if they show any signs of seizure, or uneven wear.
- If any plates show signs of damage, replace all friction plates and steel plates as a set.
- Measure the thickness of the friction plates at several points with vernier calipers.
- If they have worn past the service limit, replace them with new ones.
Friction Plate Thickness
- Standard 2.92 3.08 mm (0.115 0.121 in.)
- Service Limit 2.8 mm (0.11 in.)
A. Thickness
B. Friction Plate
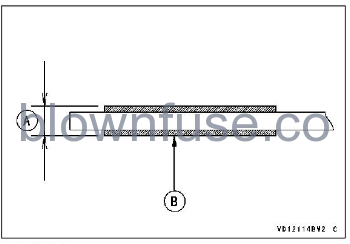
Friction and Steel Plate Warp Inspection
- Place each friction plate and steel plate on a surface plate, and measure the amount of friction plate and steel plate warp with a thickness gauge (i.e., the gap between the surface plate and each friction plate or steel plate).
- If any plate is warped over the service limit, replace it with a new one.
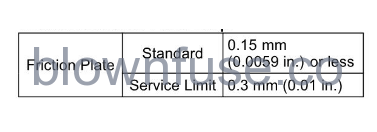
Friction and Steel Plate Warp
A. Surface Plate
B. Friction or Steel Plate
C. Thickness Gauge
Friction and Steel Plate Installation
- Install all parts in the reverse order of removal.
- Install the friction plates and steel plates, starting with a friction plate and alternating them. Finish with a friction plate.
NOTICE
If dry steel plates and friction plates are installed, apply transmission oil to the sur- faces of each plate to avoid clutch plate seizure.
- Apply molybdenum disulfide grease to the swollen areas of the clutch spring push rod.
- Install the clutch spring push rod and the washer.
A. Apply molybdenum disulfide grease.
B. Clutch Spring Push Rod and Washer
- Install the clutch pressure plate and springs.
- Hold the flywheel with the flywheel & pulley holder (special tool: 57001-1605).
A. Flywheel
B. Flywheel & Pulley Holder (Special Tool: 57001-1605)
Tighten the clutch spring bolts to the specified torque.
Tightening Torque
Clutch Spring Bolts: 9.3 N-m (0.95 kgfm, 82 in-lb)
- Replace the clutch cover gasket with a new one.
- Turn the clutch release lever toward the rear so that the push rod fit into the release lever shaft.
- Install the clutch cover to the crankcase, making sure that the two dowel pins are installed between mating surfaces.
- Tighten the clutch cover bolts to the specified torque.
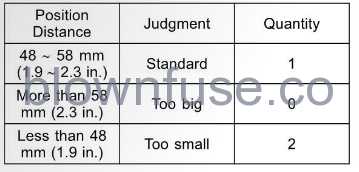
Clutch Cover Bolts: 10 N-m (1.0 kgfm, 89 in-lb) Check the clutch release lever position by measuring the position distance between the lever and the cable bracket while pushing the clutch release lever lightly forward.
A. Clutch Release Lever
B. Push forward
C. Cable Bracket
D. Position Distance (Between Lever and Cable Bracket)
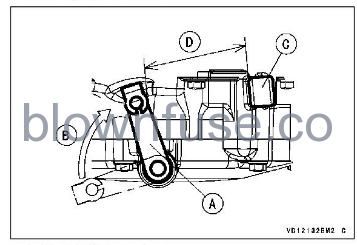
Position Distance
Standard 48 58 mm (1.9 2.3 in.)
- If the lever position is not within the standard, select the correct number of adjusting washer according to the following table.
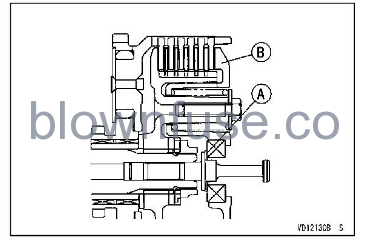
- When adjustment is necessary, remove the clutch pressure plate.
A. Adjusting Washer
B. Clutch Pressure Plate
Adjusting Washer
- Thickness 0.5 mm (0.02 in.)
- Part Number 92025-1780
Clutch Release Lever Position and Adjusting Washer Selection
- Replace the magneto cover gasket with a new one
- Install the magneto cover (see lgnition Timing sec tion)
- Check the transmission oil level (see Transmis- sion Oil section).
- Adjust the clutch cable (see Clutch section).