
2022 Kawasaki KX85 Air Cleaner

Air Cleaner
A clogged air cleaner restricts the air intake, increases fuel consumption reduces engine power, and can cause spark plug fouling. Inspect the air intake system, which includes the air cleaner ele- ment and air duct to the carburetor, and the duct clamps and carburetor, before each race or practice session.
WARNING
If dirt or dust is allowed to pass through into the carburetor, the throttle may become stuck, possibly causing an accident. Be sure to keep the dust from entering during cleaning.
NOTICE
A clogged air cleaner will affect the fuel mixture to the engine and reduce engine power and cause spark plug fouling.
NOTE
- ln dusty areas, the element should be cleaned more frequently than the recommended interval.
- After riding through rain or on muddy roads, the element should be cleaned immediately.
Element Removal and Inspection
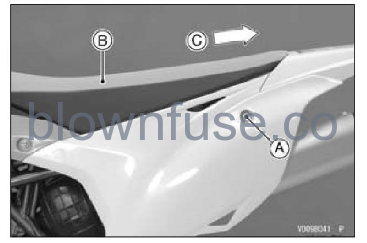
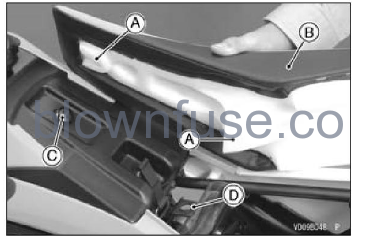
- Remove the seat bolts.
- Remove the seat rearward.
A. Seat Bolt (Both Sides)
B. Seat
C. Rearward
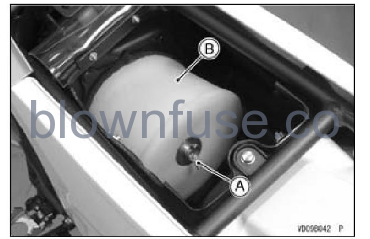
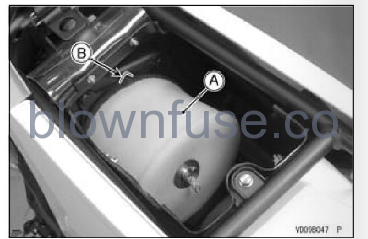
Remove the wing bolt, and take out the air cleaner element.
A. Wing Bolt
B. Air Cleaner Element
- Check inside of the intake tract and carburetor for dirt. If dirty, clean the intake tract and carburetor thoroughly.
- Stuff a clean, lint-free towel into the carburetor to
- keep dirt from entering the carburetor.
- Wipe out the inside of the air cleaner housing with a clean, damp towel.
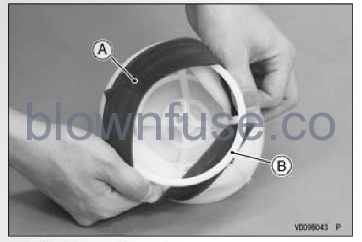
- Take the air cleaner element off its frame.
A. Air Cleaner Element
B. Element Frame
NOTICE
Do not twist or wring the element, as it gets easily torn or damaged. Inspect the air cleaner element. If it is dirty, clean it. Also check if the element is in good condition (no tears, hardening or shrinkage). If damaged, replace the element or it will allow dirt into the carburetor.
WARNING
A clogged air cleaner may allow dirt and dust to enter the carburetor and the throttle may stick resulting in a hazardous operating con- dition. Clean the air cleaner according to the periodic maintenance chart; more often if the motorcycle is used in extremely dusty conditions.
NOTICE
A clogged air cleaner may allow dirt and dust to enter the engine, causing it to wear excessively or to become damaged.
Element Cleaning and Installation
Clean the air cleaner element in a bath of a high flash-point solvent or hot soapy water. Rinse the element with clear water to remove all traces of the cleaning solution.
A. Air Cleaner Element
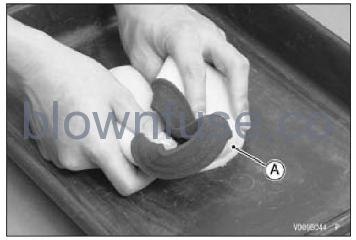
Squeeze the air cleaner element dry in a clean towel.
A. Air Cleaner Element
B. Clean Towel
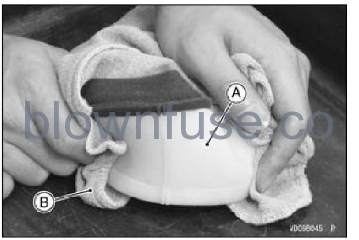
NOTICE
Do not twist, wring or blow the element dry to avoid damaging it.
WARNING
Gasoline and low flash-point solvents can be flammable and/or explosive and cause severe burns. Clean the element in a well-ventilated area, and take care that there is no spark or flame anywhere near the working areas. Do not use gasoline or low flash-point solvents to clean the element.
- After cleaning, let the element dry completely. Saturate the element with a high-quality foam air filter oil and make sure that the oil is evenly applied throughout the element. Squeeze out the excess oil, but do not wring the element as this could cause tearing. In this case, too much oil is better than too little. Finally, pat the inside of the element with a paper towel to remove any excess oil.
- Before installation, check the element for damage such as tears, hardening, or shrinkage. If dam-caged, replace the element.
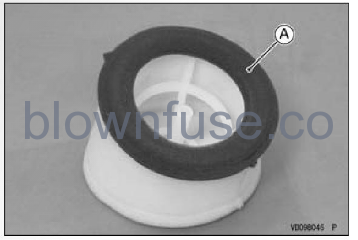
- Apply grease to the air cleaner element lip.
A. Apply grease.
- Remove the towel from the carburetor.
- Install the element onto its frame.
- Install the air cleaner element so that the projection on it fits into the notch in the holder.
A. Air Cleaner Element
B. Projection and Notch
- Tighten the wing bolt.
- Insert the hooks of the seat under the flange collar and bracket.
NOTE
Take care not to damage the side covers with the bracket of the seat.
A. Hooks
B. Seat
C. Flange Collar
D. Bracket
- Install the seat bolts.
- Pull up the rear end of the seat to make sure it is securely installed.