2022 Kawasaki KX250 Front Suspension
Front Suspension
Front Fork Inspection
- Holding the brake lever, pump the front fork back and forth manually to check for smooth operation.
- Visually inspect the front fork for oil leakage, scoring or scratches on the outer surface of the inner tube.
- If necessary, repair or replace by an authorized Kawasaki dealer.
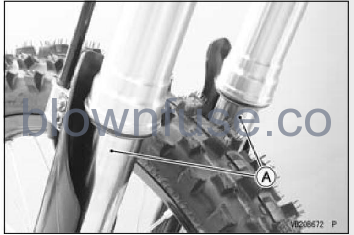
A. Inner Tube
NOTICE
If the inner tube is badly bent or creased, replace it. Excessive bending, followed by subsequent straitening, can weaken the in- ner tube.
Front Fork Adjustment
Any of the following front fork adjustments should be made to tune the front suspension to the rider’s weight and the condition of the track.Basically, there are six adjustments you can make to the front fork.
- Air Pressure
Air pressure acts as a progressive spring over the entire fork travel range. Since the air pressure in the fork legs increases with normal use, the fork action on your KX will get stiffer as the race progresses. Therefore, it is not recommended to increase the air pressure for additional springing. The KX forks are designed to function without added air. - Rebound Damping Adjustment
This adjustment affects how quickly the fork re bounds. Depending on the model, the fork rebound damping adjuster has at least 20 positions. The fully seated position (adjuster turned fully clockwise) is the hardest setting. Turning it counterclockwise 20 clicks from the fully seated position is the softest setting. - Compression Damping Adjustment
This adjustment affects how quickly the fork compresses. Depending on the model, the fork compression damping adjuster has at least 23 positions. The fully seated position (adjuster turned fully clock- wise) is the hardest setting. Turning it counterclock- wise 23 clicks from the fully seated position is the softest setting. - Fork Oil Amount Adjustment
The fork oil amount affects only the final 100 mm(4 in.) of fork travel. A higher oil amount will make the fork rebound more quickly. A lower oil amount will make the fork rebound more slowly. - Fork Springs
Optional springs, softer or stiffer than standard, are available. - Fork Clamp Position
Steering is greatly affected by the fork clamp position (how much the outer fork tubes protrude above the steering stem head). The less the fork tube pro- trudes, the lighter the front end becomes and the greater the tendency for understeering and washout due to weight biasing. Increasing the amount of fork tube protrusion has opposite effects. Be sure that the front tire does not touch the fender when the fork is fully compressed. Make this adjustment in 5 mm (0.2 in.) steps
NOTICE
The right and left fork tubes must be adjusted evenly.
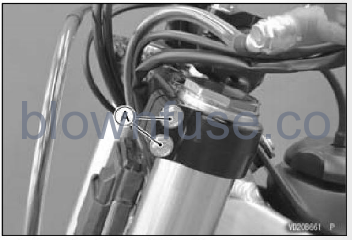
Air Pressure Adjustment
The standard air pressure in the front fork legs is atmospheric (0 kPa, 0 kgf/cm?, 0 psi). Air pressure in the fork legs increase with normal use, so the fork action stiffens during operation. Release air pres- sure from the fork legs prior to each race through the pressure relief screw located in each front fork cap. Make sure the front forks are fully extended with the front wheel off the ground when releasing the pres- sure.
- Raise the front wheel off the ground using a jack (special tool: 57001-1238) and attachment (special tool: 57001-1608).
- Remove the screw on each front fork top plug to let the air pressure equalize. Then, tighten the Screws.
Tightening Torque
Pressure Relief Screws: 1.3 Nm (0.13 kgf m, 12 in-lb)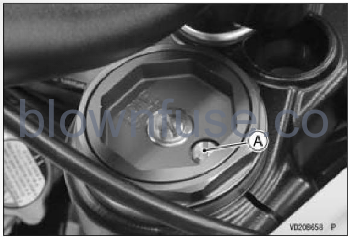
A. Pressure Relief Screw
Rebound Damping Adjustment
- Clean the bottom of the fork tubes.
- To adjust the rebound damping, turn the adjuster on each cylinder valve with a flat tip screwdriver.
- Adjust the rebound damping to suit your preference under certain conditions.
NOTICE
Do not force the rebound damping adjuster beyond the fully seated position, or the adjusting mechanism may be damaged.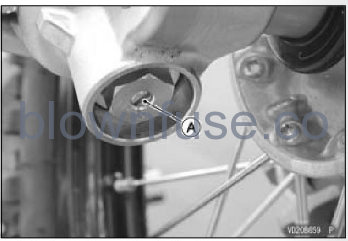
A. Rebound Damping Adjuster
Rebound Damping Adjuster Settings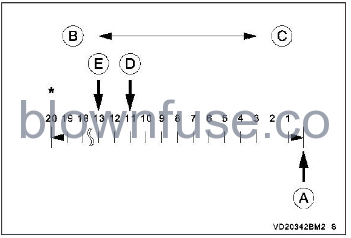
A. Seated Position (Adjuster Turned Fully Clockwise)
B. Softer (Counterclockwise)
C. Harder (Clockwise)
D. Standard Setting (KX252C)
E. Standard Setting (KX252D)
Number of turns counterclockwise usable range 20 clicks or more.
- KX252C 11 clicks
- Kx252D 13 clicks
Counterclockwise from the fully seated position
Compression Damping Adjustment
To adjust the compression damping, turn the ad- juster on the each front fork cylinder valve with a flat tip screwdriver. Adjust the compression damp- ing to suit your preference under certain conditions.
NOTICE
Do not force the compression damping ad-juster beyond the fully seated position, or the adjusting mechanism may be damaged.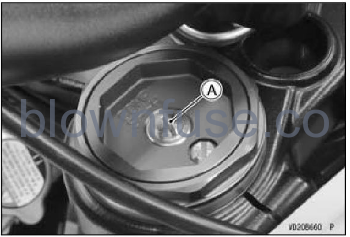
A. Compression Damping Adjuster
Compression Damping Adjuster Settings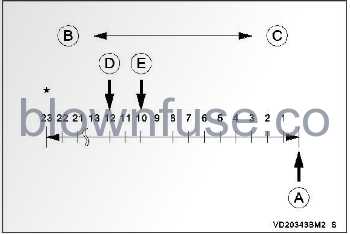
A. Seated Position (Adjuster Turned Fully Clockwise)
B. Softer (Counterclockwise)
C. Harder (Clockwise)
D. Standard Setting (Kx252C)
E. Standard Setting (Kx252D)
Number of turns counterclockwise usable range-23 clicks or more.
Standard Compression Damping Adjuster Setting
- KX252C|12 clicks
- KX252D 10 clicks
Counterclockwise from the fully seated position
Front Fork Oil Change
Thoroughly clean the fork before disassembly.
NOTICE
Be careful not to scratch the inner tube and not to damage the dust seal. Avoid scratching or damaging the inner tube or the dust seal. Use a mild detergent and sponge out dirt with plenty of water.
- Remove the number plate (see Steering section).
- Loosen the front fork clamp bolts (upper).
A. Front Fork Clamp Bolts (Upper)
NOTE
- Set the rebound and compression damping setting to the softest settings before disassembly to prevent the needle of adjusters from damping. Record the setting before turning the adjuster.
- Place a plastic bag over the top plug to protect the top plug.
- Loosen the front fork top plug with the top plug wrench, 49 mm (special tool: 57001-1653).
NOTE
Do not take off the top plug.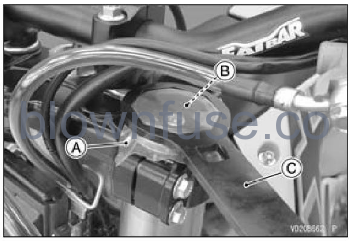
A. Plastic Bag
B. Front Fork Top Plug
C. Top Plug Wrench, 49 mm (Special Tool: 57001-1653)
- Support the motorcycle using a jack (special tool: 57001-1238) and attachment (special tool: 57001 -1608).
- Unscrew the front axle nut, and then loosen the left front axle clamp bolts.
A. Front Axle Nut
B. Left Front Axle Clamp Bolts (Loosen)
- Remove the brake caliper from the fork leg to be removed, and rest the caliper on some kind of stand so that it does not dangle.
- Insert the wood wedge between the disc brake pads. This prevents them from being moved out of their proper position, if the brake lever is squeezed accidentaly.
- Remove the brake hose clamps and both fork pro tectors.
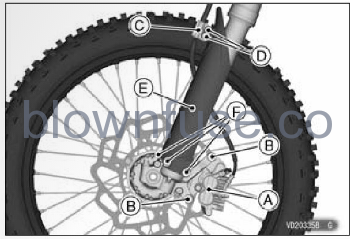
A. Brake Caliper
B. Front Caliper Mounting Bolts
C. Brake Hose Clamps
D. Brake Hose Clamp Mounting Bolts
E. Fork Protector
F. Fork Protector Mounting Bolts
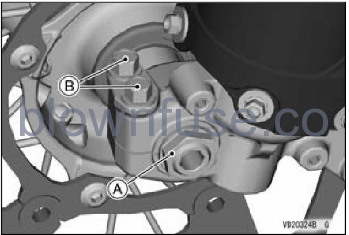
- Loosen the right front axle clamp bolts.
- Using a jack to raise the front wheel off the ground.
- Remove the axle, and pull out the wheel. Take off the collar from each side of the front hub.
NOTICE
Do not lay the wheel on the ground with the disc facing down. This can damage or warp the disc. Place blocks under the wheel so the disc does not touch the ground.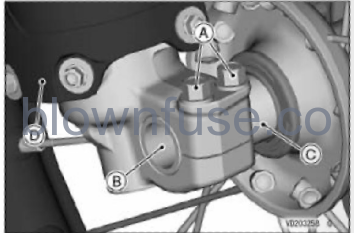
A. Right Front Axle Clamp Bolts (Loosen)
B. Front Axle
C. Collar
D. Fork Protector
Loosen the front fork clamp bolts (lower).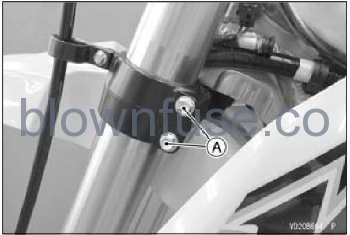
A. Front Fork Clamp Bolts (Lower)
Remove the front fork by pulling down while twisting it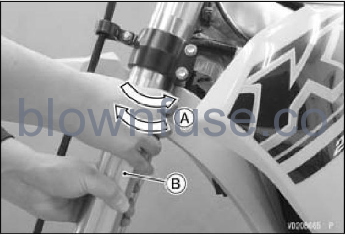
A. Pull down by twisting.
B. Front Fork
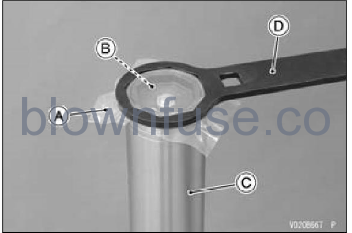
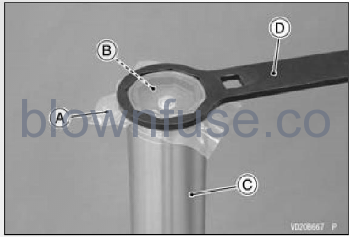
- Place a plastic bag over the top plug to protect the top plug.
- Using the top plug wrench, 49 mm (special tool: 57001-1653), remove the fork top plug from the outer tube and slowly slide down the outer tube.
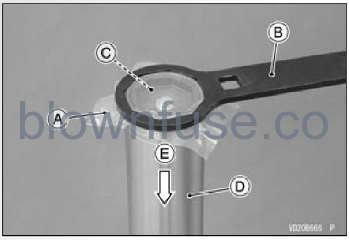
A. Plastic Bag
B. Top Plug Wrench, 49 mm (Special Tool: 57001-1653)
C. Front Fork Top Plug
D. Outer Tube
E. Slide down
Place a drain pan under the front fork and drain fork oil.
NOTE
Pump the fork tube several times to discharge the fork oil.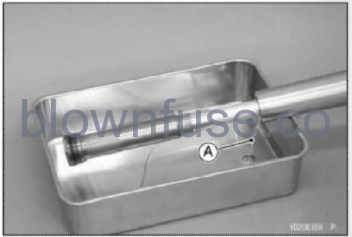
A. Fork Oil
- Place a plastic bag over the top plug to protect the top plug.
- Raise the outer tube and temporarily install the fork top plug to the outer tube using the top plug wrench, 49 mm (special tool: 57o01-1653).
A. Plastic Bag
B. Front Fork Top Plug
C. Outer Tube
D. Top Plug Wrench, 49 mm (Special Tool: 57001-1653)
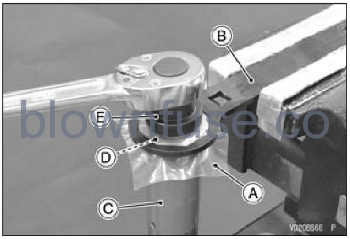
Protect the axle holder with a thick rag and secure it with a vise.
A. Axle Holder Part
B. Protect
C. Vise
WARNING
Clamping the axle holder too tight can damage it which will affect riding stability. Do not clamp the axle holder too tight.
NOTE
- Protect the axle holder with a soft jaw or heavy cloth when using a vise.
- Loosen the adjuster assembly completely.
NOTE
When removing the adjuster assembly, do not force to loosen it at once using an impact wrench.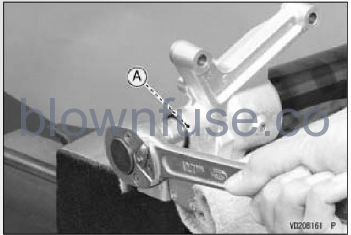
A. Adjuster Assembly
Compress the outer tube by hands and in stall the top plug wrench, 49 mm (special tool: 57001-1653) between the axle holder bottom and locknut.
WARNING
The fork spring applies pressure to the adjuster assembly and can eject the special tool with substantial force if the tool is not properly and securely placed. Be sure the tool is fully in place as shown in the photo, and keep fingers away to avoid getting them pinched between the tool, adjuster assembly and axle holder. Hold the locknut with a wrench and remove the adjuster assembly.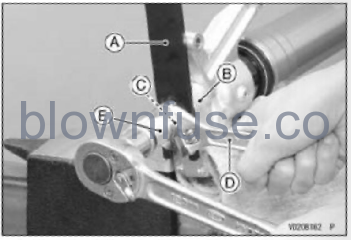
A. Top Plug Wrench, 49 mm (Special Tool: 57001-1653)
B. Axle Holder Bottom
C. Locknut
D. Wrench
E. Adjuster Assembly
Remove the push rod.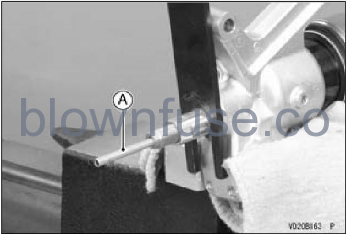
A. Push Rod
With the outer tube compressed by hand, remove the top plug wrench, 49 mm (special tool: 57001 -1653).
NOTICE
Removing the locknut and pushing the piston rod thread into the cylinder unit will damage the oil seal. Do not remove the locknut from the piston rod. Be careful of reaction force from the fork spring when removing the top plug wrench. Hold the cylinder unit tight enough so that the locknut does not damage the fork leg.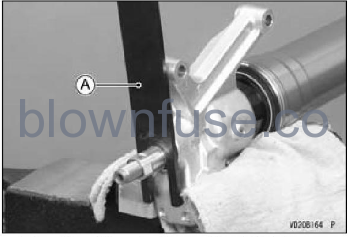
A. Top Plug Wrench, 49 mm (Special Tool: 57001-1653)
- Remove the fork leg from the vise.
- Place a plastic bag over the top plug to protect the top plug.
- Remove the front fork top plug with the top plug wrench (special tool: 57001-1653).
A. Plastic Bag
B. Front Fork Top Plug
C. Outer Tube
D. Top Plug Wrench, 49 mm (Special Tool: 57001-1653)
Remove the cylinder unit, collar and fork spring from the outer tube.
NOTICE
Disassembling the cylinder unit can lead to trouble. Do not disassemble the cylinder unit.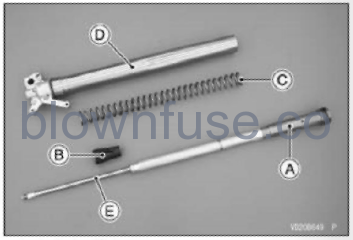
A. Cylinder Unit
B. Collar
C. Fork Spring
D. Outer Tube
E. Piston Rod
- Place a plastic bag over the top plug to protect the top plug.
- Secure the top plug wrench, 49 mm (special tool: 57001-1653) with a vise and hold the cylinder unit with the top plug wrench.
- Loosen the base valve assembly completely with the top plug wrench, 36 mm (special tool: 57001 -1705).
A. Plastic Bag
B. Top Plug Wrench, 49 mm (Special Tool: 57001-1653)
C. Cylinder Unit
D. Base Valve Assembly
E. Top Plug Wrench, 36 mm (Special Tool: 57001-1705)
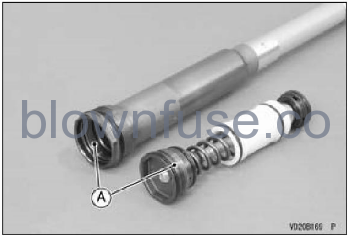
Remove the base valve assembly from the cylinder unit.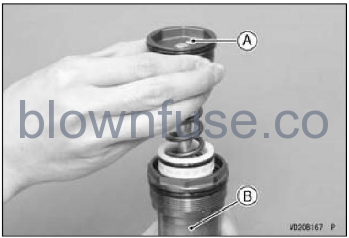
A. Base Valve Assembly
B. Cylinder Unit
NOTE
Slowly compress the piston rod until it stops so that the base valve assembly can be removed easily.
NOTICE
Disassembling the base valve assembly can lead to trouble. Do not disassemble the base valve assembly.
Drain the fork oil from the cylinder unit by pumping the piston rod several times.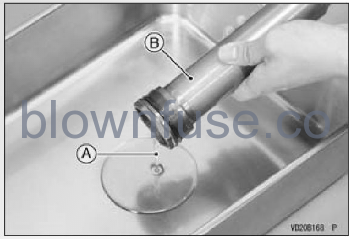
A. Fork Oil
B. Cylinder Unit
Hold the front fork at the inverted position for more than 20 minutes to allow the fork oil to fully drain. Clean the threads of cylinder unit and base valve assembly.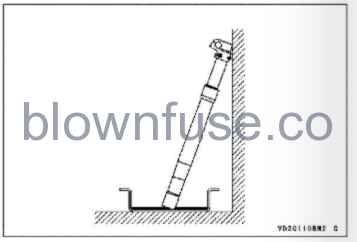
- Clean the threads of cylinder unit and base valve assembly.
A. Threads
- Replace the O-ring on the base valve assembly and cylinder unit with new ones.
- Apply specified fork oil to the O-rings on the base valve assembly.
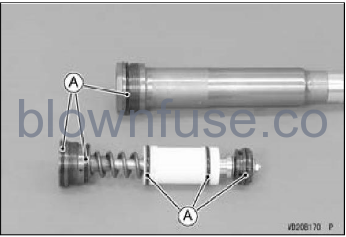
A. O-rings
With the piston rod fully compressed, pour the specified amount of fork oil.
NOTE
Put a hand over the two oil holes to prevent oil leak.