
 2023 Land Rover Defender Charging Guide

VEHICLE CHARGING SAFETY
Make sure to read and fully understand the following warnings and cautions before attempting to charge the vehicle. Failure to observe cautions and warnings may result in vehicle damage, injury, or death in the event of an accident.
- Never disassemble, remove, or replace high voltage components, cables, or connectors. High voltage cables and connectors are colored orange for identification purposes.
- Never use a charging cable if there is any damage to the unit.
- Never use an extension lead or multiple sockets in order to extend the reach of a charging cable.
- Never connect a plug adaptor to a charging cable when traveling abroad.
- Always fully unwind the charging cable. Failure to fully unwind the charging cable could lead to overheating of the cable.
- Before initially connecting a charging cable, make sure the electricity supply has been checked and approved by a suitably qualified person.
- Do not expose the charge cable contacts to rain, a direct jet of water, or a water splash. Do not immerse the charging cable in water.
Never attempt to pull the cable from the charging port once it is locked. Damage to the cable’s locking mechanism will result. If disconnection is required, press the unlock button on the smart key once for AC charging, and twice for DC charging. The cable’s locking mechanism re-engages after a short time.
Always select the correct charging cable for the vehicle when using a public charging station, with a connector that matches the vehicle’s charging port.
Always contact a retailer/authorized repairer if the charging cable fails to release regularly.
Before attempting to perform any repairs on a vehicle, consult a retailer/authorized repairer.
Further user instructions for the Mode 2 Basic (Home Charge) cable can be found at: https://www.aptiv.com/user-manual
The following hexagon labels are EN62196-2 regulatory labels. Each is associated to an electric power supply. The main distinction is based on the supply method, whether it is based on vehicle connectors and inlets, or on plug and socket outlets.

Black hexagon with ‘C’ inside: AC, Type 2, Vehicle connector and vehicle inlet, less than or equal to 480 V RMS.

White hexagon with ‘C’ inside: AC, Type 2, Plug socket outlet, less than or equal to 480 V RMS.

Black hexagon with ‘K’ inside: DC, FF Configuration, Vehicle connector and vehicle inlet, voltage range between 50V to 500V DC.
VEHICLE CHARGING OVERVIEW
Make sure all relevant safety warnings and cautions have been read and understood before charging the vehicle. See VEHICLE CHARGING SAFETY.
A charging cable is supplied with the vehicle. The cable should be:
- Stored securely in the luggage compartment when not in use.
- Used if a public charging cable is not available.
CHARGING PORT LOCATION
Make sure all relevant safety warnings and cautions have been read and understood before charging the vehicle. See VEHICLE CHARGING SAFETY.
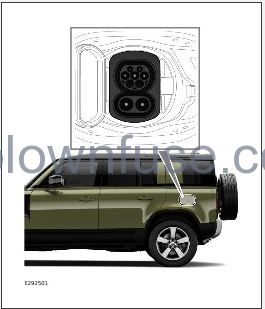
The charging ports are located as shown above.
Press the middle of the flap on the right side to gain access to the charging port. Once open, move the flap aside to gain access to the charging port.
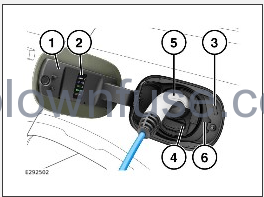
For AC and DC charging:
- Charging flap.
- Charging indicator label.
- Charging status lights. See CHARGING PORT INDICATORS.
- DC Charging port cap. For DC charging only.
- Charging cable.
- Charge flap catch.
CONNECTING A CHARGING CABLE
Make sure all relevant safety warnings and cautions have been read and understood before charging the vehicle. See VEHICLE CHARGING SAFETY.
Make sure to select the correct charging cable for the vehicle when using a public charging station. The vehicle supports both AC and DC charging providing the correct cable is used.
Make sure that the AC charging cable meets standard IEC62196-2.
Always connect the charging cable to the electricity supply before connecting to the vehicle. See VEHICLE CHARGING OVERVIEW.
To connect a charging cable to the vehicle, first, prepare the vehicle, and then connect the charging cable.
To prepare the vehicle:
- Unlock the vehicle.
- Make sure Park (P) is selected.
- Open the charging flap. If using the DC charge port, remove the cap. See CHARGING PORT LOCATION.
The approach unlocking feature does not unlock the charging port. If the charging cable does not fully engage in the charging port, open the charging port via the smart key or a door handle. See SMART KEY OPERATION and KEYLESS ENTRY.
To connect the charging cable at home:
- Plug in the domestic connector to the electricity supply.
- Connect the charging cable to the appropriate vehicle charging port.
To connect the charging cable at a public charging facility:
- Connect a public charging cable to the applicable vehicle charging port socket.
- Follow the instructions on the charging post.
The charging cable is locked into position once connected.
The charging process starts automatically if all conditions have been met. See CHARGING PORT INDICATORS and CHARGING CABLE INDICATORS.
When charging is complete, unplug and store the charging cable. See DISCONNECTING A CHARGING CABLE.
- During AC charging, if a power cut occurs, the charging process stops. Once power is restored, the AC charging process resumes automatically.
- If a power cut occurs during DC charging, the charging process must be manually resumed.
- A power cut may affect the vehicle’s ability to fully charge before embarking on a journey.
- The vehicle is unable to start with the charging cable connected. See STARTING THE ENGINE.
CHARGING PORT INDICATORS
Make sure all relevant safety warnings and cautions have been read and understood before charging the vehicle. See VEHICLE CHARGING SAFETY.
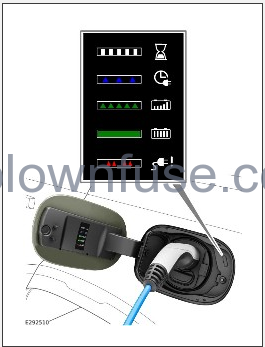
A label adjacent to the charging port provides a quick reference to the behavior of the charging indicator LED in relation to charging status. See INSTRUMENT PANEL OVERVIEW.
A charging status light next to the charging port illuminates to aid in connecting the cable in dark conditions and to show the current charging status. The instrument panel also shows the charging status. Both are illuminated as follows:

A white flashing light indicates that a cable has been detected and the vehicle is attempting to start charging with an initialization process. If the flashing wihte light is shown for longer than 10 seconds, check connections at both ends of the cable and check for any incomplete steps at the charge post. The instrument panel flashes a white cable symbol.

A blue pulsing light indicates that the initialisation process has been completed and timed charging has been set. The vehicle is not currently charging but will charge prior to the set departure time. The instrument panel flashes the clock symbol shown above. See VEHICLE PRECONDITIONING OVERVIEW .

A green pulsing light indicates that the initialisation process has been completed and the vehicle is charging. The instrument panel flashes a green cable symbol.

A continuous green light indicates that the vehicle charging is completed. The instrument panel displays a green cable symbol.

A flashing red light indicates a charging fault with the vehicle. The instrument panel displays a red charging symbol. If the charging fault persists, contact a retailer/authorized repairer.
Charging status can also be viewed via the MY EV touchscreen menu. See APPS SCREEN.
UNLOCKING THE CHARGING PORT
To unlock the charging port when the vehicle is locked:
- When DC is charging, press the unlock button on the smart key twice. If 2-stage unlocking is active, press the unlock button 3 times to unlock the charging port. See 2-STAGE UNLOCKING .
NOTES
When AC charging, unlock the vehicle as normal, either using the smart key or keyless entry. See SMART KEY OPERATION and KEYLESS ENTRY. - Wait for the charging port lock to release. The charge port is unlocked when the status light displays continuous white or continuous green.
- Remove the charging cable within 60 seconds.
NOTES
If the cable is not released within 60 seconds, the charging port relocks.NOTES
If the smart key’s unlock button is pressed once during DC charging, the vehicle unlocks without disrupting the charging process or unlocking the charging port.
Refer to the charging cable’s emergency release procedure if the charging port does not release. See CHARGING CABLE EMERGENCY RELEASE.
CHARGING CABLE INDICATORS
Make sure all relevant safety warnings and cautions have been read and understood before charging the vehicle. See VEHICLE CHARGING SAFETY.
The home charging cable supplied with the vehicle contains four indicators to inform the user of its status.
| Power | Charging | Temperature | Fault | Description |
|---|---|---|---|---|
| Off. | Off. | Off. | Off. | No electrical supply detected. |
| On. | Off. | Off. | Off. | Ready for operation. |
| On. | Flashing. | Off. | Off. | Charging in progress. |
| On. | On. | On. | On. | Self-test procedure in progress. |
| On. | Flashing. | On. | Off. | Slow charging due to increased temperature. |
| On. | Off. | On. | Off. | Charging inhibited due to temperature out of range. Protect cable and wall plug from excessive temperature and direct sunlight. |
| On. | Off. | Flashing. | Off. | Charging procedure interrupted. Check all connections. |
| Off. | Off. | Off. | Flashing. | Charging fault. |
| Off. | Off. | Off. | On. | The power supply to the vehicle has failed. |
TIMED CHARGING OVERVIEW
The preferred charging period feature allows the vehicle to use a cheaper rate of electricity, based on the household tariff. When set, the vehicle attempts to charge the vehicle within the time window selected. By setting a departure time, the timed charging feature makes sure that the vehicle is in an optimum state of charge before a journey. The timed charging feature attempts to charge the vehicle within the preferred charging time window. See TIMED CHARGING.
If it is not possible to fully charge the vehicle within the preferred charging period, charging may begin in advance. Charging outside of the preferred charging period makes sure that the vehicle is fully charged before the set departure time.
TIMED CHARGING
To set a timed charging event, from the touchscreen’s HOME menu and select the APPS menu. See APPS SCREEN.
- From the APPS screen, select Vehicle Departures.
- Touch the VEHICLE DEPARTURES screen to select a date and time for departure.
- Tap the screen to add a new departure time.
- Use the up and down arrows to adjust the start time, if necessary.
- Select Once only to set a single event. Select Repeat every to set a repeating event.
- Select Charging or Charging and Timed Climate.
- Select OK.
The first time a timed charging event is set, the PREFERRED CHARGING PERIOD screen displays. Use the up and down arrows to select a charging period that takes advantage of the most environmental and economical charging times.
If required, the preferred charging period can be changed via the settings menu.
DISCONNECTING A CHARGING CABLE
Make sure all relevant safety warnings and cautions have been read and understood before charging the vehicle. See VEHICLE CHARGING SAFETY.
To disconnect a charging cable:
- Make sure that the charging cable is unlocked from the charging port. See UNLOCKING THE CHARGING PORT.
- If the charging cable is fitted with a release button, press the release button, and disconnect the charging cable from the vehicle.
NOTES
Always disconnect the charging cable from the vehicle first. - If DC charging, replace the DC charging port cap.
- Fully close the charging flap.
- If AC charging, remove the connector from the electricity supply.
CHARGING CABLE EMERGENCY RELEASE
Make sure all relevant safety warnings and cautions have been read and understood before charging the vehicle. See VEHICLE CHARGING SAFETY.
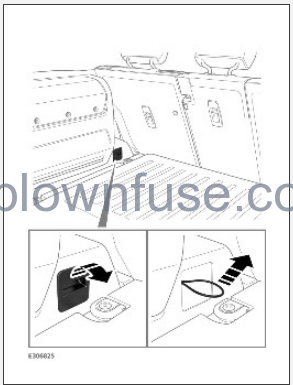
The charging cable emergency release is located in the loadspace. If the charging cable does not release, carry out the following:
- Pull the access panel outwards to access the emergency release ring.
- Pull the emergency release ring towards the front of the vehicle to release the charging cable.
If the charging cable cannot be removed following the operation of the emergency release, consult a retailer/authorized repairer. Do not apply force or attempt to remove any components.