2022 Kawasaki KX112 Brakes
Brakes
Disc and disc pad wear is automatically compen- sated for and has no effect on the brake lever or pedal action. There are no parts on the brakes that require adjustment except brake lever position.
Brake Lever Position Adjustment
- The brake lever position can be adjusted to suit the rider’s preference.
- To adjust the brake lever position, slide the front brake lever dust cover back, and loosen the lock- nut, and turn the adjuster to either side with a wrench.
- After adjustment, tighten the locknut securely.
WARNING
An improperly adjusted brake could drag and cause the brake to overheat, damaging the brake assembly and possibly locking the rear wheel, resulting in loss of control. Al- ways maintain the proper brake adjustment.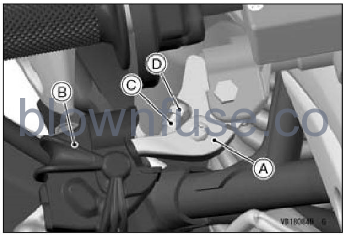
- A. Brake Lever
- B. Dust Cover
- C. Locknut
- D. Adjuster
Test the braking power and check that there is no brake drag.
WARNING
Air in the brake lines diminishes braking perfor mance and can cause an accident resulting in injury or death. If the brake lever or pedal feels mushy when it is applied, there might be air in the brake lines or the brake may be defective. Have the brake checked immediately by an authorized Kawasaki dealer?
Disc Brake Fluid
Inspect the brake fluid level in the front and rear brake reservoirs and change the brake fluid in accordance with the Periodic Maintenance Chart. The brake fluid should also be changed when contaminated with dirt or water.
Use only heavy-duty brake fluid as follows.
- Front: DOT3 or DOT4
- Rear: DOT4
NOTE
The motorcycle is shipped with brake fluid DOT4 in the brake system.
NOTICE
- Do not spill brake fluid onto any painted surface.
- Do not use fluid from a container that has been left open or that has been unsealed for a long time.
- Check for fluid leakage around the brake system fittings.
- Check for brake hose damage.
Brake Fluid Level Inspection
Front Brake Reservoir
- With the front brake reservoir positioned horizontally, the brake fluid must always be above the lower level line.
- A. Front Brake Reservoir
- B. Lower Level Line
- If the brake fluid in the front brake reservoir is be- low the lower level line, check for fluid leaks in the brake line and add brake fluid as follows.
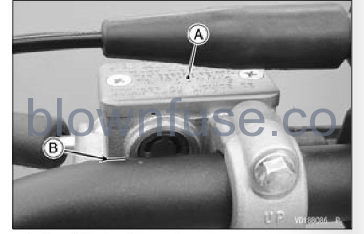
- Remove the screws and the front brake reservoir cap.
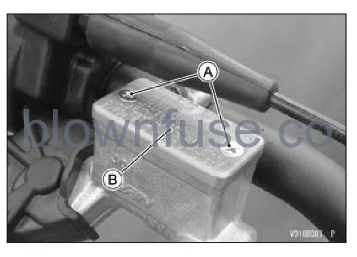
- A. Front Brake Reservoir Cap Screws
- B. Front Brake Reservoir Cap
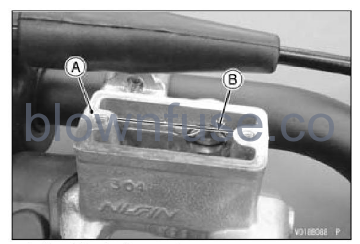
- A. Front Brake Reservoir
- B. Upper Level Line
WARNING
Mixing brands and types of brake fluid can reduce the brake system’s effectiveness and cause an accident resulting in injury or death. Do not mix two brands of brake fluid. Change the brake fluid in the brake line completely if the brake fluid must be refilled but the type and brand of the brake fluid that is already in the reservoir are unidentified.
- Install the front brake reservoir cap.
- Tighten the screws to the specified torque.
Tightening Torque
- Front Brake Reservoir Cap Screws: 1.5 Nm (0.15 kgfm, 13 in lb)
Rear Brake Reservoir
- With the rear brake reservoir positioned horizontally, the brake fluid must always be kept the upper level line.
- If the brake fluid is below the upper-level line, check for fluid leaks in the brake line and add brake fluid as follows..
- Remove the rear brake reservoir mounting bolt and washer.
- Remove the rear brake reservoir cap.
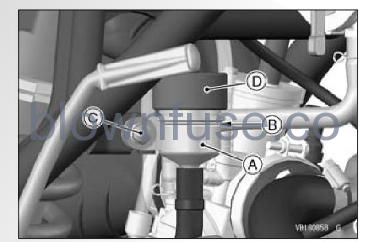
- A. Rear Brake Reservoir
- B. Upper-Level Line
- C. Rear Brake Reservoir Mounting Bolt and Washer
- D. Rear Brake Reservoir Cap
WARNING
Mixing brands and types of brake fluid can reduce the brake system’s effectiveness and cause an accident resulting in injury or death. Do not mix two brands of brake fluid. Change the brake fluid in the brake line completely if the brake fluid must be refilled but the type and brand of the brake fluid that is already in the reservoir are unidentified.
- Install the rear brake reservoir cap, mounting bolt and washer.
NOTE
First, until slight resistance is felt indicating that the cap is seated on the reservoir body; then, tighten the cap an additional 1/6 turn while holding the brake fluid reservoir body.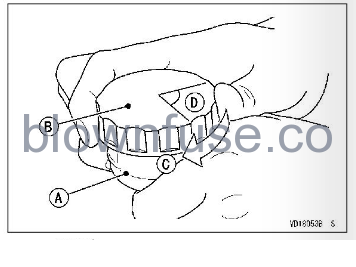
- A. Reservoir
- B. Cap
- C. Clockwise
- D. 1/6 tun
Brake Pad Wear Inspection
Inspect the brake pads for wear in accordance with the Periodic Maintenance Chart. If the thickness of any pad in any (front or rear) brake caliper is less than 1 mm (0.04 in.), have both pads in the caliper replaced as a set. Pad replacement should be done by an authorized Kawasaki dealer.
Brake Pads Lining Thickness
- Standard 4.0 mm (0.16 in.)
- Service Limit 1 mm (0.04 in.)
Usable Brake Pad Range
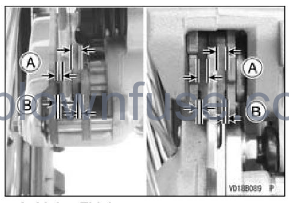
- A. Lining Thickness
- B. 1 mm (0.04 in.)