2022 Polestar 2 Battery

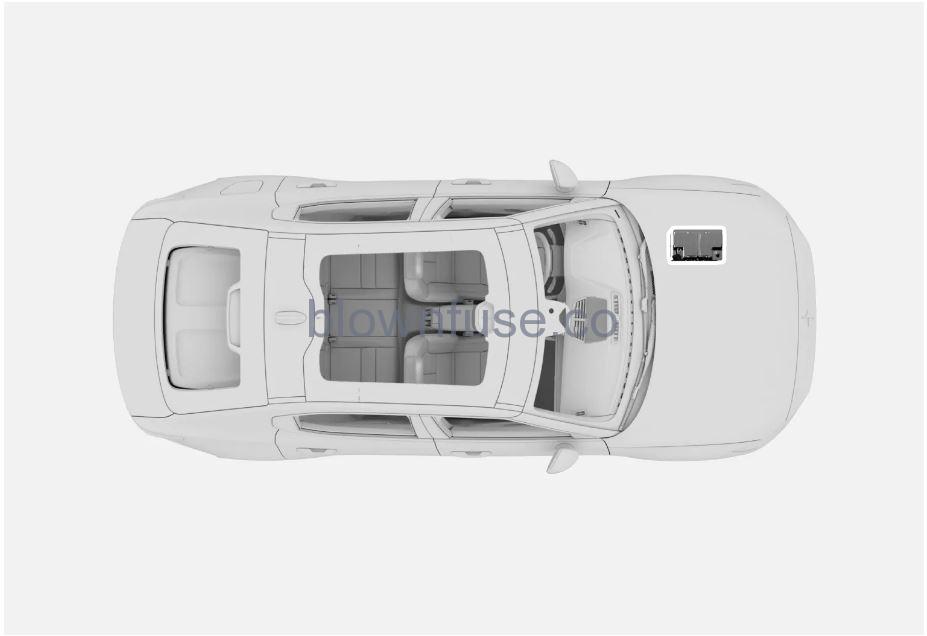
12 V battery
- The 12-volt battery powers the vehicle’s primary electrical system, which includes most of its electrical equipment. However, the high-voltage battery is used for driving.
- The battery is dimensioned to power the specific electrical systems and functions of this vehicle model. In normal conditions, it is kept charged by the larger high-voltage battery.
Location
If the 12 V battery is disconnected, the function for automatic opening and closing must be reset to function correctly. A reset is required in order for the pinch protection to work.
WARNING
- The battery can generate hydrogen gas, which is very explosive. A spark caused by an incorrectly connected jumper cable could be enough to make the battery explode.
- Battery fluid contains sulfuric acid. Do not allow battery fluid to come into contact with eyes, skin, fabrics or painted surfaces.
- If contact occurs, flush the affected area immediately with water. Obtain medical help immediately if eyes are affected.
- Never expose the battery to open flame or electric spark. Do not smoke near the battery. Failure to follow the instructions for jump starting can lead to injury.
12 V battery specifications
| Battery type | H6 AGM |
|---|---|
| Voltage (V) | 12 |
|
Cold start capacity – CCA (A) |
760 |
| Dimensions, L×W×H | 277.70×174.40×188.50 mm (10.9×6.9×7.4 inches) |
| Capacity (Ah) | 70 |
If replacing the battery, make sure you replace it with a battery of the same size, cold start capacity and type as the original battery (see the decal on the battery).
Contact Polestar Customer Support for assistance with battery replacements.
Batteries and power supply
- The vehicle’s own power is supplied by different batteries and components. These enable the vehicle’s electrical functions.
- The vehicle’s primary electrical system operates with 12 V voltage and powers electrical equipment.
- In addition to the primary electrical system, the vehicle also has a high-voltage system for electric propulsion.
Batteries
To supply power to various components, your vehicle is equipped with:
- a 12 V start battery that powers the vehicle’s primary electrical system
- a high-voltage battery for electric propulsion of the vehicle.
A number of components in the vehicle use high-voltage electrical current. Do not touch anything connected to the high-voltage system and do not perform any actions that are not clearly described in the Manual.
Battery recycling
- Batteries must be recycled in an environmentally sound manner at the end of their service life.
- Consult with Polestar Customer Support if you have any questions or concerns about the disposal of this type of waste. Only authorized workshop personnel may handle high-voltage batteries.
Battery symbols
 |
Wear protective goggles |
 |
See the vehicle’s Manual for additional information |
 |
Keep batteries away from children |
 |
Batteries contain corrosive acid |
 |
Avoid smoking, open flames, and/or sparks |
 |
Risk of explosion |
 |
Recycle properly |
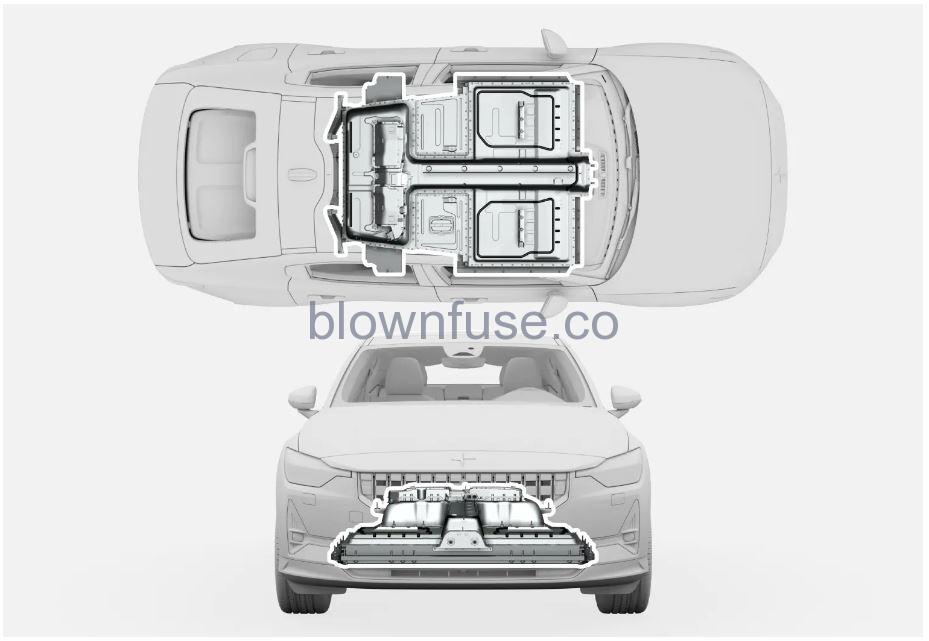
High-voltage battery
- For driving, the vehicle is equipped with a powerful high-voltage battery located in the vehicle’s underbody. It is maintenance-free and rechargeable.
- Only authorized workshop personnel may handle high-voltage components.|
- If the high-voltage battery is discharged, it will not be possible to start the vehicle. If both the 12 V battery and the high-voltage battery are discharged, both batteries must be recharged. In this situation, it is not possible to first charge only the high-voltage battery. The 12 V battery must have a certain charge level in order for the high-voltage battery to be charged.
Only a workshop may replace a high-voltage battery – contact Polestar Customer Support.
Location of high-voltage battery
High-voltage battery service life and capacityThe capacity of the high-voltage battery decreases with age and use, which could result in decreased range.
Here are some recommendations for increasing the battery’s service life:
- Plug in the charging cable when the vehicle is parked. Especially in very hot or cold weather.
- Avoid discharging the battery completely to 0%.
- If the charge level is 0%, the battery should be recharged as soon as possible.
- Avoid fully charging the battery to the maximum level unless needed for the distance you will drive. A recommended charge level is shown in the center display.
High-volt battery specificationsType: Lithium-ion
Total amount of current: 78 kWh
Jump starting using another battery
- If the vehicle won’t start, it could be because the 12 V battery is discharged. The battery can then be recharged using electrical current from another vehicle’s battery or an external charger.
- Under normal conditions, the 12 V battery is charged when the vehicle is charged, and through electrical current transfer directly from the high-voltage battery when the vehicle is not plugged in for charging.
- If the 12 V battery becomes discharged for any reason, it can be jump-started. There are several reasons why a battery may become discharged, such as the vehicle not being used for a long period of time, a temporary malfunction or a blown fuse in the vehicle’s charging circuit. A discharged 12 V battery needs to be recharged to a level high enough that it can start the vehicle’s electrical system. After startup, it is possible to start charging of the vehicle using a charging cable, which is necessary when the high-voltage battery is also discharged. If the vehicle is out of range for charging, it must be towed.
- To jump-start the vehicle, you will need to connect jumper cables to the charging points on the 12 V battery.
Access to charging pointsThe protective panel that provides access to the charging points is located at the front of the vehicle, to the left under the hood, and is held in place with plugs. To remove these plugs, use a screwdriver, pen or similar to press in the locking pin in the middle of the plug. When the pin is pressed in far enough, the plug can be pulled out. Avoid pushing the pin all the way through the plug, as this could cause it to dislodge and fall down between components.
When reinstalling the panel, pull the locking pin out completely before reinserting the plug. When the plug is inserted in the attachment hole, push the pin into place again to secure the panel.
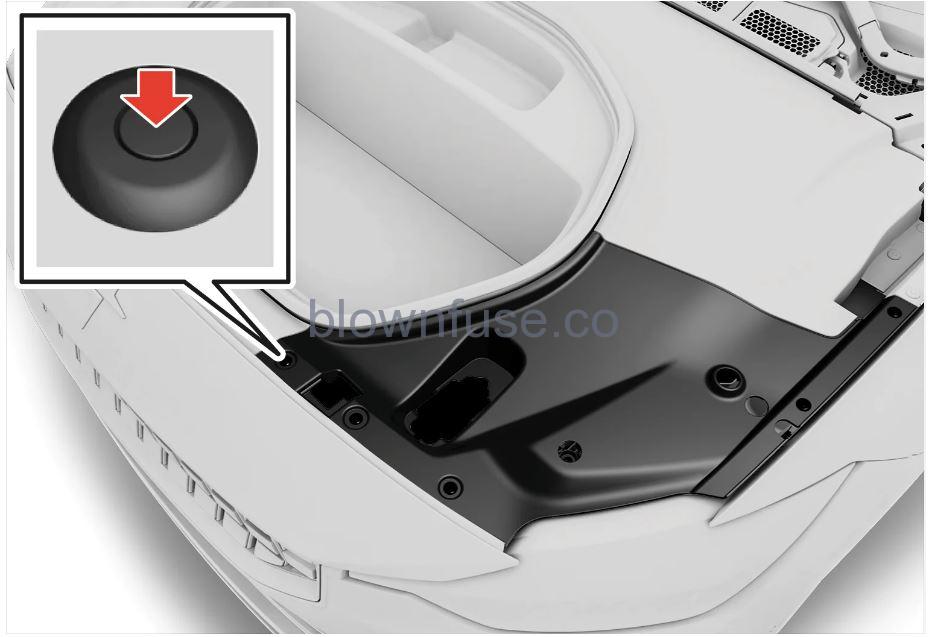 Remove the 5 plugs and lift up the panel.
Connecting jumper cables
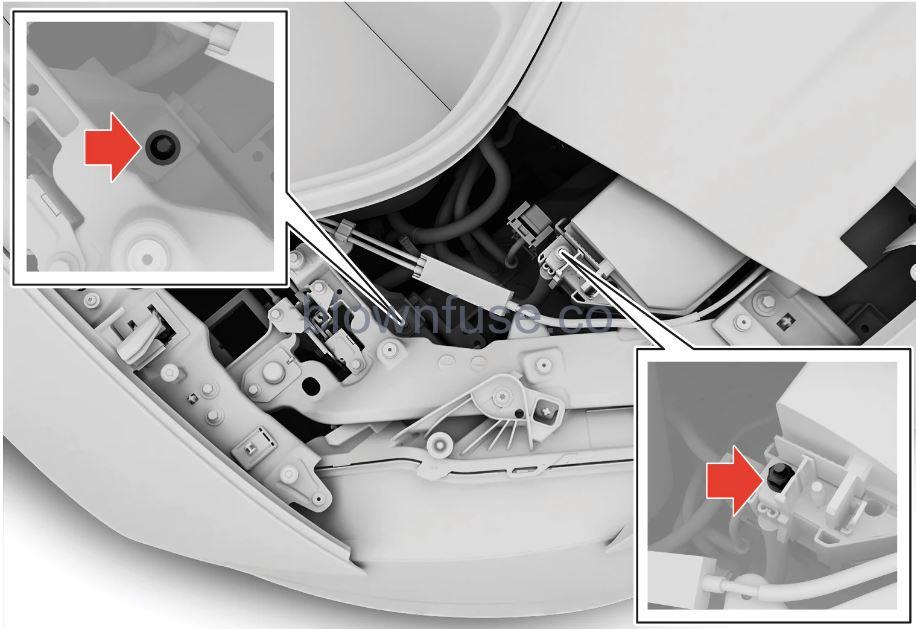 The charging points under the panel. The positive, at the rear next to one of the vehicle’s fuse boxes, and the negative, which is a bolt toward the front of the vehicle that is in contact with the vehicle’s chassis.
The vehicle’s charging points are only intended for jump-starting your own vehicle. The charging points are not intended for jump-starting another vehicle. Using the charging points to jump-start another vehicle could cause a fuse to blow, which would cause the charging points to stop working.
If the message 12 V battery fuse failure Service required is shown in the instrument panel, a fuse has blown and must be replaced.
To avoid short circuits or other damage, the following steps are recommended when jump-starting the battery using another battery:
- Put the vehicle’s electrical system in Passive usage mode.
- Make sure the assisting battery has a voltage of 12 V.
- If the battery is in another vehicle, turn off that vehicle’s motor and make sure that the vehicles are not touching each other.
- Clamp one end of the red jumper cable onto the assisting battery’s positive terminal, often marked in red or with a plus sign (+).
Use caution when connecting the jumper cables. A short circuit can occur if the ends come in contact with any other surface than the charging points.
- Open the cover over the positive charging point by pressing in its side to release the catch while lifting the cover upward. There are two charging points under the cover. Use the one closest to the center of the vehicle.
- Clamp the other end of the red jumper cable to the positive charging point.
- Clamp one end of the black jumper cable onto the assisting battery’s negative terminal, often marked in black or with a minus sign (-).
- Clamp the other end of the black jumper cable to your vehicle’s negative charging point. Because the vehicle’s chassis serves as ground for the 12 V system, the bolt head marked in the illustration can be used.
- Make sure the jumper cables are securely attached to help prevent sparks while jump starting.
- Start the motor of the assisting vehicle.
- Start the vehicle with the discharged battery by depressing the brake pedal and selecting gear position D or R.
Do not touch the connections between the cable and the vehicle during the start attempt. Risk of sparking.
Full startup is indicated by the indicator lights on the instrument panel going out and the panel’s preselected theme illuminating.
- If the high-voltage battery is also discharged, begin charging of the vehicle using the charging cable.
- Remove the jumper cables in the reverse order ‒ first the black cables and then the red cables.Make sure that none of the clamps of the black jumper cables come into contact with the vehicle’s positive charging point, the assisting battery’s positive terminal or either of the red jumper cable’s connected clamps.
A discharged 12 V battery must be recharged until the charge level is high enough to power the vehicle’s electrical system. At an ambient temperature of about +15 °C (about 60 °F), the battery must be charged by the vehicle for at least 30 minutes. At lower ambient temperatures, the charging time can increase to 3-4 hours. If possible, the battery should be charged using an external battery charger.
WARNING
PROPOSITION 65 VARNING! WARNING! Battery posts, terminals, and related accessories contain lead and lead compounds, chemicals known to the state of California to cause cancer and reproductive harm. Wash hands after handling.
- Batteries generate hydrogen gas, which is flammable and explosive. A spark caused by an incorrectly connected jumper cable could be enough to make the battery explode.
- Do not connect the jumper cable to any part of the fuel system or to any moving parts. Avoid touching hot manifolds.
- Battery fluid contains sulfuric acid. Do not allow battery fluid to contact eyes, skin, fabrics or painted surfaces.
- If contact occurs, flush the affected area immediately with water. Obtain medical help immediately if eyes are affected.
- Never expose the battery to open flame or electric spark. Do not smoke near the battery. Failure to follow the instructions for jump starting can lead to injury.
Replacing the key’s battery
All batteries have a limited service life and must eventually be replaced. The battery’s service life varies depending on how often the vehicle/key is used.

The key battery should be replaced if
- the information symbol illuminates and the message Vehicle key battery low See Manual is displayed in the instrument panel
- the locks do not react after several attempts to lock or unlock the vehicle using the key within approx. 20 meters (65 feet) from the vehicle.
Move closer to the vehicle and try to unlock it again.
The battery in the buttonless key (Key Tag) cannot be replaced – contact Polestar Customer Support.
Contact Polestar Customer Support when the Key Tag has reached the end of its service life. The key must be deleted from the vehicle because it can still be used to back-up start the vehicle.
Opening the key and replacing the battery

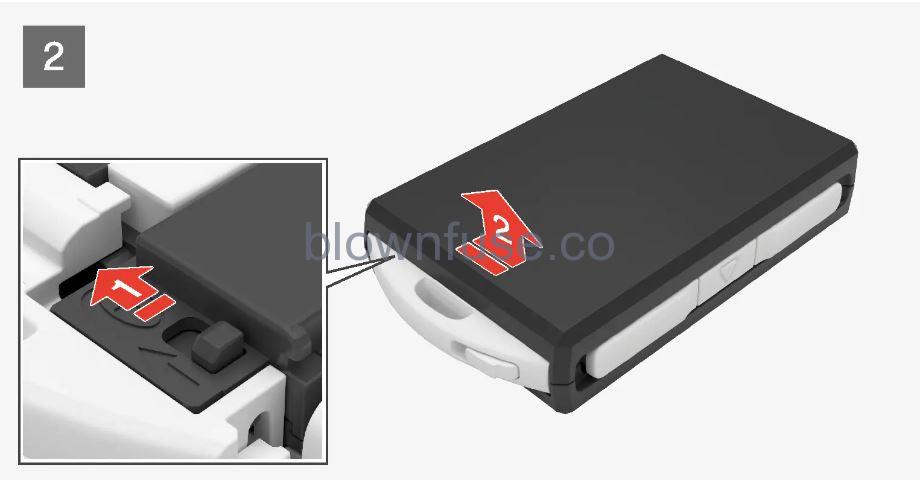
 Hold the key with the front side (with the Polestar logo) facing up and move the button on the key ring section to the right. Slide the front cover slightly upward.
 The cover will loosen and can be removed from the key.
- Turn the key over, move the button to the side and slide the rear cover slightly upward.\
- The cover will loosen and can be removed from the key.
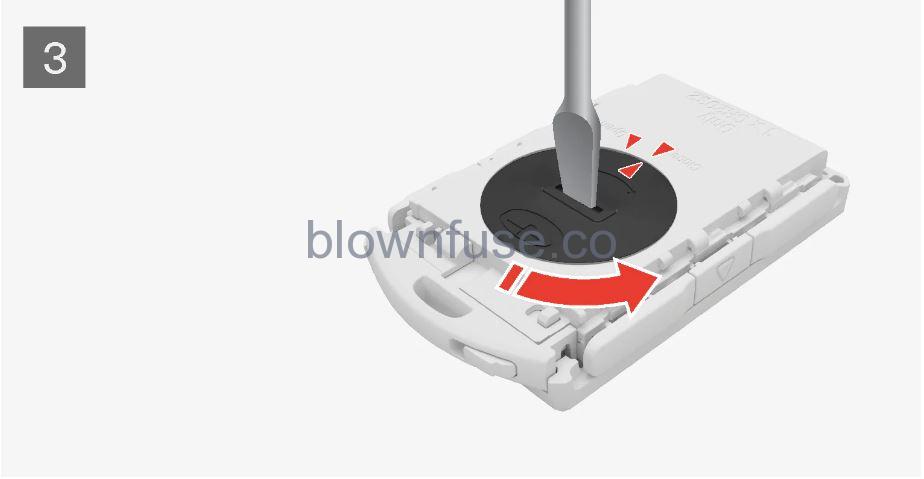
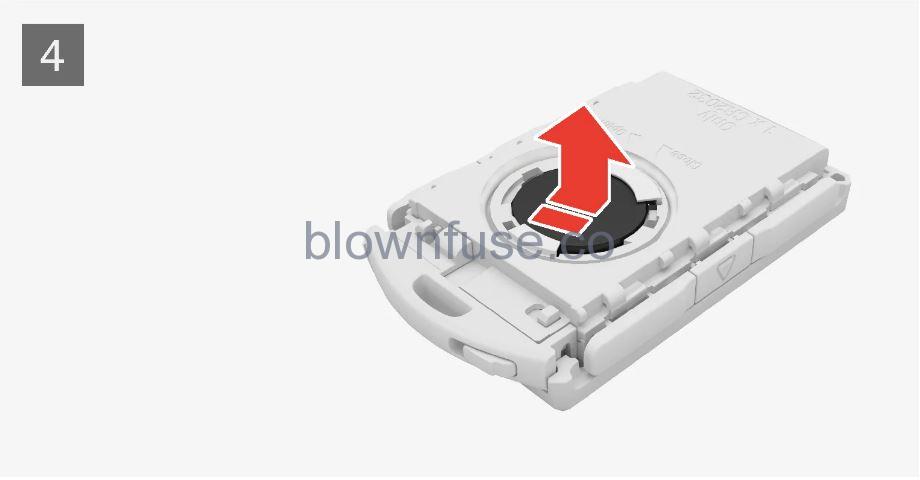
- Use a screwdriver or similar object to turn the battery cover counterclockwise so the markers point to OPEN.
- Remove the cover carefully by pressing e.g. a fingernail into the indentation.
- Pry the cover up.
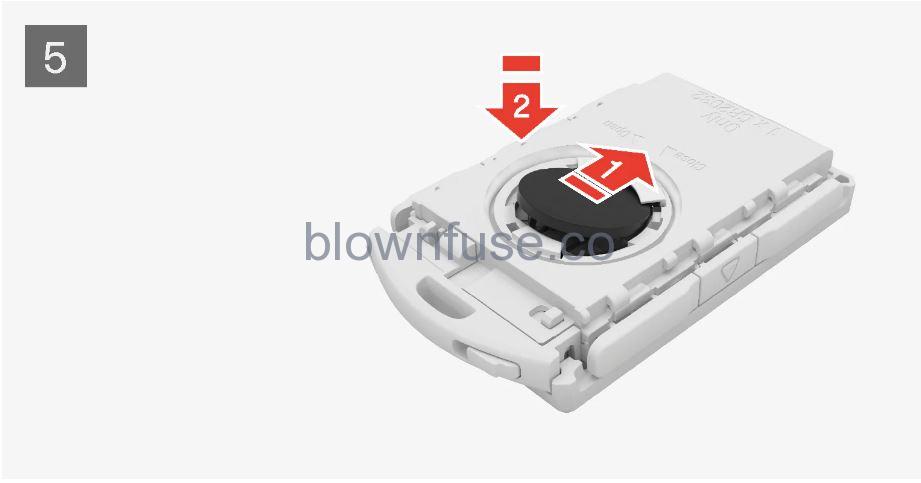
- The battery’s positive side (+) faces upward. Carefully pry out the battery as shown in the illustration.
Avoid touching new batteries and their contact surfaces with your fingers as this will impair their function.
- Insert a new battery with the positive side (+) facing upward. Do not touch the contact surfaces of the key battery.
- Place the edge of the battery downward into the holder. Slide the battery forward until it locks into place under the two plastic catches.
- Press the battery downward until it locks into place under the upper black plastic catch.
Use batteries with the designation CR2032, 3 V.
NOTE
Polestar recommends that batteries used in the key satisfy the UN Manual of Test and Criteria, Part III, sub-section 38.3. Contact Polestar Customer Support if you need to replace factory-installed batteries.
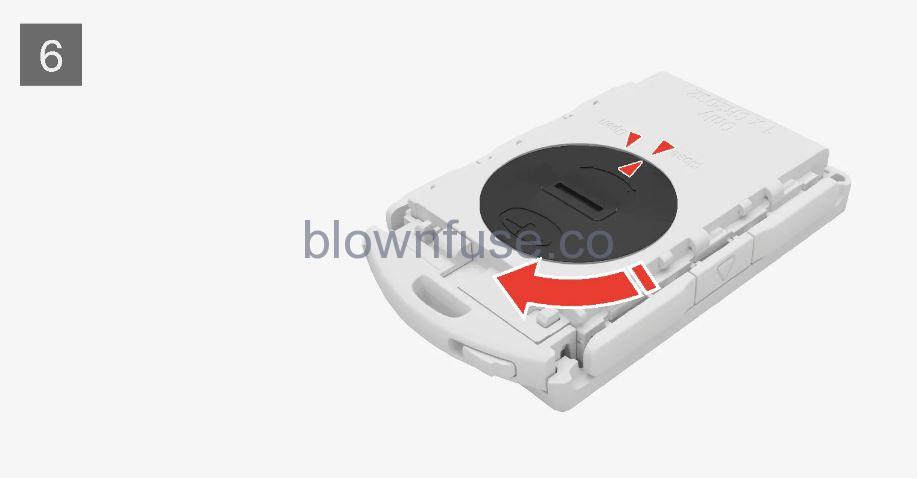
- Replace the battery cover and turn it clockwise until it points to CLOSE.
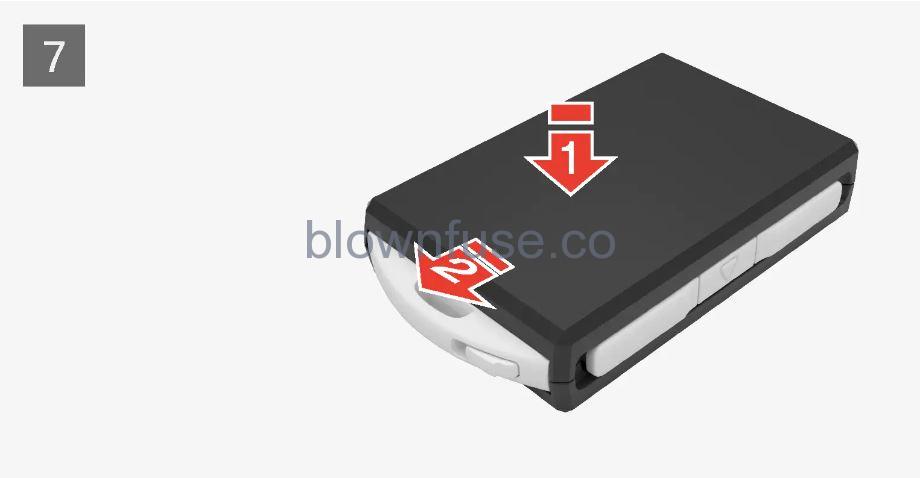
- Put the rear cover back into position and press it down until it clicks into place.
- Slide the cover back.
> A second click indicates that the cover is correctly positioned and locked into place.

- Turn the key over and press the front cover down until it clicks into place.
- Slide the cover back.
> An additional click indicates that the cover is correctly in place.
Make sure the battery is correctly positioned with the right polarity. If the key will not be used for a prolonged period of time, remove the battery to avoid battery leakage and damage. Damaged or leaking batteries can lead to injuries in contact with skin, so use protective gloves when handling damaged batteries.
- Keep batteries out of reach of children.
- Do not leave batteries lying about where they could be swallowed by children or pets.
- Never dismantle, short-circuit or throw a battery into an open flame.
- Do not charge non-rechargeable batteries, as this could cause them to explode.
Make sure the key is undamaged before use. If any damage is detected, for example, if the battery cover doesn’t close properly, the product should not be used. Keep defective products out of the reach of children.
Be sure to dispose of end-of-life batteries in a way that protects the environment
California Proposition 65
Operating, servicing and maintaining a passenger vehicle can expose you to chemicals including engine exhaust, carbon monoxide, phthalates, and lead, which are known to the State of California to cause cancer and birth defects or other reproductive harm. To minimize exposure, avoid breathing exhaust, do not idle the engine except as necessary, service your vehicle in a well ventilated area and wear gloves or wash your hands frequently when servicing your vehicle. For more information go to www.P65Warnings.ca.gov/passenger-vehicle.